
1.Introduction to the PDF Maker
The PDF Maker is extension tool designed for vtiger CRM. There is already possibility of the export to pdf format in vtiger CRM functionality but it covers just few modules. In addition pdf templates are hardcoded and cannot be edited. Therefore, the intention was to provide powerful and flexible tool which allows users of vtiger CRM to create own pdf templates.
The PDF Maker benefits are:
- supported mostly inside all modules
- unlimited number of PDF templates within one module
- simple addition, edit, duplication or deletion of the pdf template
- simple direct sending of the pdf files
- advanced and more creative editing of pdf files using inserting images, tables, barcodes
- creation of an own product block
- mass export to PDF from list view

![]() Note: For versions PDF Maker_4_0 and higher, you will be needing to have installed our Installer in order to activate license keys.
Note: For versions PDF Maker_4_0 and higher, you will be needing to have installed our Installer in order to activate license keys.
2.How to install PDF Maker
There are currently two options how to install extension:
- (Recommended) Using our Free extension Installer
(Please visit the Installer page for more info) - Manually installation using a .zip file
(You still need to have Installer in order to activate license)
![]() Note: For versions PDF Maker_4_0 and higher, you will be needing to have installed our Installer in order to activate license keys.
Note: For versions PDF Maker_4_0 and higher, you will be needing to have installed our Installer in order to activate license keys.
Since December 2019 we launched our extended version of Installer which helps you install modules and manage extensions.
2.1.Installation via Installer
Make sure you have Installer installed, you can download Installer via our E-shop when you log in under Free Downloads section.
Next, simply install Installer via Module Management in Vtiger CRM by importing the .zip file you downloaded.
After successful installation, you can access Installer in two ways:
- by a click on Notifications Icon
 and then on the button
  ,
, - or via Main Menu – Settings – CRM Settings – Extensions – ITS4YouInstaller.
![]() Note: To see modules and manage licenses you have to log in to our e-shop with @email and password via
Note: To see modules and manage licenses you have to log in to our e-shop with @email and password via ![]() button (top right screen side in Installer module).
button (top right screen side in Installer module).
After log in, you can activate Extensions or our Packages licenses associated to your account via ![]() button.
button.
When the license was activated you can see module available in the Modules tab below.
Simply hit the ![]() button and Extension is installed now.
button and Extension is installed now.
2.2.Manual Installation
Please provide following steps in order to install PDF Maker manually:
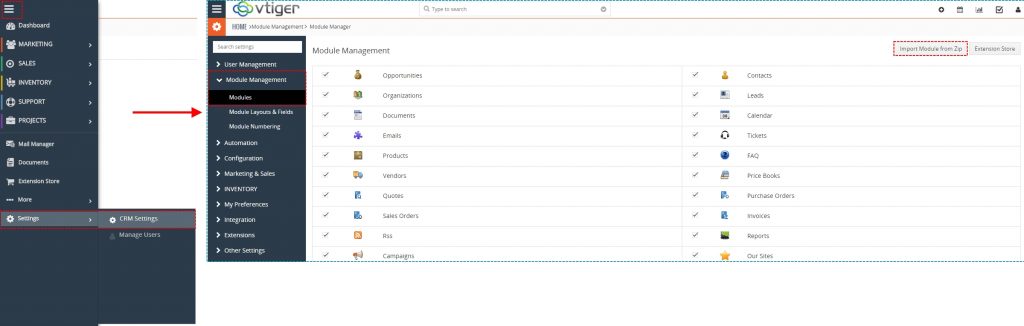
- Install the .zip (package) file of the PDF Maker module via Setting -> CRM Settings -> Module Management -> Modules. Click on the Import Module from Zip.
Installation of PDF Maker for vtiger 7 – step 1
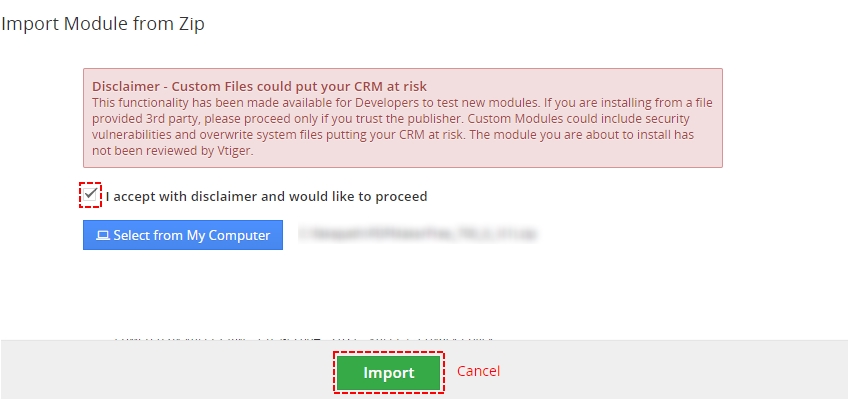
- Select the .zip (package) file that you downloaded from our shop. Please check that you accepted the disclaimer and would like to proceed. Click on the [Import] button.
Installation of PDF Maker for vtiger 7 – step 2
Note: If you have after this step error message: Sorry! Attempt to access restricted file. Please check if folder test/vlib has correct write permission for browser (apache, www-data).
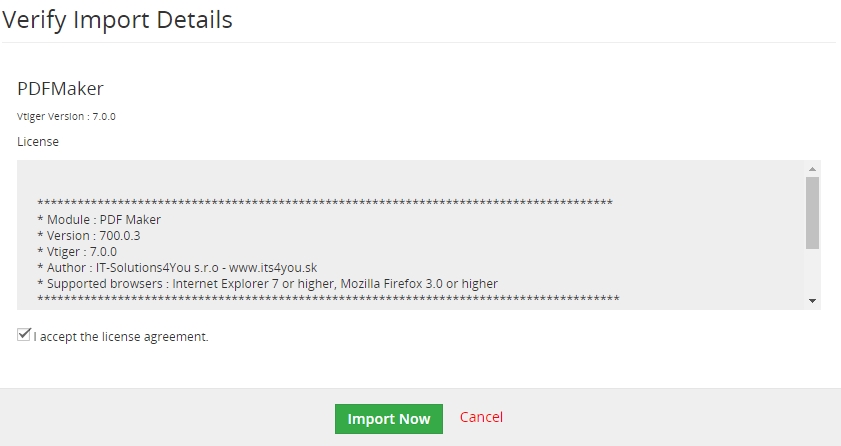
- Verify the import details parsed from the .zip (package) file. Please check that you accepted the license agreement and click [Import Now] to proceed or [Cancel] to cancel.
Installation of PDF Maker for vtiger 7 – step 3
For successfully completing the installation is neccesary download mPDF library into PDFMaker module from external storage place,
because mpdf.zip is over 2MB and many customers has MAX_UPLOAD_SIZE set to 2 MB (webhosting) so we have make available download it from our server. - PDF Maker was imported

Installation of PDF Maker for vtiger 7 – step 4

![]() Note: In order to finish installation, you need activate license. For that please use our Installer
Note: In order to finish installation, you need activate license. For that please use our Installer
3.How to update PDF Maker
The upgrade of the module is initiated manually or via our Installer.
Updating via Installer:
- open the Installer in the CRM
- in the Modules tab find your installed module and you should see the
 button available
 - If the new version is available, you will be notified via Installer Notifications icon

Updating PDF Maker manually:
The upgrade of the PDF Maker is initiated in the same way as PDF maker installation or click on Upgrade PDF Maker link in Customize tab of PDF Maker.

How to update/upgrade PDF Maker
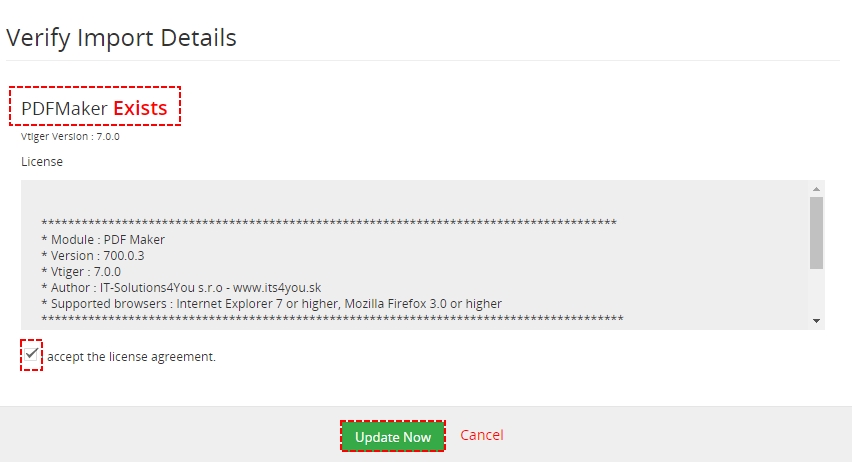
So please refer to above installation part for details how to initiate the import of the module from the file. As can be seen on following picture you will be notified that the PDF Maker module already exists. The upgrade will start immediately when you click on the [Update Now] button.
How to update PDF Maker
After upgrade the notification about successful upgrade is shown.

How to update PDF Maker
4.Quick start
In the following section you can find short description how to create your first simple PDF template for vtiger CRM using PDF Maker.
Note: The full description of the PDF Maker’s menus, tabs and icons can be found in the later chapters.
4.1.Create the simple PDF template
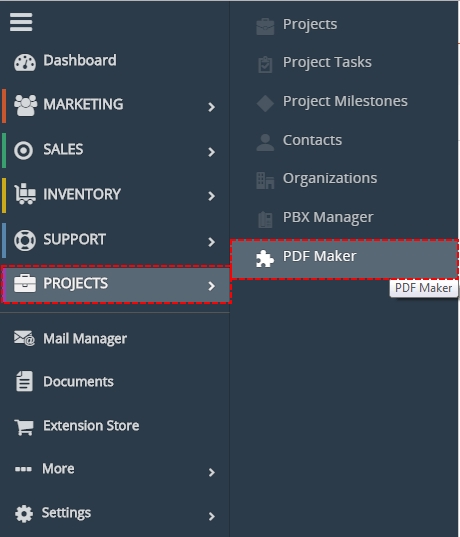
In order to edit the PDF template you have to start the PDF Maker tool which can be after installation located under the Projects as seen below on the picture.
- In vtiger CRM menu please go to Projects and click on PDF Maker (since vtiger 7 there is no Tools part so records which used to be in Tools tab are in Projects tab now)
Location of PDF Maker module
- The screenshot below shows PDF Maker ListView. You can click on [+Add template] button to add new template.

Add PDF template – PDF Maker Vtiger 7
- In the EditView, go to Properties tab and define the template name and the description.
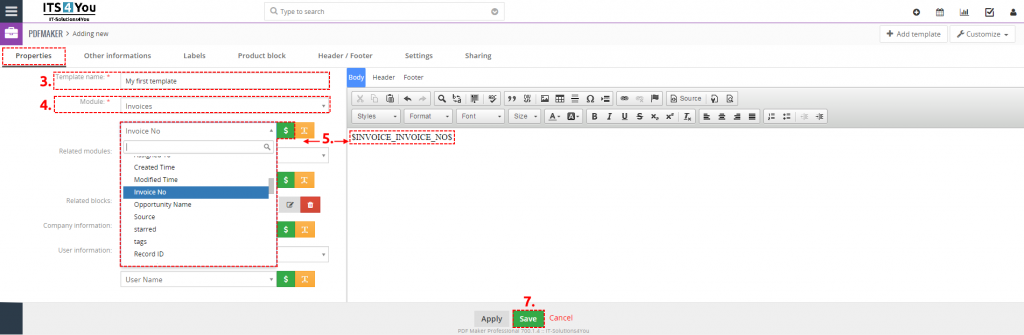
Creation of the template in EditView
- Choose the module from the list (i.e. Invoice).
- Choose one of the all available fields from the selected module (i.e. Invoice No) and click on the [$] button to insert it into template.
- Repeat the steps 5. and 6. to finish your pdf template according to your needs.
- Finally click on the [Save] button.

4.2.Create the simple Header/Footer template
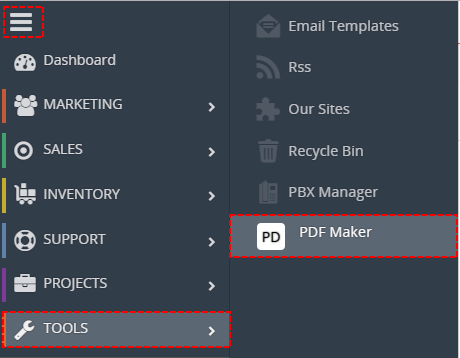
In order to edit/create the Header/Footer template you have to start the PDF Maker tool which can be after installation located under the Projects (since Vtiger 7.1.0 again in Tools) as seen below on the picture.
- In vtiger CRM menu please go to Projects and click on PDF Maker (since vtiger 7 there is no Tools part so records which used to be in Tools tab are in Projects tab now)
Location of PDF Maker module – PDF Maker Vtiger 7
- The screenshot below shows PDF Maker ListView. You can click on
 button to add new Header/Footer template.
Add Header/Footer template – PDF Maker Vtiger 7
- In the EditView, go to Properties tab and define the template name.
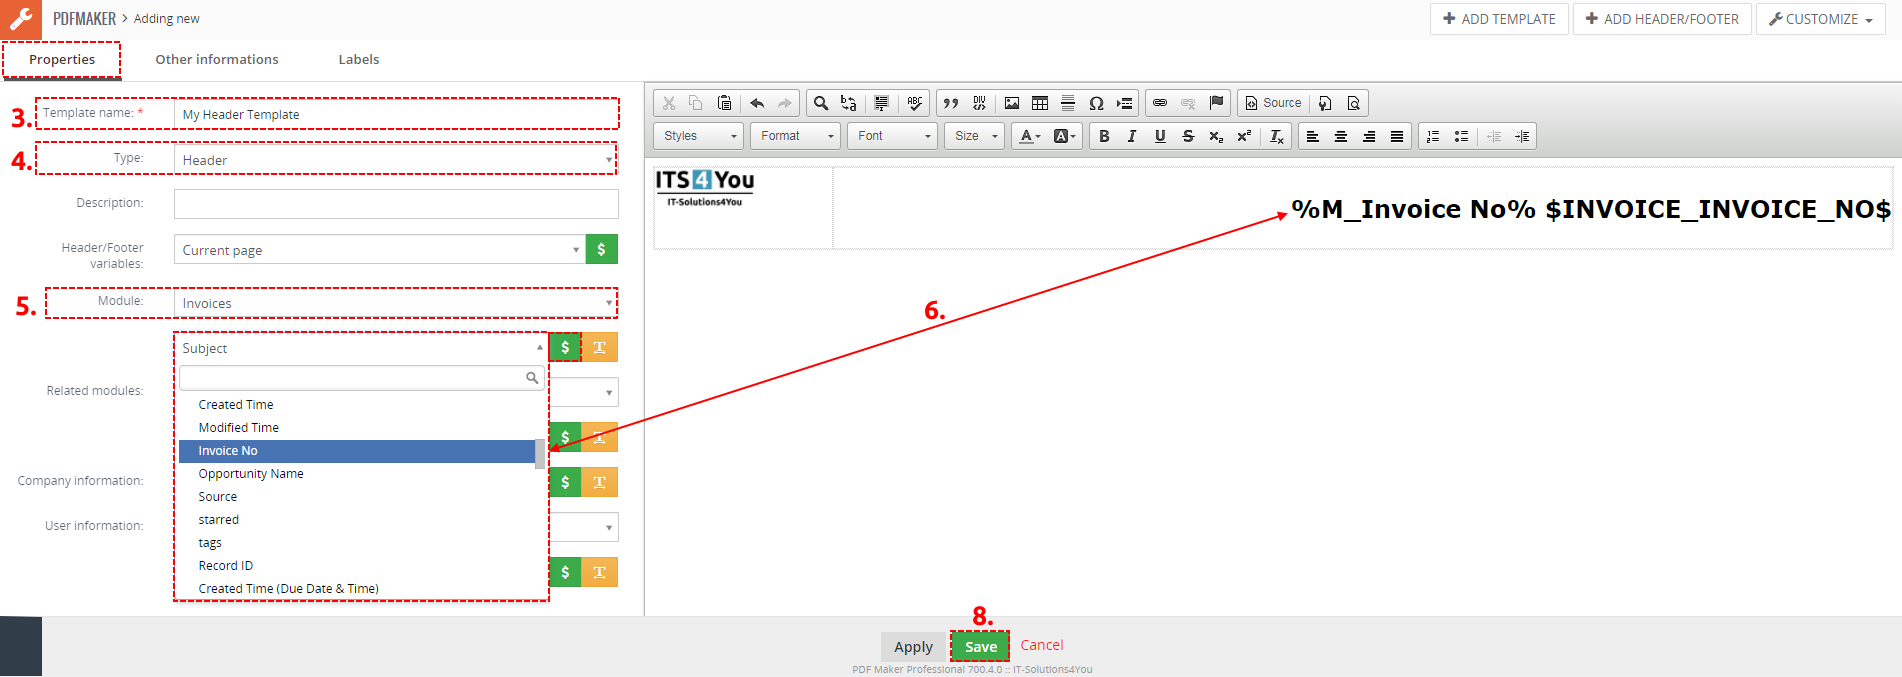
Creation of the Header/Footer template in EditView – PDF Maker Vtiger 7
- Select the type of template from the list (i.e. Header).
- Choose the module from the list (i.e. Invoice) if you want.
- Choose one of the all available fields from the selected module (i.e. Invoice No – if module is selected) or create universal template without module’s variables and click on the
 button to insert it into template.
 - Repeat the steps 6. and 7. to finish your Header/Footer template according to your needs.
- Finally click on the
 button.
4.3.How to generate PDF file with PDF Maker template
In the following picture you can see how to generate PDF file in the ListView or DetailView using PDF Maker:
Listview
| DetailView
|
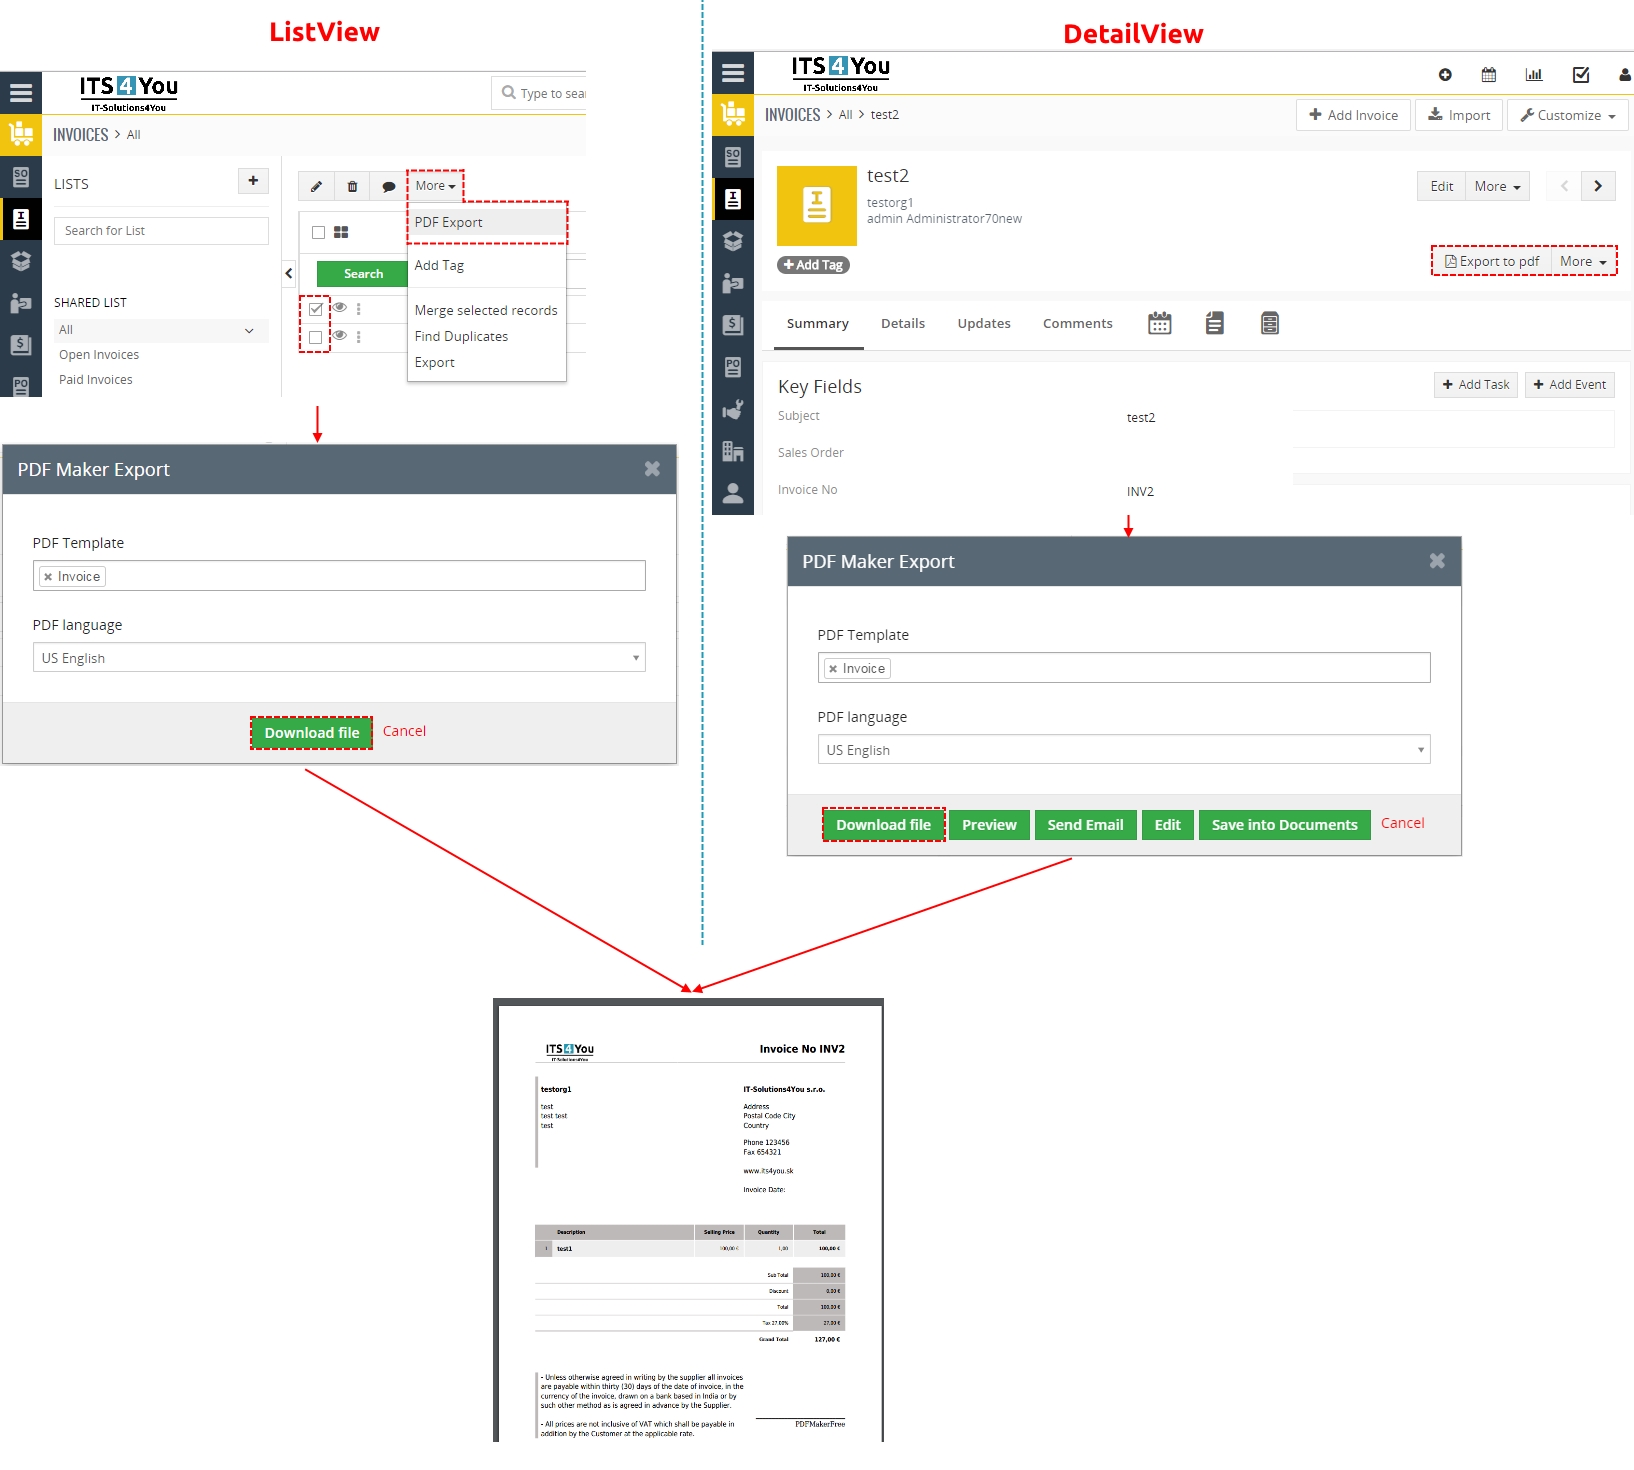
Generate the PDF file
5.Work area
The Work Area of PDF Maker consists of:
- ListView – used for common tasks like add new template, import and export templates and access to others tools
- ListView of Header/Footer – used for common tasks like add new template of Header or Footer, import,export or delete templates
- DetailView – shows already created PDF template in details
- EditView – allows the preparation of the new PDF template or editing existing templates
- EditView of Header/Footer – allows the preparation of the new Header/Footer template or editing existing templates
- PDF Maker block – mainly used for export records to PDF file
- Preview – preview window with options to Download, Print, Send Email, Edit and Save into Documents
5.1.ListView of PDFMaker
The common tasks like add/delete template, import/export templates or start editing have to be initiated via PDF Maker ListView. Go to Projects→ PDF Maker and PDF Maker ListView will appear on your screen.
The main part of the PDF Maker ListView consists of list of the PDF templates, which gives you information about a template name, a primary module, a short description, sharing info, template owner and its status. In the list you can also select one or more templates and consequently delete or export the selected group of templates using button  . As shown in the picture, it is also possible to edit or duplicate already created PDF templates directly from the ListView. Also there is option to search templates in your ListView.

ListView – PDF Maker Vtiger 7
There is group of buttons in the above part:
contains actions for delete, import and export of the PDF templates
 is used to add new PDF template
is used to add new Header/Footer template
 is settings part of PDF Maker. You can find here Extensions, Profiles, Self-defined labels, Product block templates, License setting, Upgrade PDF Maker and option to Uninstall PDF Maker
How to create Header/Footer is described in the DetailView of Header/Footer.
5.2.ListView of Header/Footer
The common tasks like add/delete Header/Footer template, import/export templates or start editing have to be initiated via ListView of Header/Footer. Go to Projects→ PDF Maker click on Header/Footer List and Header/Footer ListView will appear on your screen.
The main part of the PDF Maker ListView consists of list of the Header/Footer templates, which gives you information about a template name, a primary module, a short description and type of template. In the list you can also select one or more templates and consequently delete or export the selected group of templates using button . As shown in the picture, it is also possible to edit or duplicate already created PDF templates directly from the ListView.

ListView of Headers/Footers – PDF Maker Vtiger 7
There is group of buttons in the above part:
contains actions for delete, import and export of the Header/Footer templates
is used to add new PDF template
is used to add new Header/Footer template
is settings part of PDF Maker. You can find here Extensions, Profiles, Self-defined labels, Product block templates, License setting, Upgrade PDF Maker and option to Uninstall PDF Maker
5.3.DetailView of PDF Maker
From ListView you can directly open any pdf template in DetailView. The DetailView consists of:
- Template information part – gives basic information of the template
- PDF template itself which consist of Header, Body and Footer part.
- Group of action buttons
- [Edit] – switch to EditView and start editing
- [More] –
- [Delete] – allows you to delete template
- [Duplicate] – create duplicate of the template and start editing
- Tools – for changing default and status of the shown template
- Set as default / Unset as default – setting of default
- Set as inactive / Set as active – change status
- Display conditions – allows you to set conditions when template is shown or hidden
- CSS Styles – allows to you manage your CSS styles and assigned it to templates

DetailView of PDF Maker
Display conditions
Display conditions tab allows set conditions when template is shown or hidden. If you want to show template without ban, leave conditions empty. There is option to show template if conditions are true or hide templates if conditions are true. You can set it by choosing Yes if/No if in Displayed tab. In Conditions tab you can choose if you want that all conditions must be met or At least one of the conditions must be met. You can add or delete conditions.
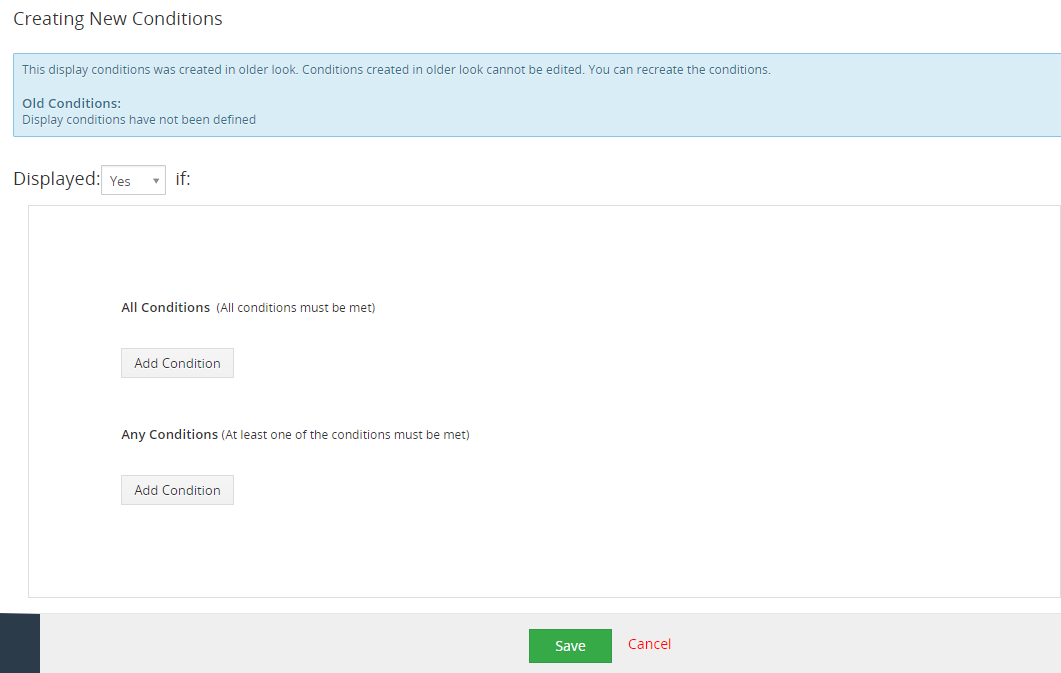
Display conditions
CSS Styles
Styles4You extension allows to you manage your CSS styles and assigned it to templates.
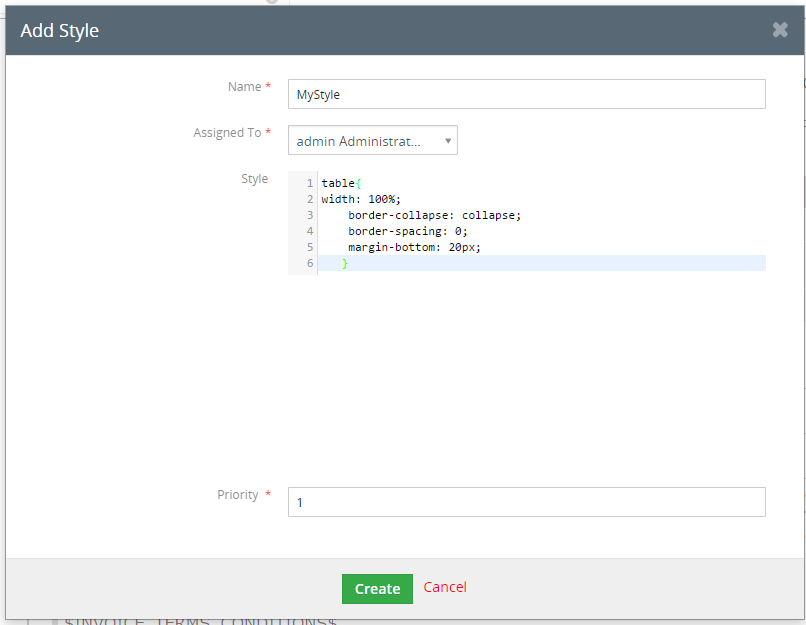
Styles4You
5.4.DetailView of Header/Footer
From ListView of Header/Footer you can open any Header/Footer template in DetailView. The DetailView consists of:
- Template information part – gives basic information of the template
- Header/footer template itself which consist of Header, Body and Footer part.
- Group of action buttons
- [Edit] – switch to EditView and start editing
- [More] –
- [Delete] – allows you to delete template
- [Duplicate] – create duplicate of the template and start editing

DetailView of Headers/Footers – PDF Maker Vtiger 7
5.5.Edit view of PDF Maker
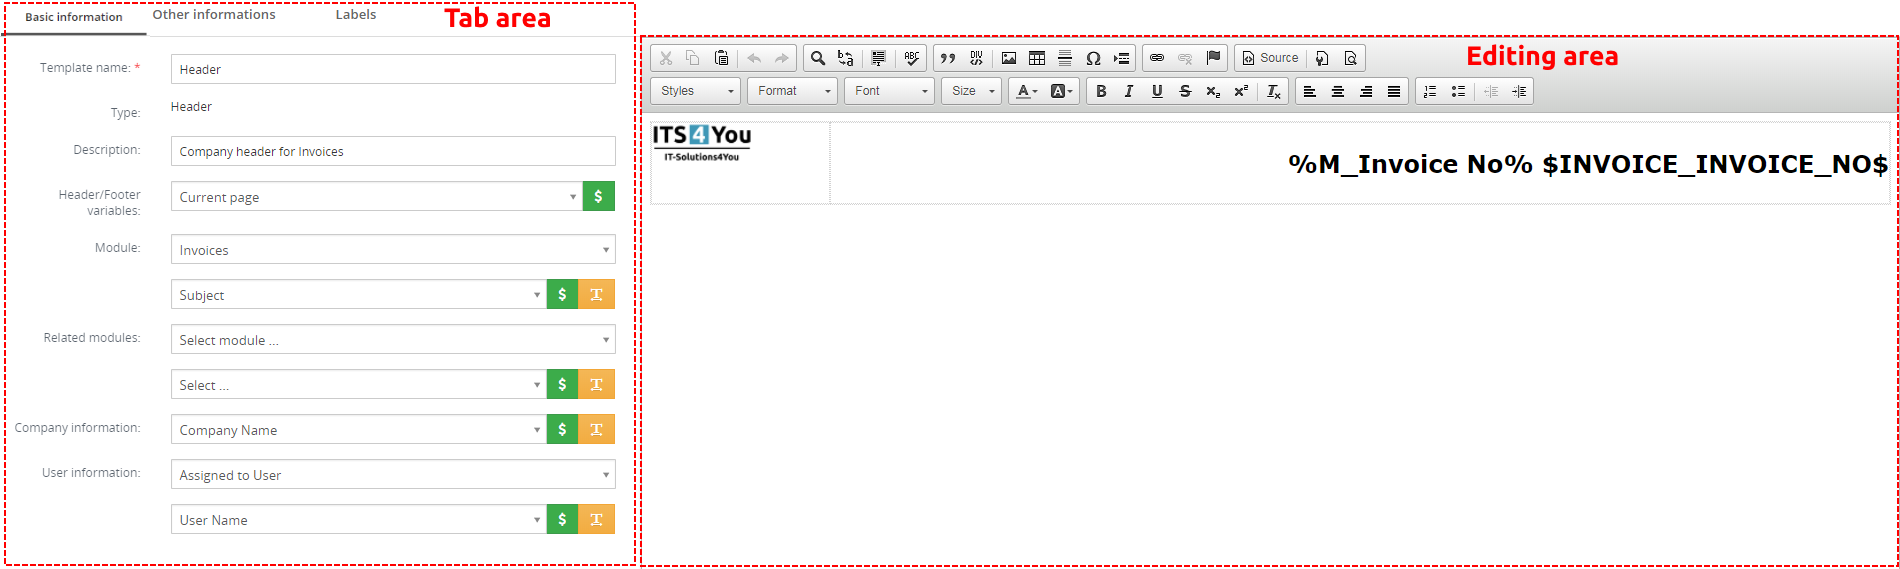
The Edit view shown in the picture below is divided into two areas:
- Tabs area – allows user to insert into template different kind of values, fields, labels and to set up properties, sharing and other common settings of the pdf template. Tabs area consists of following tabs, which are described in the following sub-chapters:
- Basic information
- Other information
- Labels
- Product block
- Header/Footer
- Properties
- Settings
- Signature
- Sharing
- Editing area – is mainly used for inserting/editing your own text, tables, images etc. and to make some design adjustment of the template like font change, color, format, size, background color of the text etc. This editing can be initiated via many toolbars located inside three tabs (Body, Header and Footer) in the above part of Editing area. Please refer to the chapter 4 for the details related to editing.
Note: If you click on the Body tab in editing area you automatically switch to the Properties tab. Also, if you click on Header tab or Footer tab in editing area then it switches Tabs area to Header/Footer tab.
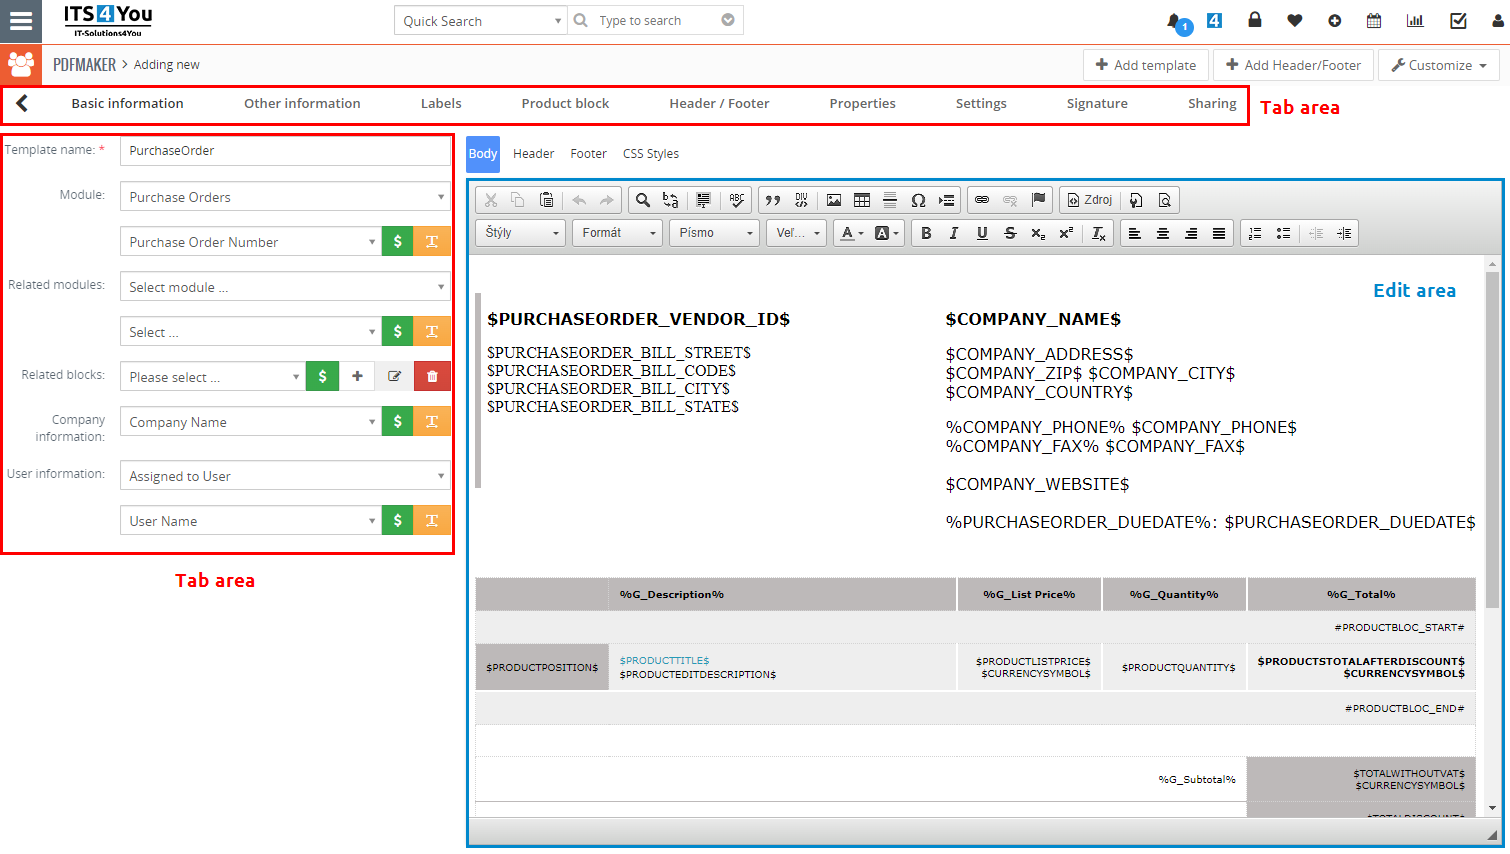
PDF Maker – Edit view
5.5.1.Basic information
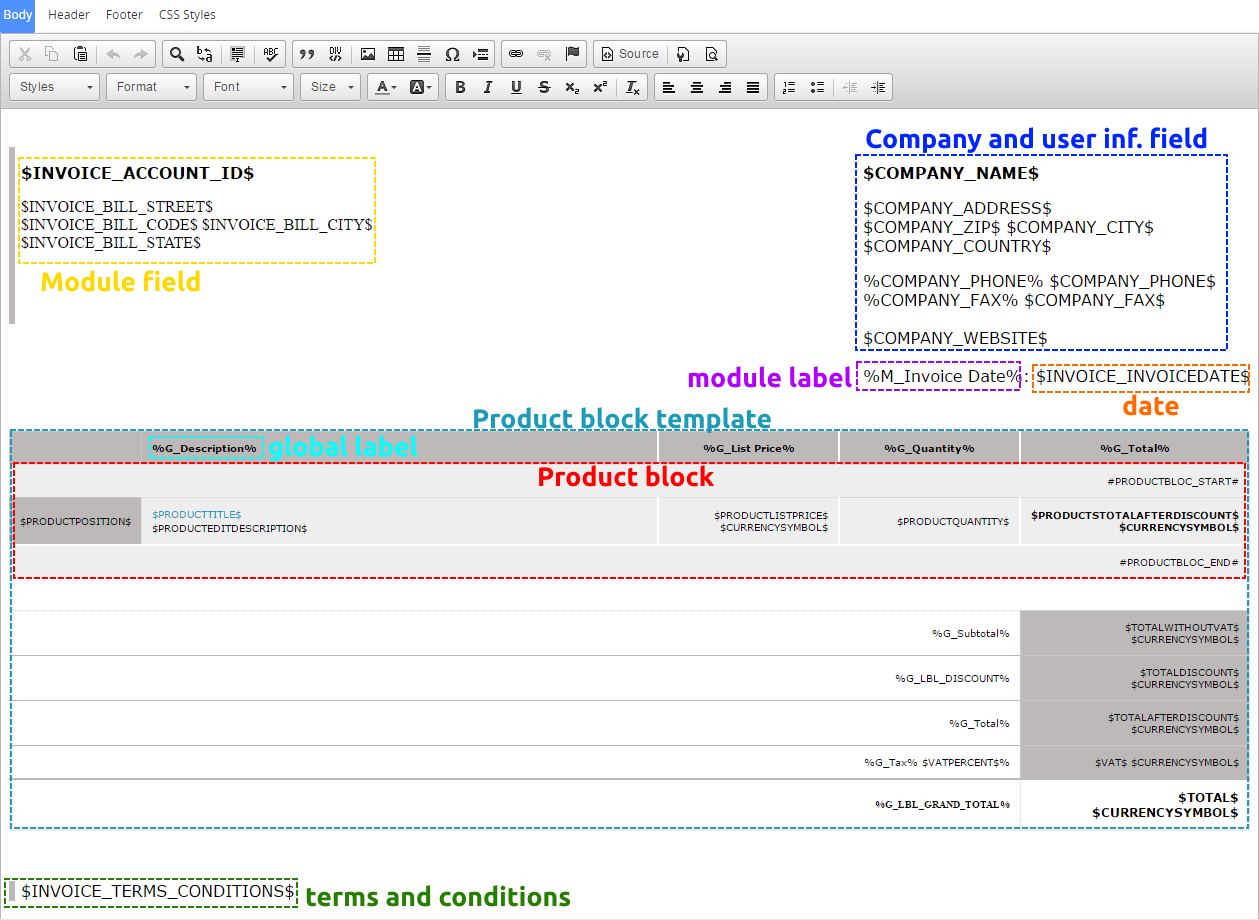
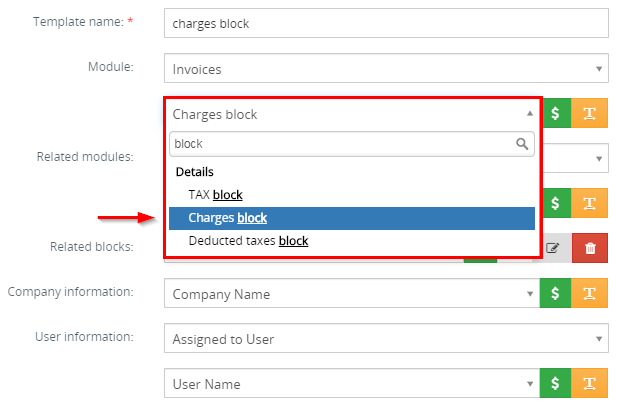
The main purpose of the Basic information tab is to define template name and module for which PDF will be used.
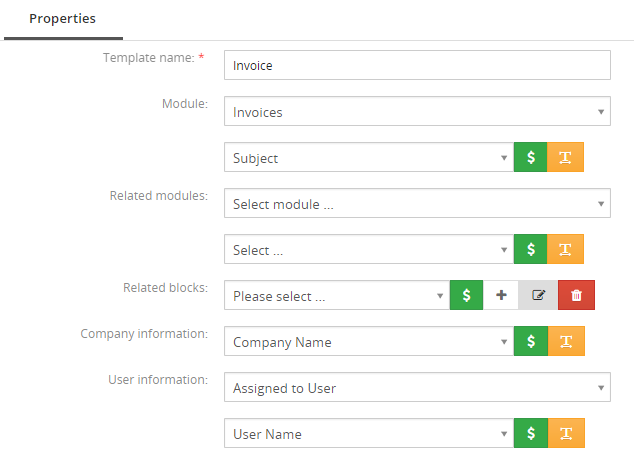
PDF Maker Properties tab
| Name | Description |
|---|---|
| Template name | The name of the template. It is mandatory field for template creation. |
| Module | Template will be based and available only for one selected module and its fields. |
| Related modules | If exists related module(s) to selected module, it is possible here to select and use fields from any related modules. |
| Related blocks | Related block(s) to selected module, with buttons to insert, create, edit or delete related block. |
| Company information | Comprises group of fields from Company information. |
| User information | Assigned to User, Logged in User, Modified by User and Created by User information |
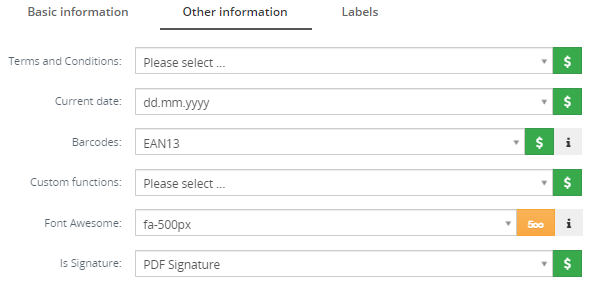
5.5.2.Other information
As shown below Other information tab contains several fields and functions:

Other information tab – PDF Maker Vtiger 7
| Name | Description |
|---|---|
| ListView block | Create list view blocks |
| Terms and Conditions | Terms and Conditions. |
| Current date | Current date and times in several formats. |
| Barcodes, QR code | Several types of Barcodes and QR code |
| Custom functions | If you need a special treatment of Vtiger data in your template, you can use custom (or your own) functions. |
| Font Awesome | Insert Font Awesome icons into your template |
| Is Signature | Insert variable $PDF_SIGNATURE$ to place PDF Signature block |
5.5.3.Labels
Labels tab consists of Global language, Module language and Self-defined labels part. Labels are very useful especially in case you need to print/save documents in two or more languages.
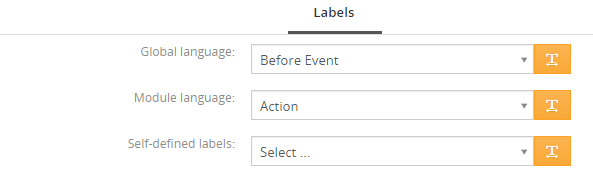
PDF Maker Labels tab
| Name | Description |
|---|---|
| Global language | Global labels. |
| Module language | Labels related only to selected module. |
| Self-defined labels | Labels defined by user. |
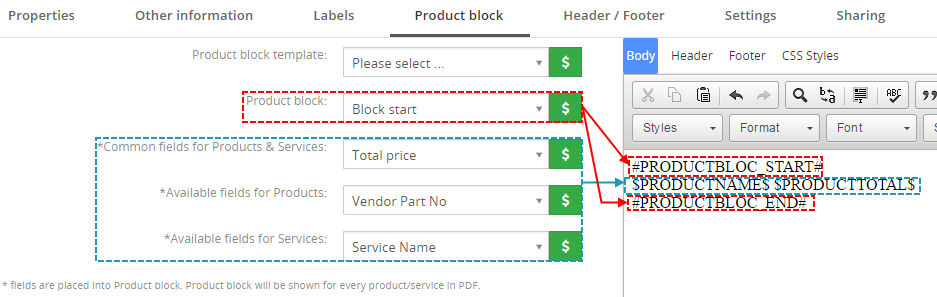
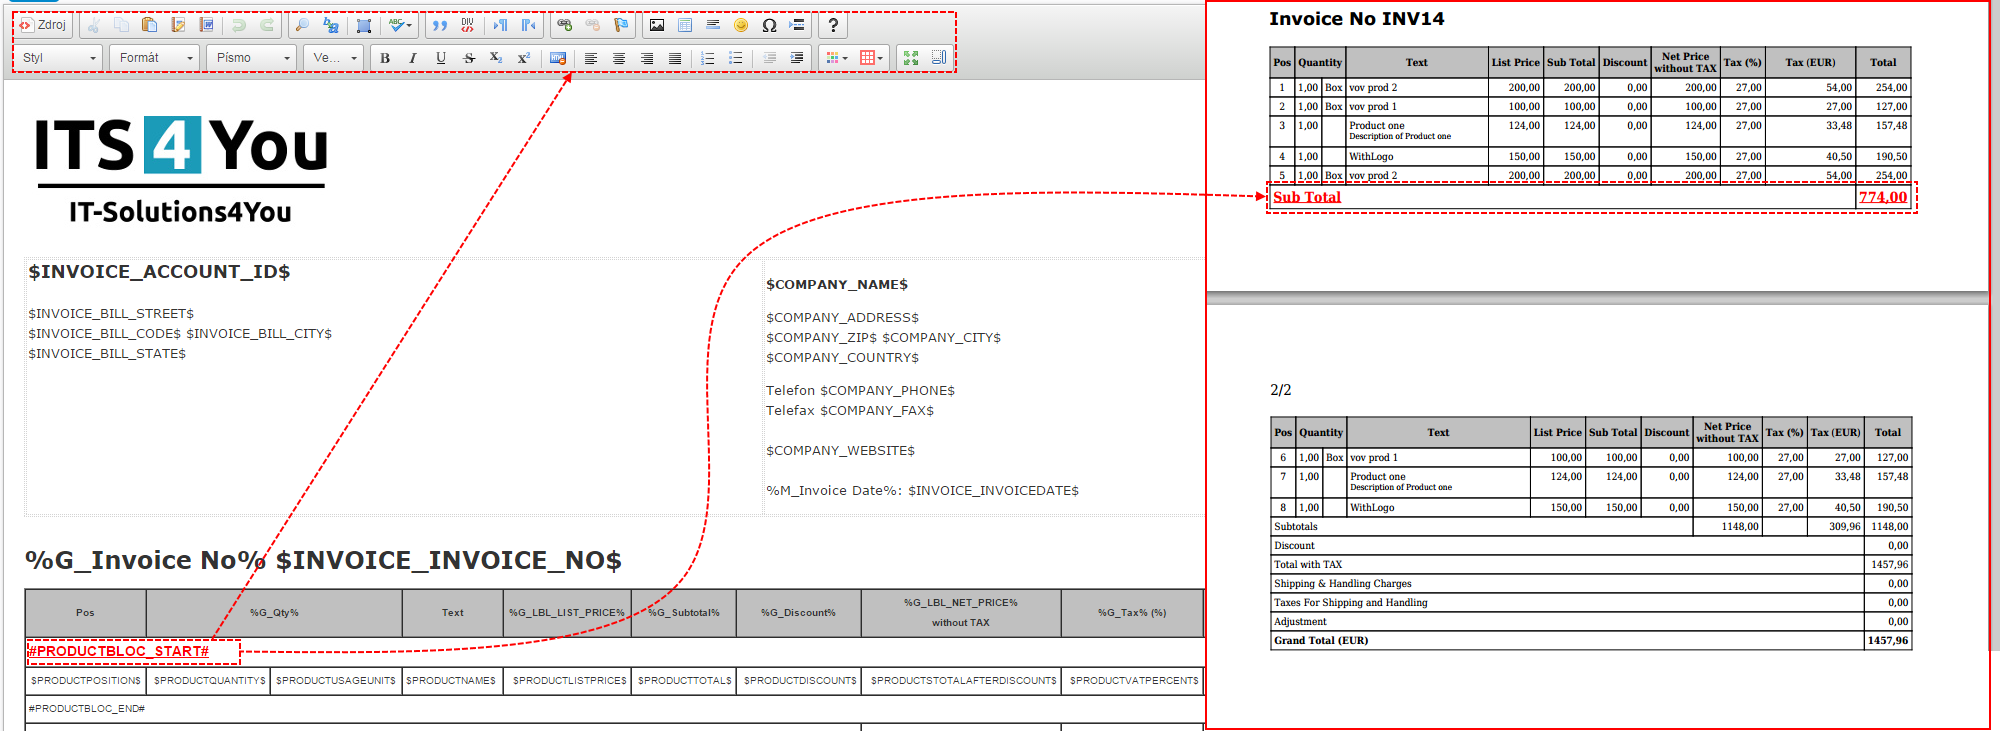
5.5.4.Product block
The product block tab allows inserting product block template and editing it. In addition, you can create your own product block using “Block start”, “Block end” and fields for products and services.
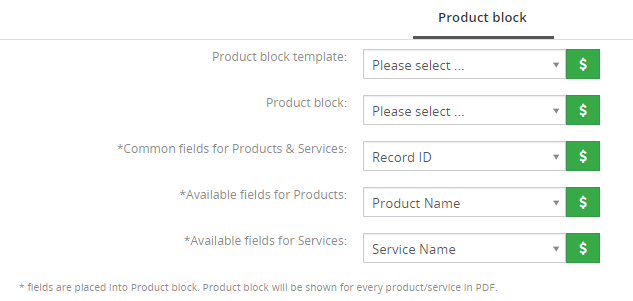
PDF Maker Product block tab
| Name | Description |
|---|---|
| Product block template | Insert predefined and created product block templates. |
| Product block | Products and Services Block start, Products and Services Block end. Products Block start, Products Block end. Services Block start, Services Block end. Each product block has to start with “Block start” and ends with “Block end”. |
| Common fields for Products & Services | Fields common for products & services. You can find same fields for products and services separately as well, but it is recommended to prefer common fields in the templates. |
| Available fields for Products | Fields for products. |
| Available fields for Services | Fields for services. |
5.5.5.Header/Footer
The Header / Footer tab comprises some variables and header/footer settings related to displaying.
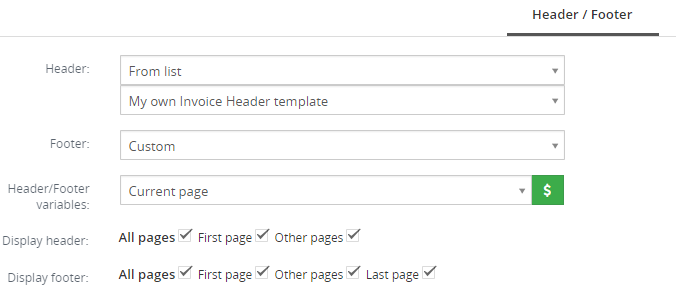
Header/Footer tab – PDF Maker Vtiger 7
| Name | Description |
|---|---|
| Header | Allows you use custom or select from your Header templates |
| Footer | Allows you use custom or select from your Footer templates |
| Header / Footer variables | “Current page”, “Total pages” and “Page/pages”. |
| Display header | Allows defining how to display the header of the pdf document. |
| Display footer | Allows defining how to display the footer of the pdf document. |
If you use Custom Header or Footer then to export is taken Header or Footer from PDF Template.
If you Select From list and choose your Header or Footer template then this template is added to PDF file in process of export.
How it works you can find also here
5.5.6.Properties
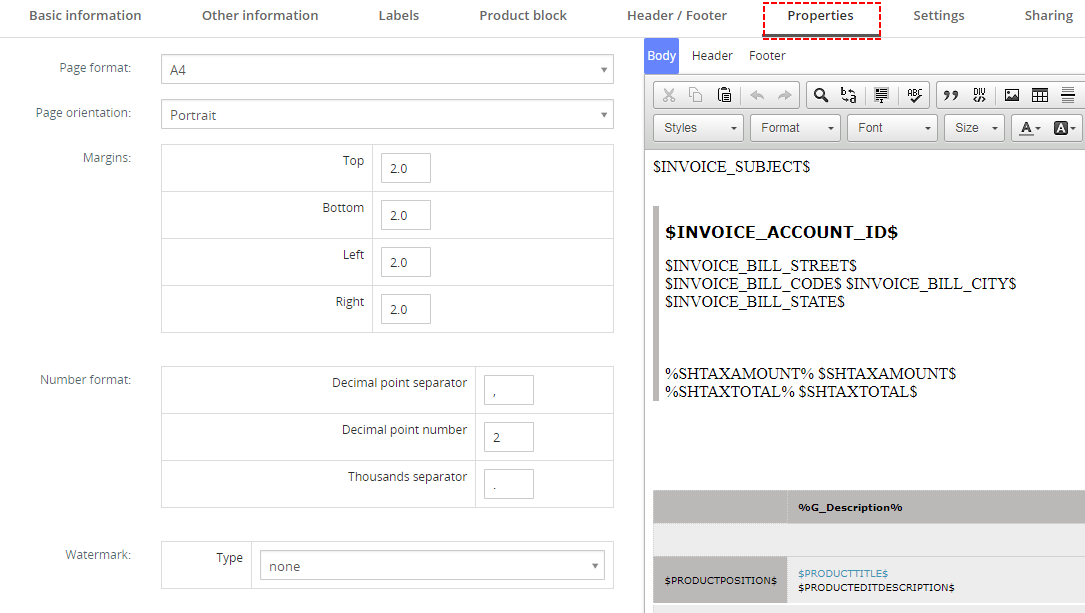
The Properties tab allows defining page settings, number format and new Watermark functionality.
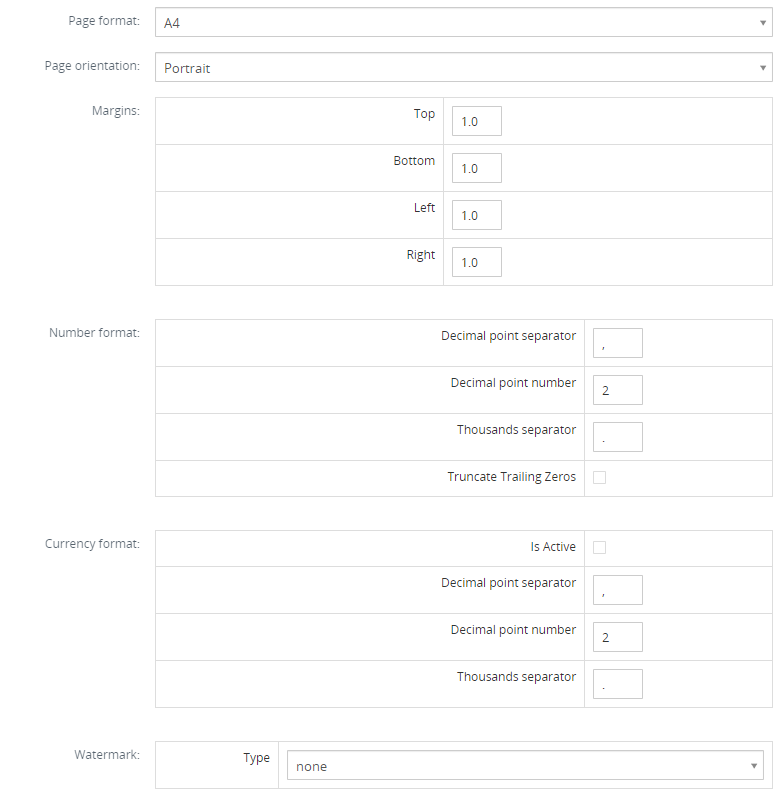
Properties Tab – PDF Maker Vtiger 7
| Name | Description |
|---|---|
| Page format | A3, A4, A5, A6, Letter, Legal or Custom. Custom page format allows to define width and height of the page in mm. Maximum values are 2000 mm x 2000 mm and minimum values are 1mm x 1mm. |
| Page orientation | Portrait or landscape. |
| Margins | Margins in cm. Maximum value is 9.9 cm and minimum value is 0 cm. |
| Number format | This format is used as default when Currency format is not checked for all values Otherwise is can be used for Quantity or Percentage values ONLY if the Currency format is checked. Decimal point separator – comma, dot (but any symbol can be used) |
| Curreny format | When checked, this formatting is applied only on currency values. Is Active – activate this formatting only for currency fields |
| Watermark | Allows you set text or image like watermark. Text should be static or based on module or related modules variables. Read more: Watermark |
5.5.7.Settings
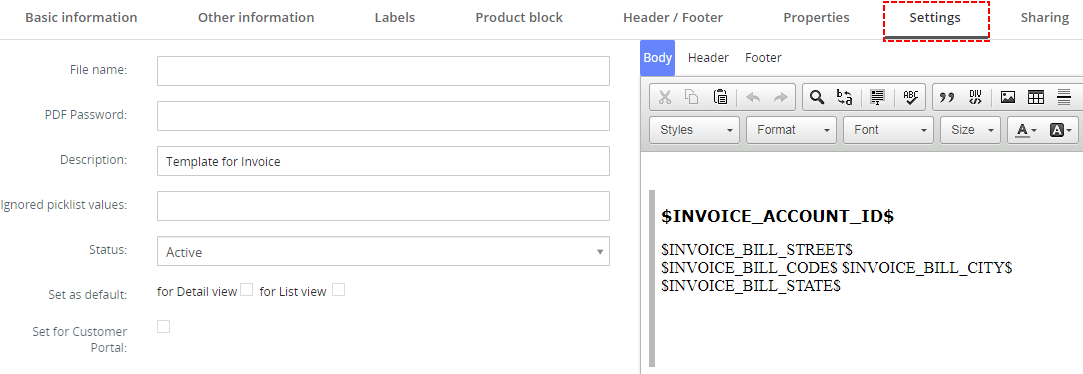
The Settings tab allows defining file name, new functionality PDF Password, description. page settings and other settings from usage of template point of view.
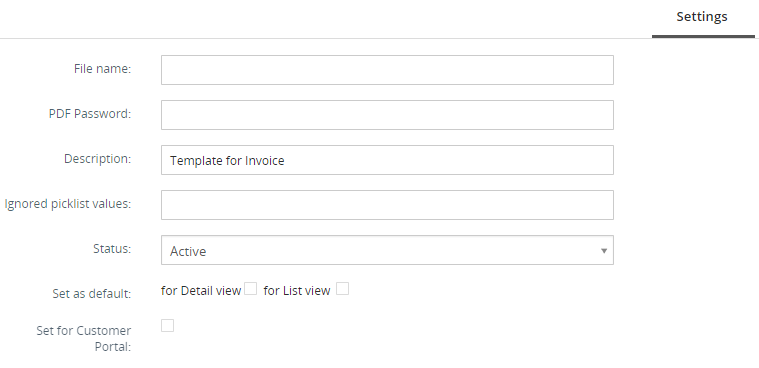
Settings Tab – PDF Maker Vtiger 7
| Name | Description |
|---|---|
| File name | File name in different formats. |
| PDF Password | Allows you lock PDF file with static password or password created by values from module or related modules. Read more: PDF Password |
| Description | The description of the pdf template. |
| Ignored picklist values | Define picklist values which will be ignored in the final pdf document like None, none, keine etc. Entered values have to be separated with comma. |
| Status | Active / Inactive |
| Set as default | Set/unset as default for DetailView and ListView. |
5.5.8.Signature
This feature was added in version PDF Maker 4.49 on June 2023.
Users or Admin can create Signatures in form of Image and then load them into the Templates.
This can be used for PDF Signature extension, the Acceptance Signature process.
PDF Maker – Signature tab
Users can create an Acceptance Signatures from the PDF Maker template list view, by going to Customize – Signatures:
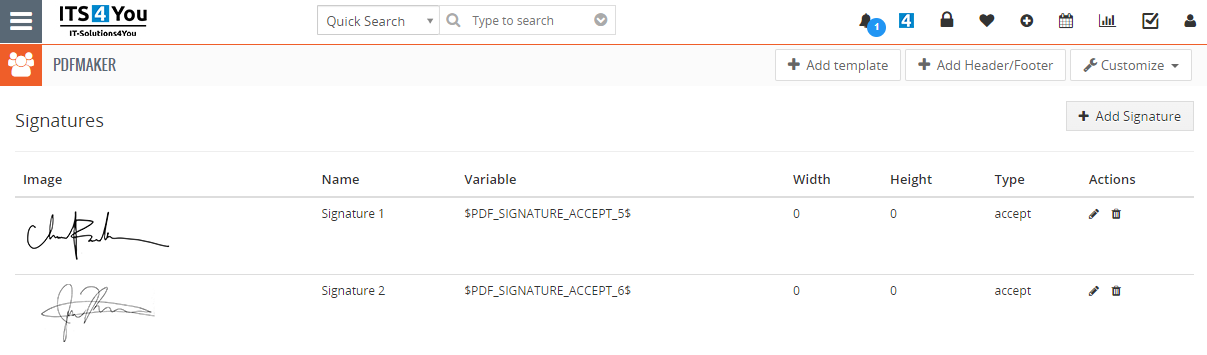
PDF Maker – Settings – Signatures
5.5.9.Sharing
The Sharing tab changes depend on whether PDF template is shared or public/private. Using this tab you can define how to share your template between you and other users or groups.

PDF Maker Sharing tab
| Name | Description |
|---|---|
| Template owner | Select template owner from the list. |
| Sharing | Select “Public”, “Private”, “Share” |
5.6.EditView of Header/Footer
The EditView of Header/Footer shown in the picture below is divided into two areas:
- Tabs area – allows user to insert into template different kind of values, fields and labels and to set up properties, and other common settings of the pdf template. Tabs area consists of following tabs which are described in the following subchapters:
- Basic information
- Other informations
- Labels
- Editing area – is mainly used for inserting/editing your own text, tables, images etc. and to make some design adjustment of the template like font change, color, format, size, background color of the text etc.

EditView of Header/Footer – PDF Maker Vtiger 7
5.6.1.Basic information of Header/Footer
The main purpose of the Properties tab is to define template name and type of template (Header or Footer).

Properties tab – PDF Maker Vtiger 7
| Name | Description |
|---|---|
| Template name* | The name of the template. It is mandatory field for template creation. |
| Type | Type of template. Header or Footer template |
| Description | Description of your template |
| Header/Footer variables | Current page, All pages, Page/pages |
| Module | You can select module if want add module fields. If you do not choose module template will be available for all PDF templates. |
| Related modules | If you select module and if exists related module(s) to selected module, it is possible here to select and use fields from any related modules. |
| Company information | Comprises group of fields from Company information. |
| User information | Assigned to User, Logged in User, Modified by User and Created by User information |
5.6.2.Other Informations of Header/Footer
As shown below Other information tab contains several fields and functions:
Other information tab – PDF Maker Vtiger 7
| Name | Description |
|---|---|
| Terms and Conditions | Terms and Conditions. |
| Current date | Current date and times in several formats. |
| Barcodes, QR code | Several types of Barcodes and QR code |
| Custom functions | If you need a special treatment of Vtiger data in your template, you can use custom (or your own) functions. |
| Font Awesome | Insert Font Awesome icons into your template |
| Is Signature | Insert variable $PDF_SIGNATURE$ to place PDF Signature block |
5.6.3.Labels of Header/Footer
Labels tab consists of Global language, Module language (if module is selected) and Self-defined labels part. Labels are very useful especially in case you need to print/save documents in two or more languages.

Labels tab – PDF Maker Vtiger 7
| Name | Description |
|---|---|
| Global language | Global labels. |
| Module language | Labels related only to selected module. |
| Self-defined labels | Labels defined by user. |
5.7.PDF Maker block
The PDF Maker block can be found inside the specific module. In the module ListView it is necessary to click on any record to see details and on the right side, you can find the block. Depends on type of module and whether template already exists for selected module following forms of PDF Maker block can be seen in the screen (after PDF Maker installation, the PDF Maker block is visible only for modules with at least one already created PDF template) :
- Standard layout of the PDF Maker block.
- Extended layout of the PDF Maker block available for modules Invoice, Sales Order, Purchase Order, Quotes.
PDF Maker block for vtiger 7
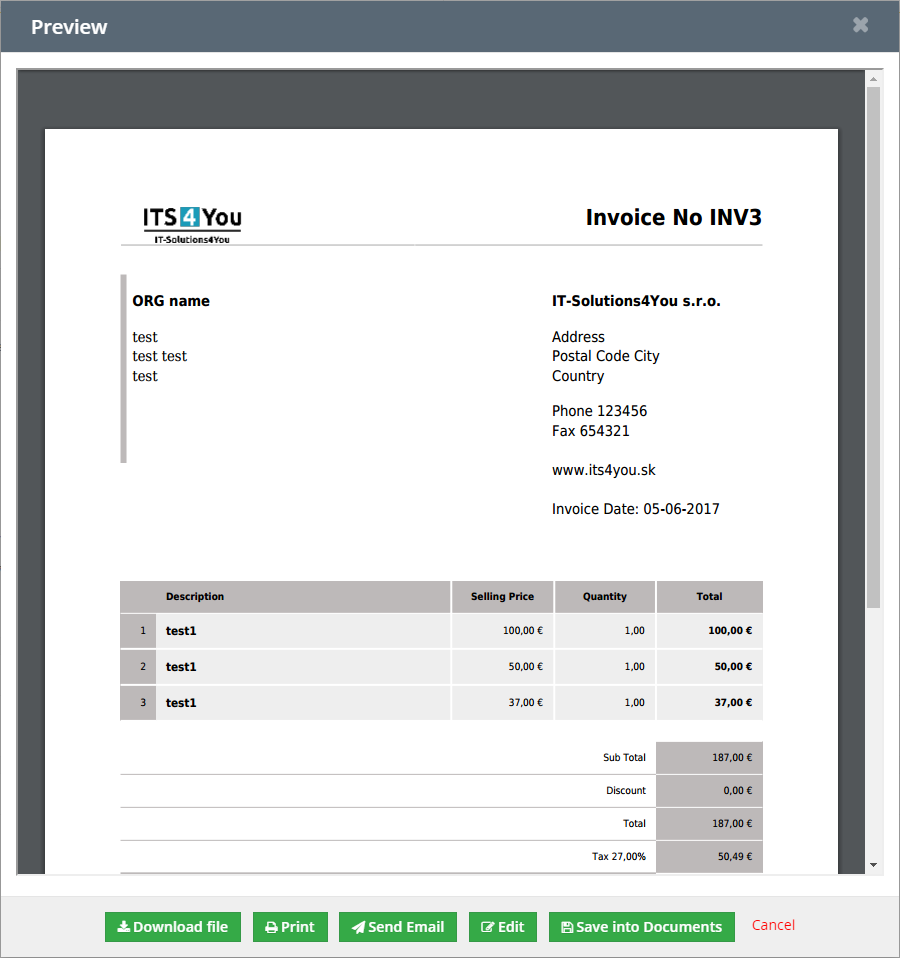
5.8.Preview
Preview window contains of PDF file preview and also you can find here options to Download file, Print, Send Email, Edit and Save into Documents.
It is useful to see how looks your PDF file.
Preview of PDF Maker
6.Editing
The editing of the pdf templates in the PDF Maker is easy and is provided inside editing area in the EditView. Before you start the creation of the new template, you have to decide whether the new PDF template will be based on primary module or not. So two kinds of PDF templates exists:
Common templates – templates can be used in all modules. Inside common templates is not recommended to use primary module fields, related module fields, products block templates, related blocks or listview blocks. The reason is that values for such fields should be not available for particular modules and therefore the exported pdf file will contain just notations of the fields e.g. $s-products-productname$ but not real expected values.
As can be seen in the picture below, in order to have useful pdf template you can combine: your own text, module fields or related module fields, images, tables, barcodes, labels, products block templates, related blocks, etc… Just click inside the editing area below the Body/Header/Footer tabs and start typing your text. You can continue with adding additional fields. Body/Header/Footer tabs allows you to change formatting of your text and other inserted fields using a lot of toolbars. Just select the text/field and click on any icon of the tool like font, color, bold, italic, alignment etc.
Editing
6.1.Inserting images
mages can improve the design of your documents. CKEditor is used inside the PDF Maker and it allows you to add images into your documents in an easy and intuitive way.
So, if you would like to insert image please provide following steps:
- Press the button
 on the toolbar.
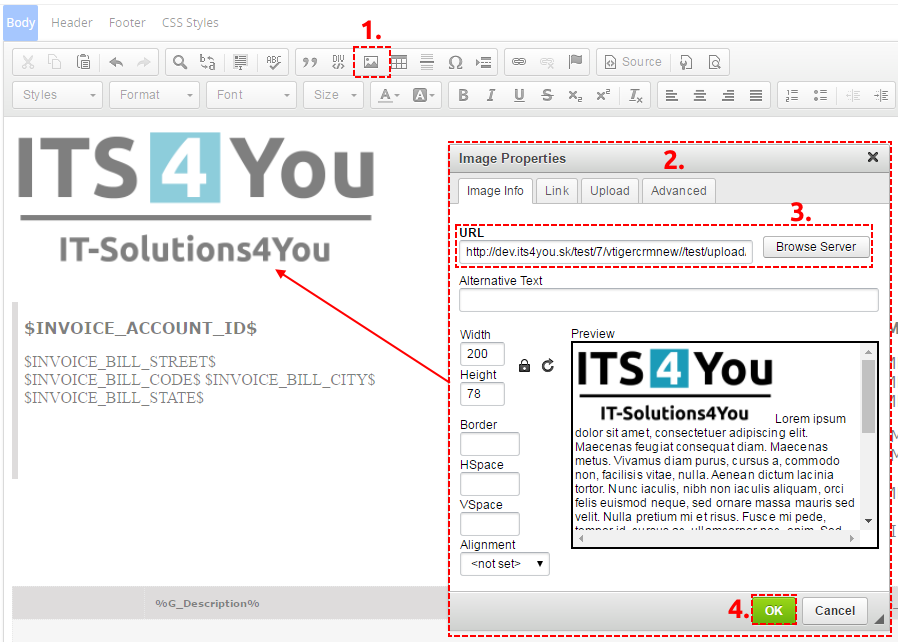
Insert Image
- A pop-up window called “Image Properties” will appear. It includes four tabs that group image options.
- Define the URL address of the image. You may also use the [Browse Server] in order to browse the files. Set up other properties of the image.
- Click [Ok] to add image into Templates.
For more info visit following site: http://docs.cksource.com/CKEditor_3.x/Users_Guide/Rich_Text/Images
6.2.Creating tables
The tables are inseparable component of many documents. Similarly to images, tables can be inserted into
your templates in few simple steps:
- Press the insert/edit table button
 on the toolbar. After that a popup window called “Table
Properties” will appear.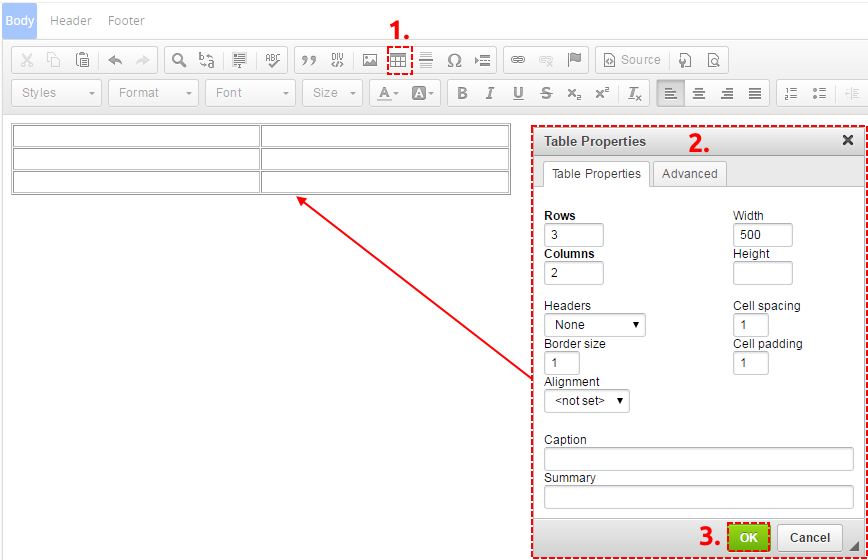
Creating tables
- Set the basic table properties like number of columns and rows, width, height, etc.
- Click on [Ok] button.
After that the table is inserted into the template and you can write some text, insert all available fields from
chosen and related Modules or add some images into the new table. You can also make some design
adjustments like bold text, underline, etc.
For more info visit following site: http://docs.cksource.com/CKEditor_3.x/Users_Guide/Rich_Text/Tables
6.3.Inserting barcodes and QR codes
There is a “Barcodes, QR code” field in the Other information tab. Barcodes are divided into group.
Detailed description of the barcodes can be found in the attached document (just click on  )
)
In order to insert the barcode into the template please provide following steps:
- Choose your barcode type.
- Click on
 button.
 - Barcode is inserted into template.
- Replace “YOURCODE” with static number/string (4a) for making the barcode or you can use the
variables from the actual template (4b).
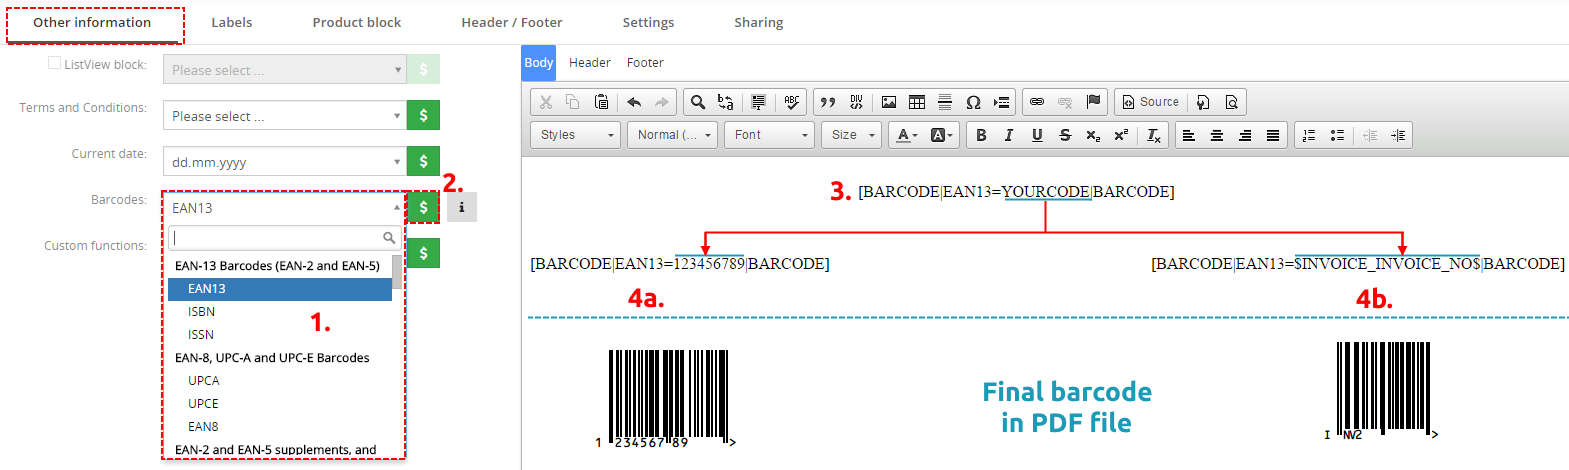
Barcode selection
How to insert QR code shows next picture:
- In Other information tab please select QR field from “Barcodes, QR code” and click on button.
- In inserted part [BARCODE|QR=YOURCODE|BARCODE] replace “YOURCODE” with your QR code
value.
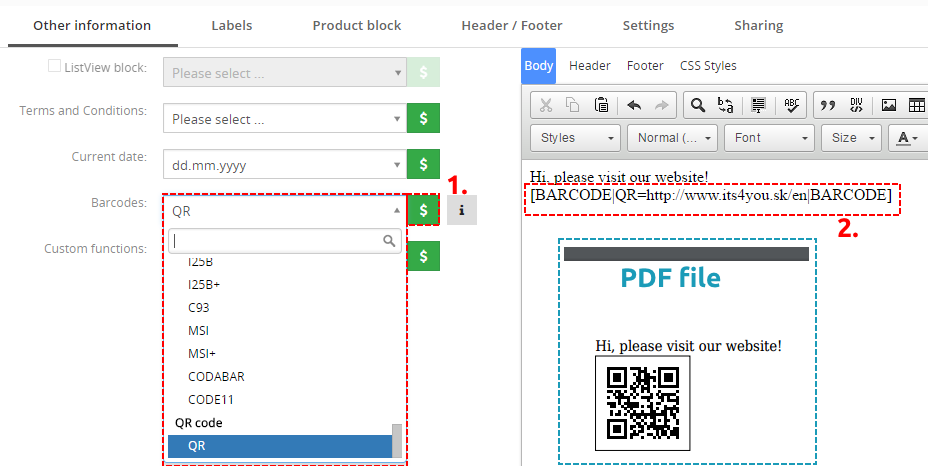
How to insert QR code
6.3.1.Formatting barcodes and QR codes
The inserted barcodes or QR codes can be formatted using:
- additional attributes – add one or more supported attributes into barcode/QR syntax like
[BARCODE|CODE=YOURCODE|ATT1=value1|…|ATTN=valueN|BARCODE]
Example:[BARCODE|EAN13=789|SIZE=1.5|HEIGHT=0.5|BARCODE] - Cascading Style Sheets (CSS) – define CSS style within PDF template and put it into barcode/QR
syntax like: [BARCODE|CODE=YOURCODE|CLASS=name_of_style|BARCODE]
Example:[BARCODE|EAN13=123|CLASS=barcodestyle|BARCODE]
You are able to change colors, sizes and other styles with barcodes. See on the image down below:

Formatting barcodes and QR codes
Please refer to mPDF library manual, barcode part for the details:
https://mpdf.github.io/reference/html-control-tags/barcode.html
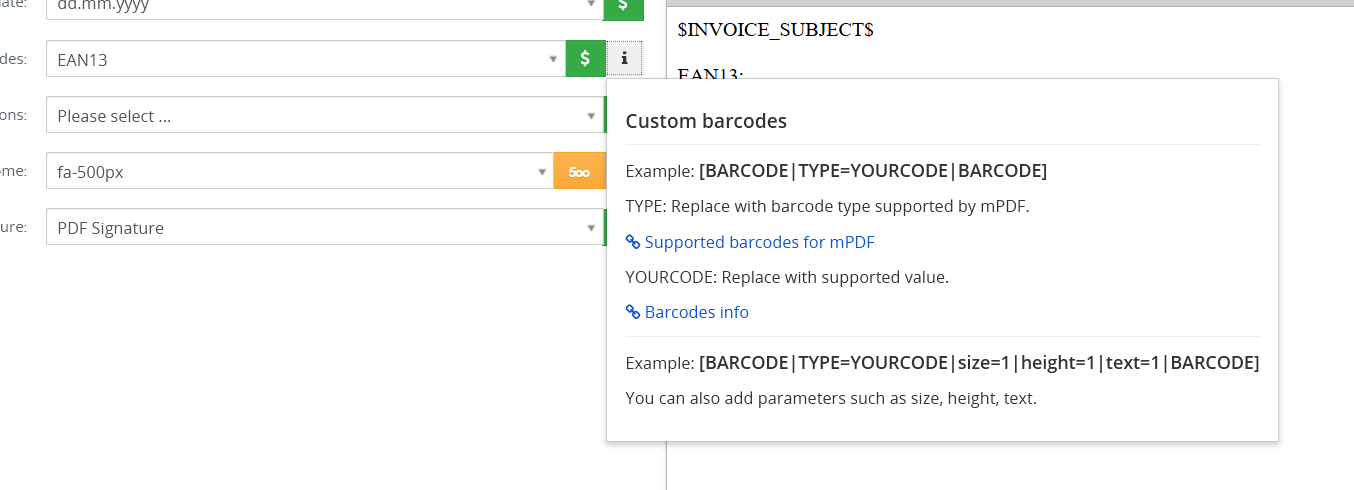
6.3.2.Custom barcodes
This feature was added in version 4.26 of PDF Maker.
Custom bar codes
Custom barcodes
Example: [BARCODE|TYPE=YOURCODE|BARCODE]
TYPE: Replace with barcode type supported by mPDF.
YOURCODE: Replace with supported value.
Example: [BARCODE|TYPE=YOURCODE|size=1|height=1|text=1|BARCODE]
You can also add parameters such as size, height, text.
6.4.Inserting Labels
The intention of the labels is saving time and effort for creating pdf templates. Using labels provides an easy and flexible way to prepare pdf files / or just parts of pdf files in different languages without necessity to create separate pdf template per each language. As it was described in chapter 5.3.3, labels can be inserted into templates via Labels tab. In order to insert any global related label, module related label or self-defined label just click on Labels tab, select from dropdown list any label and click on [Insert into template] button.
Labels tab
Please refer to example below used for invoice pdf template. Instead of having two (or more) templates the labels are used as much as possible. For example the label %G_Phone% used in the template will be replaced in final pdf file in german language as “Telefon” and in final pdf file in English language as “Phone” automatically based on your language selection. So it is not necessary to create duplicate templates for another language, just use labels and select language before exporting into pdf. The global labels use notation %G_*****%, module labels use %M_*****% and self-defined labels use notation %C_*****%.

Inserting labels
If the global and module related labels are not sufficient for you, it is possible to define self-defined labels. In order to define self-defined please follow instructions described in the chapter 9.2.
6.5.Using a product blocks
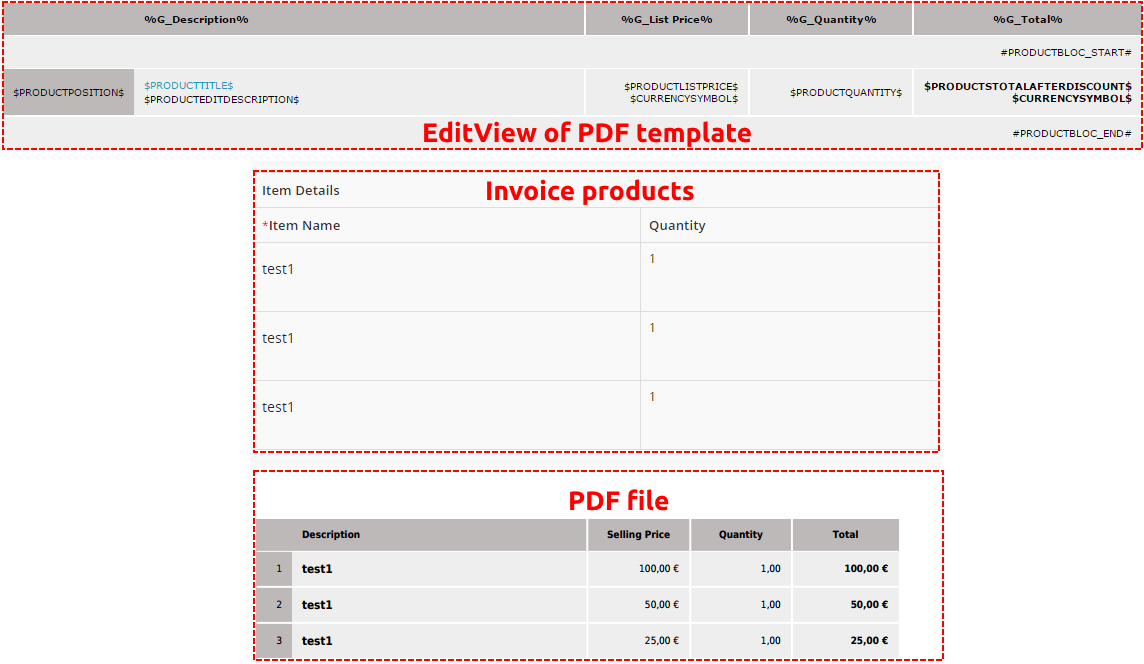
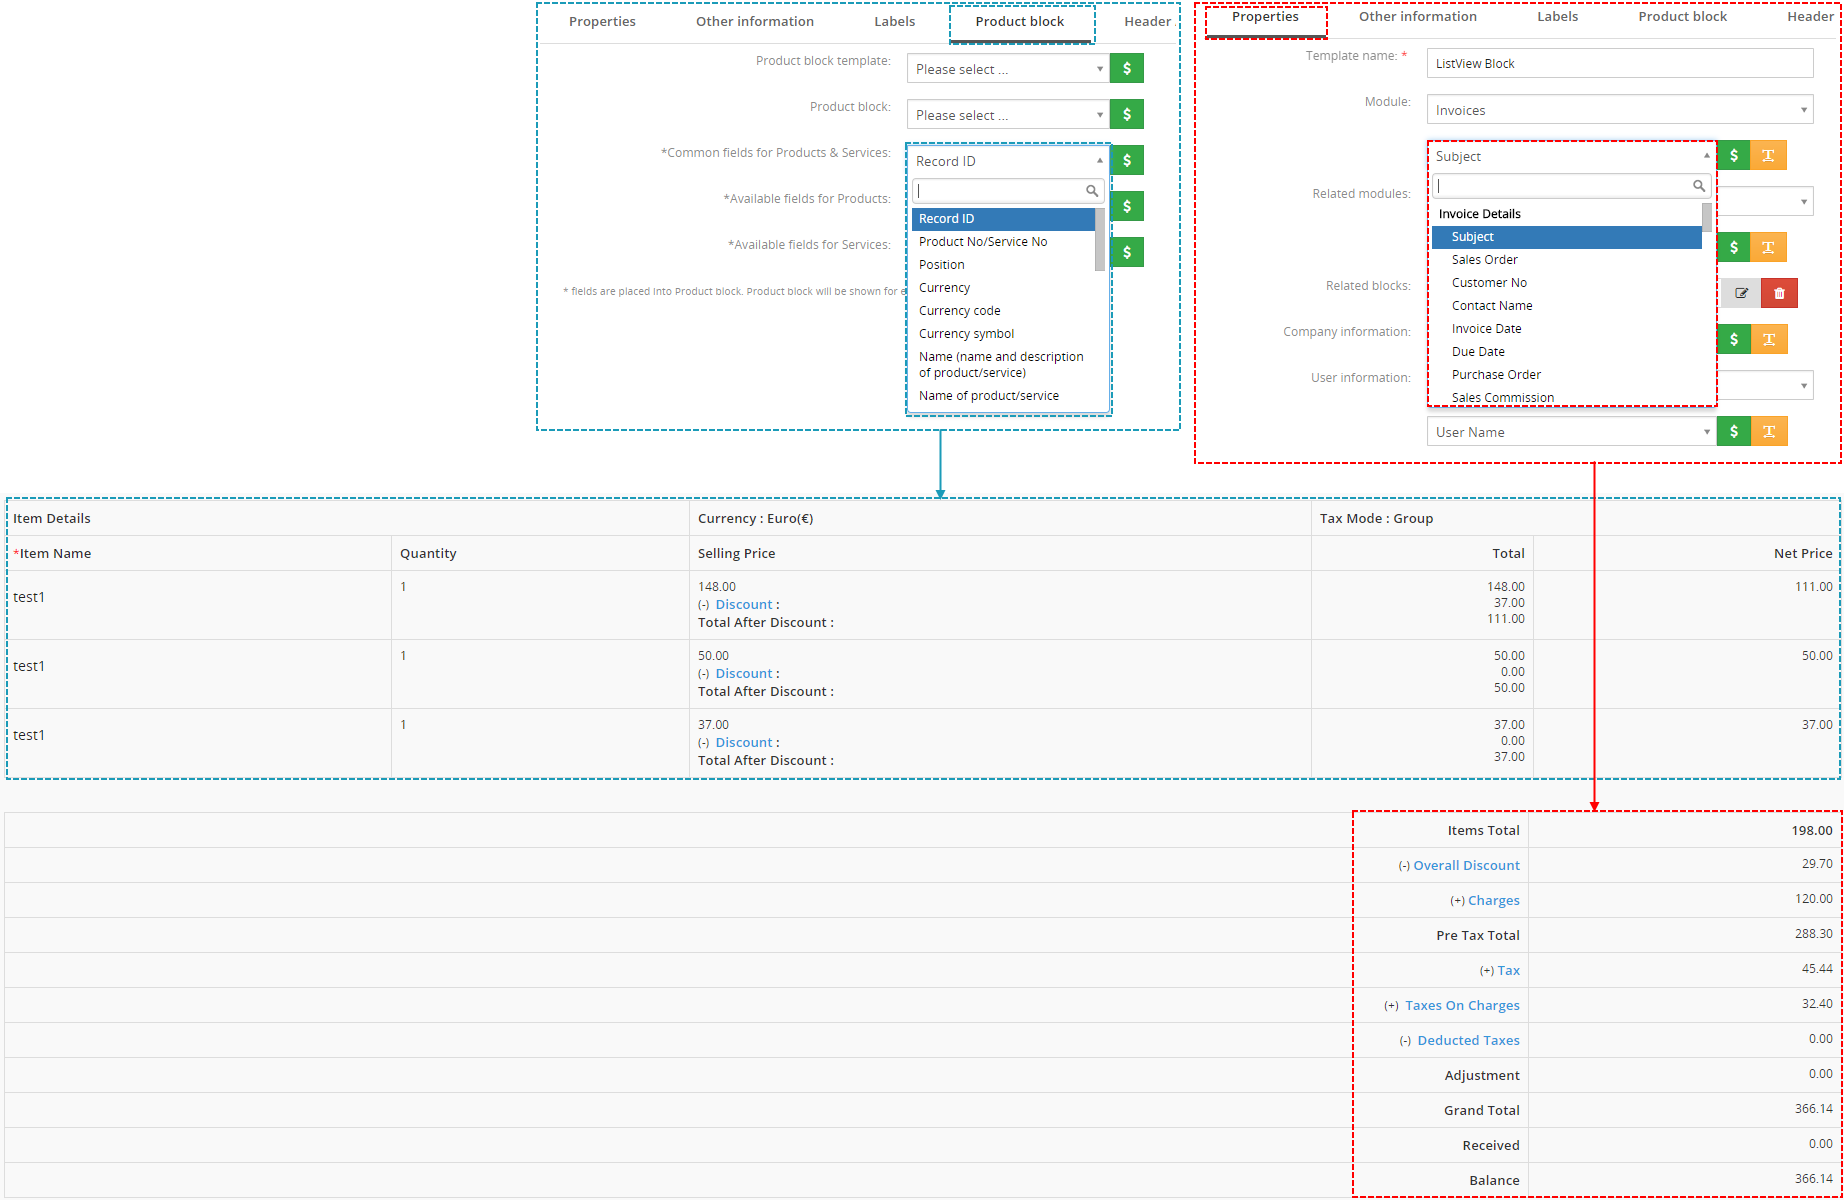
The product blocks are simple but powerful parts of your PDF templates. They are used to display all products/services from modules Invoices, Quotes, Sales Order and Purchase Order in your PDF files regardless of the number of products/services for particular record. Below you can find simple example where invoice contains three products which are automatically seen in the final PDF exported file. You don’t need to create template for three rows in the table, just define start and stop of the product block and product fields according to your needs. Next chapter describes how to create your own product block. In addition, we also introduced some default product block templates as well as tool for managing them (9.3).
Product block usage
6.5.1.Create new product block in EditView
You can find Product block tab in EditView which allows inserting, editing and creating of product blocks. In case that product block templates are not sufficient for you, it is easy to create your own product block:
- Go to Product block tab and insert product block start variable (#PRODUCTBLOC_START#) and
product block end (#PRODUCTBLOC_END#). - Add all necessary product/service fields according to your needs between (#PRODUCTBLOC_START#)
and (#PRODUCTBLOC_END#) and provide formatting if needed.
Create product block
6.5.2.Insert and edit product block template
There are already created product block templates which you can insert from product block tab and later edit if needed. These templates are available only for modules Invoices, Quotes, Sales Order and Purchase Order that displays product block. The product block templates created within product block tool (9.3) can be added in the same way. You can simply add the whole product block template into your template by:
- Go to Product block tab.
- Select product block template.
- Click on button.

Insert product block template
When the product block template is inserted you can modify it according to your needs. For example you can add new cells / rows / columns, change font, change the background color, etc. You can edit layout like a table or you can add some new variables / labels as well.
6.5.3.Separate block for Products and for Services
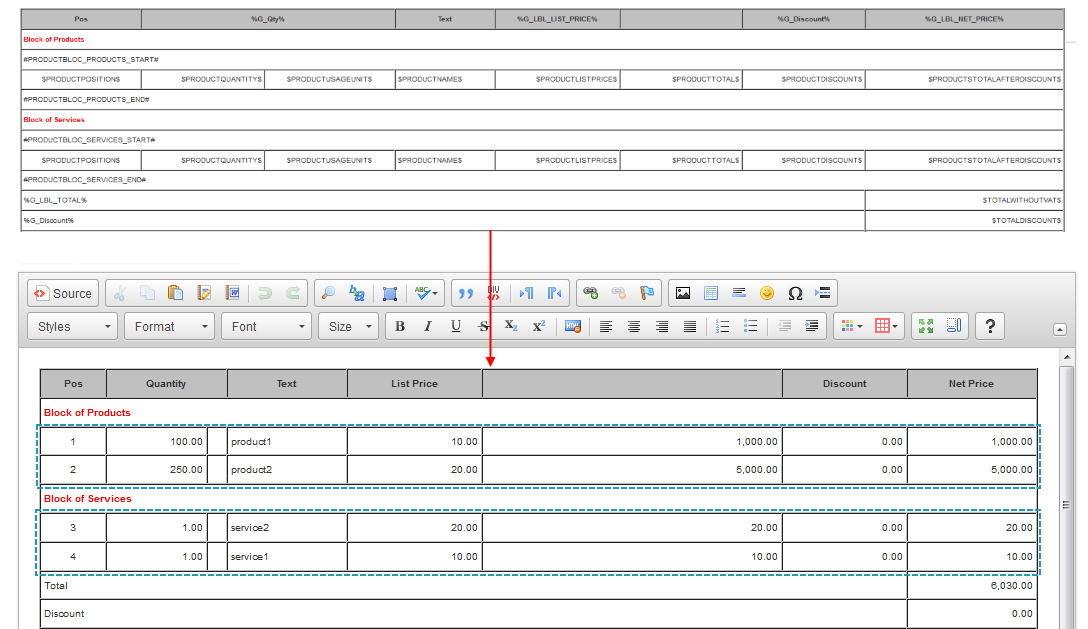
There is also the option to create a separate Block for Products and for Services. To create separate Block please provide following steps:
- Go to Product block tab and insert product block start variable (#PRODUCTBLOC_PRODUCTS_START# or #PRODUCTBLOC_SERVICES_START#) and product block end (#PRODUCTBLOC_ PRODUCTS_END# or #PRODUCTBLOC_ SERVICES_END#).
- Add all necessary product/service fields according to your needs between (#PRODUCTBLOC_PRODUCTS_START# or #PRODUCTBLOC_SERVICES_START#) and (#PRODUCTBLOC_PRODUCTS_END# or #PRODUCTBLOC_SERVICES_END#) and provide formatting if needed.
Separate Block for Products and for Services
6.5.4.Duplicates handling block
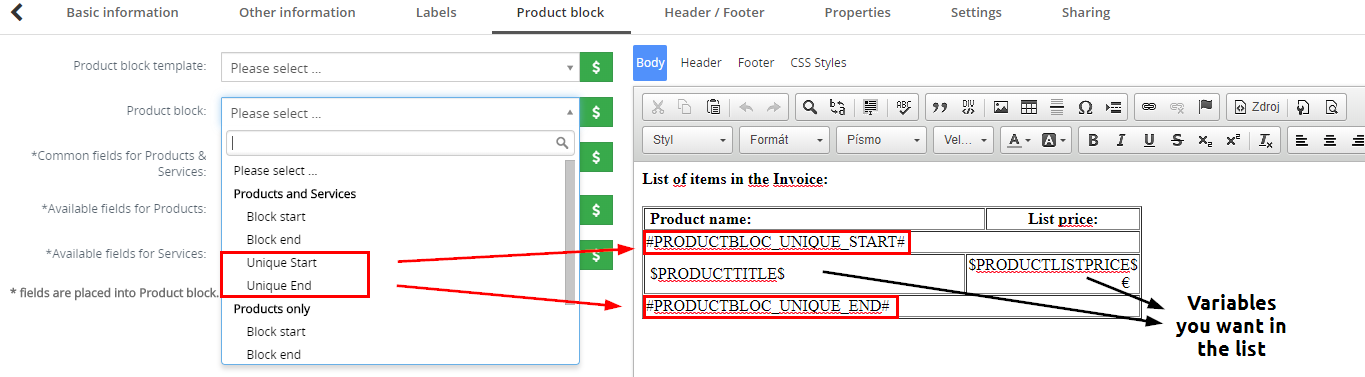
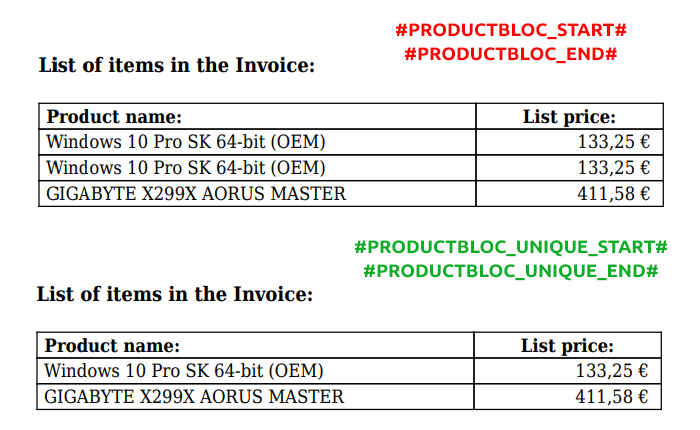
There is also an option to create blocks which will handle duplicate records.
What does it mean? It means that duplicated records will be shown just one time in the list/table.
It can be used if you need to create a list of products in the invoice, if some products have the same name, they will be displayed only once.
For this you need to use variables:
- #PRODUCTBLOC_UNIQUE_START#
- #PRODUCTBLOC_UNIQUE_END#
In our Invoice we have:
- 2 x : Windows 10 Pro SK 64-bit (OEM)
- 1 x : GIGABYTE X299X AORUS MASTER

PDF Maker for Vtiger CRM – Duplicates Handling product block
To create Duplicates handling block please provide following steps:
- Go to Product block tab.
- From the Product block list add variables:
#PRODUCTBLOC_UNIQUE_START# and #PRODUCTBLOC_UNIQUE_END# - Between these variables, use other variables you like to show in the list.
- Provide additional edit steps and save the template.
PDF Maker for Vtiger CRM – Duplicates Handling product block
Next, go to your Record and Export or Preview the template. Results in our case will be:

PDF Maker for Vtiger CRM – Duplicates Handling product block
Comparison between (#PRODUCTBLOC_START#/END#) and (#PRODUCTBLOC_UNIQUE_START#/END#)
PDF Maker for Vtiger CRM – Duplicates Handling product block
6.6.1.Create the related block
As you can see in the picture below, you can simply insert, create, edit or delete related blocks using buttons in Properties tab. How to create related block will be shown on example based on “Organizations” module. Let’s suppose that we would like to create simple PDF template based on module “Organizations”, and we need to list all invoices for particular organization which were created within last 90 days. In order to do it:
- Create new template based on Organizations module and put your variables/text into the body of the template.
- Go to the Properties tab and click on
 button.
 - Edit block window will appear on the screen.
- Start creation of the related block
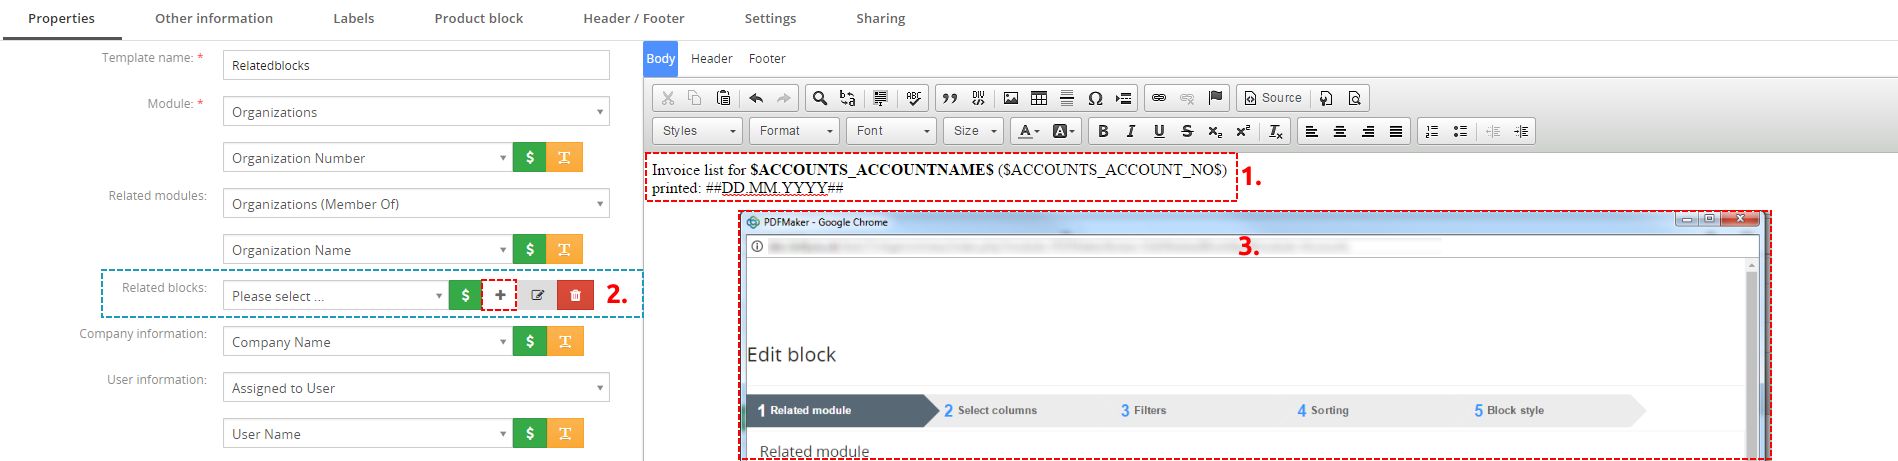
Start creation of the related block
As you can see in the next picture, 5 steps are necessary to create the related block. In this window also all related entity modules for primary module are shown. First step is to select one related module from the available list (1.). Please select “Invoice” and click on  button.
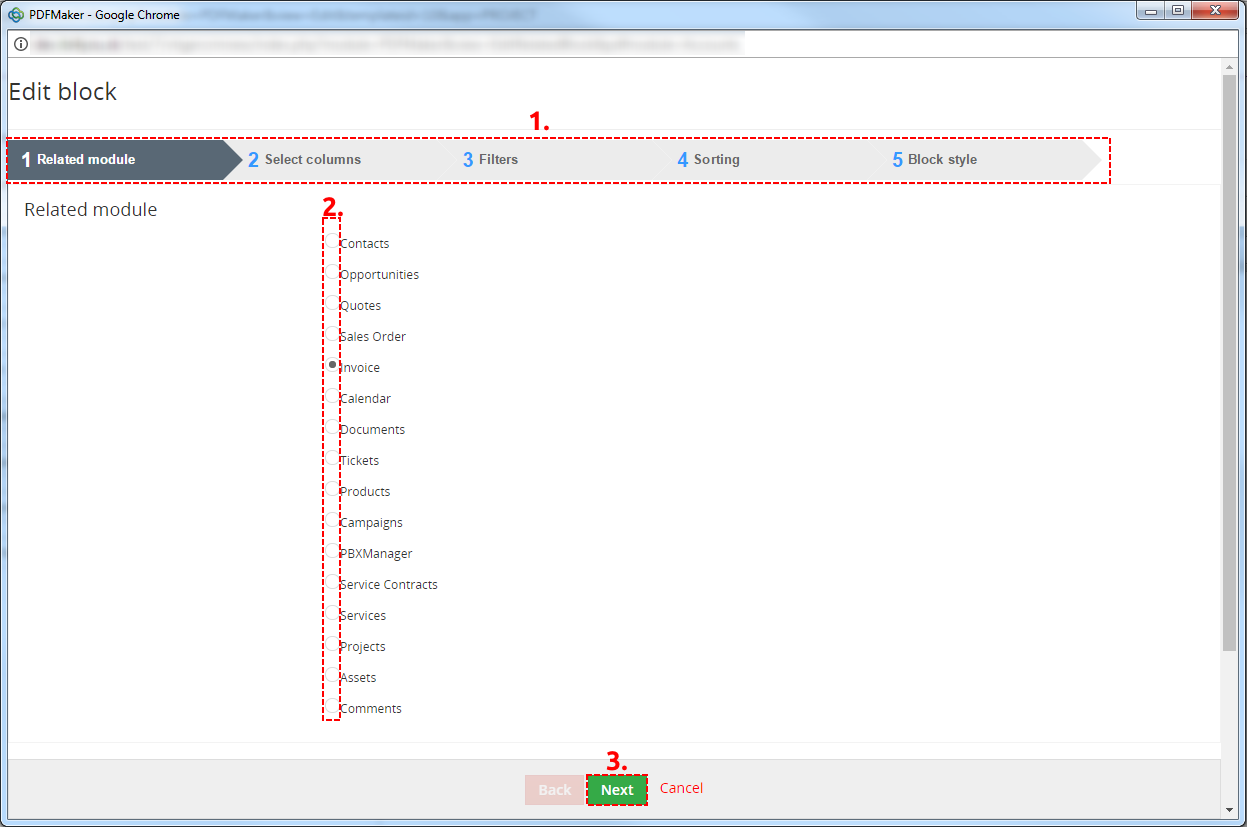
Creation of the related block – step 1
Second step is to select the fields to show in generated PDF template. These fields can be selected from the related modules. It is possible to change an order of the fields and delete it if necessary. Click on to continue.
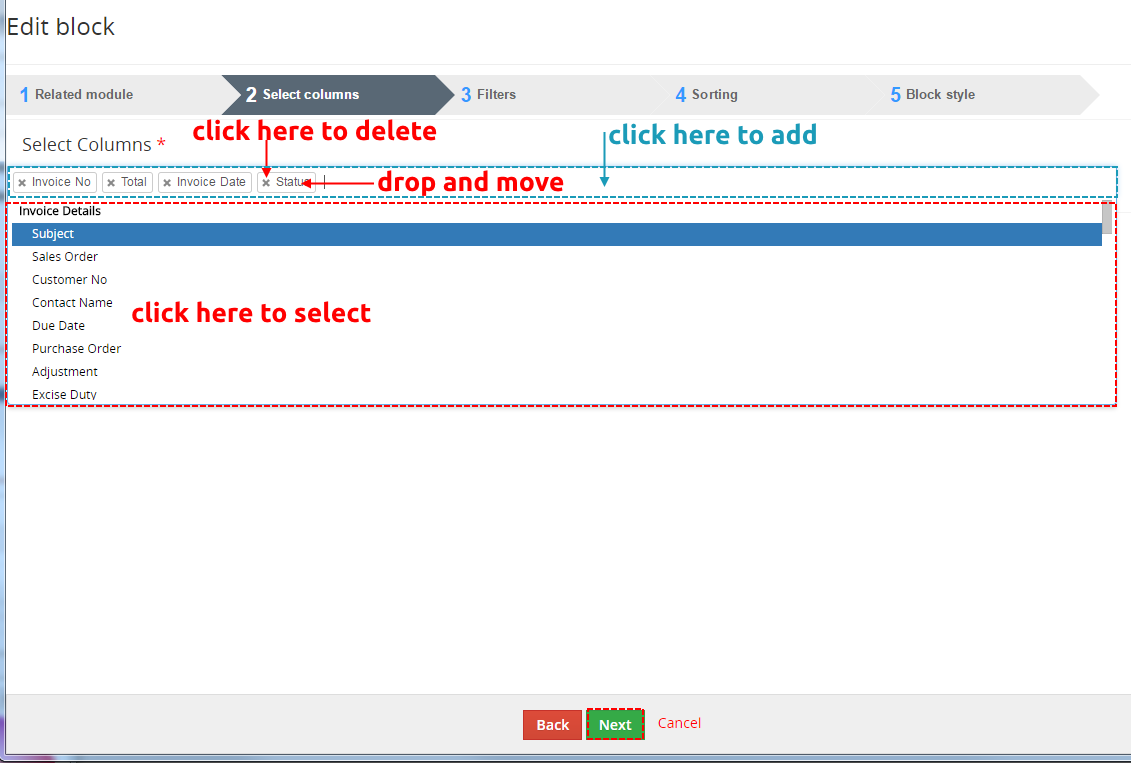
Creation of the related block – step 2
In step 3, we can specify the conditions to filter the results in the template. We can specify conditions in standard or advanced filters. The standard filters have fields like Date & Time fields whereas advanced filters have all the fields from the selected modules where the comparator and condition can be chosen based on type of the selected field.

Creation of the related block – step 3
Within step 4 define fields used for sorting and type of sorting, i.e. ascending or descending sorting. You can define more fields for sorting. Continue to final step via button .
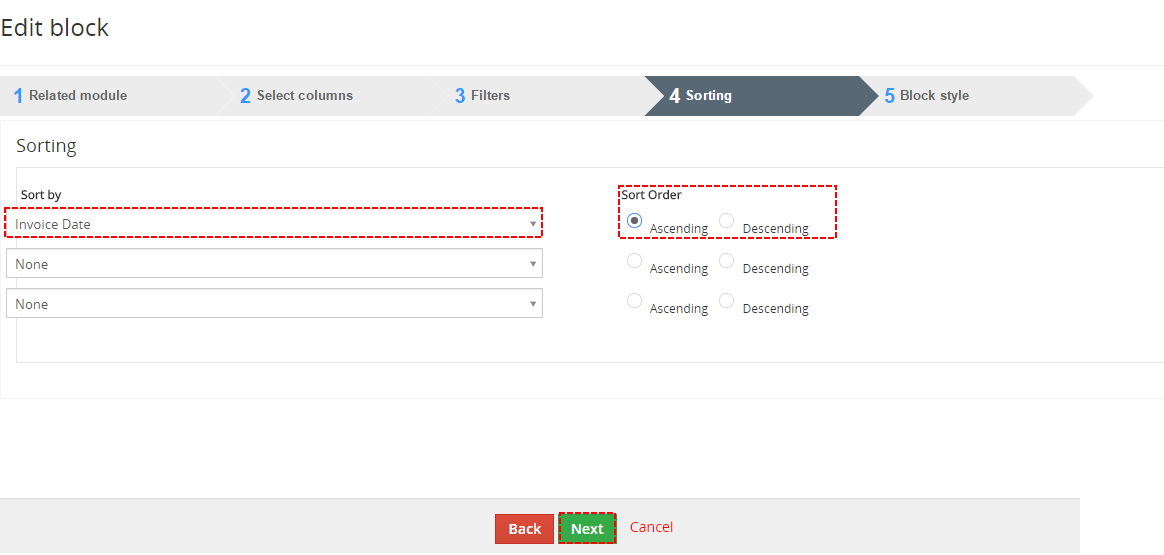
Creation of the related block – step 4
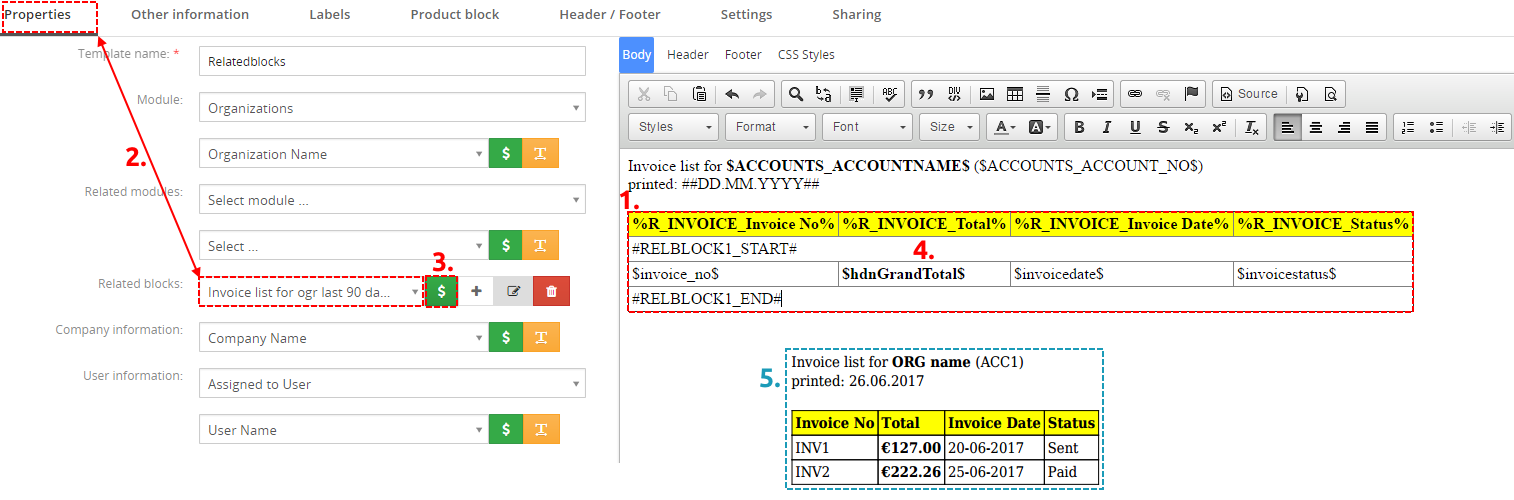
As can be seen in the next picture, related block in form of table is created. Please, write the Name (1.), in CKEditor area (2.) provide some layout/design changes if necessary and click the button to finish.

Creation of the related block – step 5
6.6.2.Insert related block
If the related block is created you can continue with editing your template. In order to insert related block
provide following actions:
- Click to editing area where would you like to have related block.
- Using dropdown list select your related block.
- Click on button.
- Related block is inserted. You can continue with editing of the related block if necessary.
- Example of the final PDF document is shown below.
Insert related block
6.6.3.Edit related block
In order to edit already existing related block, just select it (1.) in the Properties tab and click on  button.

Edit related block
6.6.4.Delete related block
Please provide following simple steps in order to delete related block. Select the related block (Properties
tab) using dropdown list (1.), click on  button (2) and finally confirm deletion (3).
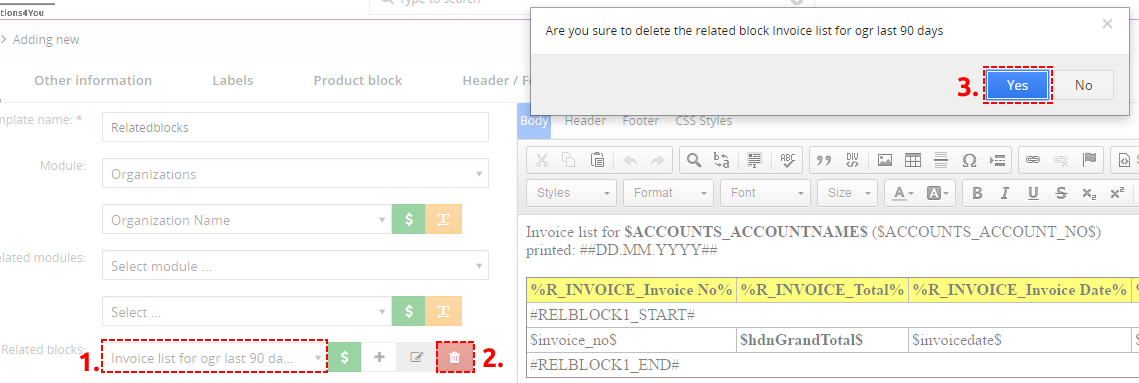
Delete related block
6.7.Using List view block
In case you need a PDF file which consists of the several records and some related fields you can use List view block. Within this block you can simply set which fields of the records you would like to have. Please refer to below picture which shows a simple example of the PDF file consists of the list of invoices and related few fields (invoice number, invoice date, status etc.) and how to prepare it
Firstly, in the PDF Maker Edit view:
- Go to Other infromation tab and select the “Block start” and click .
- Insert fields you would like to have in ListView block ($s-invoice-invoice_no$..).
- Insert “Block end” using button .

List view block – Edit view
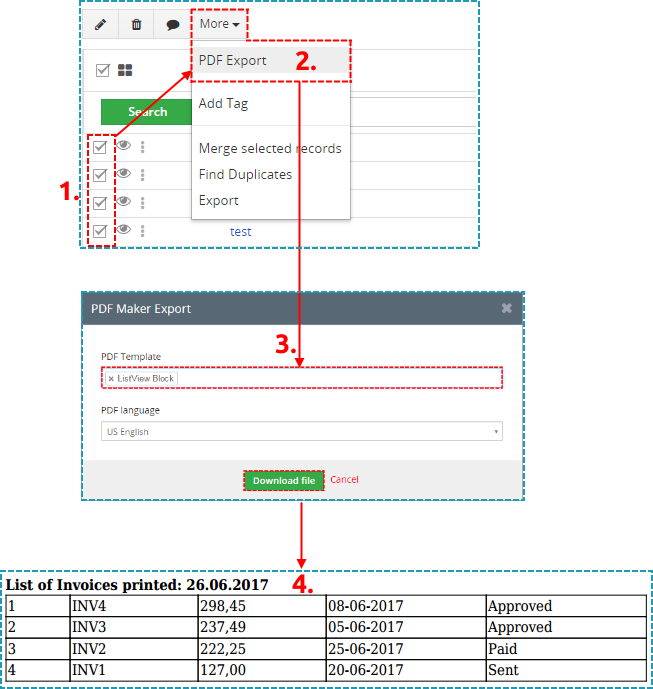
Provide additional edit steps and save the template. When the template is ready you can use it within List view (ONLY!) to prepare mail using following steps:
- Go to List view of particular module and select 1 to N records.
- Click on
 and select PDF Export.
 - Select List view block template (language) and click on
 .
. - Final PDF file with correspondent List view block is created.
List view block
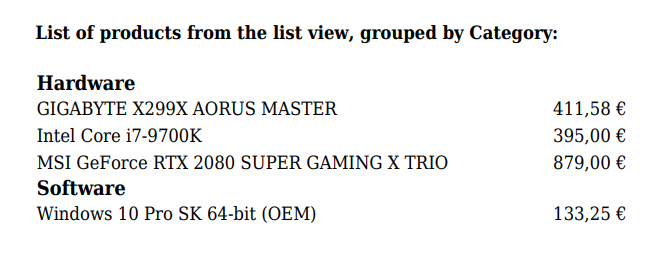
6.7.1.List view group by "x"
Since PDF Maker version 4.5, you can also group list view records by “values/variables”.
It is working via added a variable to the template: [LISTVIEWGROUPBY|Group by label|LISTVIEWGROUPBY]
- Group by label = is replaced with the text you want or variable in our example it will be “PRODUCTS_PRODUCTCATEGORY$”
For example: Products module, group products by Category.
On the image below you see records where 1 record has a Software category and 3 records with Hardware category.

PDF Maker for Vtiger CRM – Products with different category
Firstly, in the PDF Maker Edit view:
- Go to Other information and select the “Block start” and click .
- Next, select the “Group by label” and click .
- Replace the text “Group by label” with your variable, in our case it is: PRODUCTS_PRODUCTCATEGORY$
- Select other variables you want to show in the list.

PDF Maker for Vtiger CRM – Group by label, edit template
Provide additional edit steps and save the template. When the template is ready you can use it within List view (ONLY!).
The result will be:
PDF Maker for Vtiger CRM – List view group by
6.8.Mapping product block with vtiger form
Below picture shows how you can find and use variables during preparation of the PDF template. Although variables have same or similar name you can not mix them if you would like to have correct PDF document.
Please take it into account during preparation of the templates and see short description in following Tables.
Mapping product block with vtiger form
| Name | Description |
|---|---|
| Currency | Euro, Dollar |
| Currency symbol | €, $ |
| Currency code | EUR, USD |
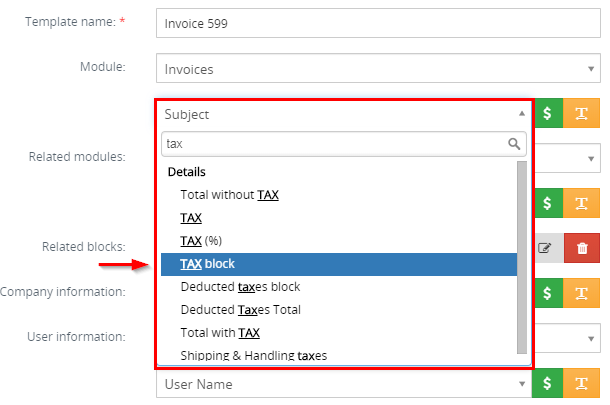
| Subtotal | Price without TAX before discount, by Tax Mode: group = Net Total |
| Total discount | Final Discount amount |
| Total discount (%) | Final Discount in % |
| Total without TAX | Total price without TAX after discount |
| TAX | Total TAX amount |
| TAX (%) | Total TAX in % |
| TAX block | This is useful for some countries, that need to have the detail amount of TAX |
| Charge block | This is useful if you require to have additional charges applied |
| Total with TAX | Total price with TAX |
| Shipping & Handling taxes | Final taxes for Shipping & Handling |
| Shipping & Handling amount | Final amount for Shipping & Handling |
| Adjustment | Adjustment from vtiger form |
| Grand Total | Grand Total from vtiger form |
PDF Maker Other information tab
| Name | Description |
|---|---|
| Record ID | Record ID |
| Product No / Service No | Number of product / service |
| Position | Number of position (1,2,3, …) |
| Currency | Euro, Dollar |
| Currency code | EUR, USD |
| Currency symbol | €, $ |
| Name | Name and description of the product or service |
| Name of product/service | Only the name of the product or service |
| Description of product/service | Description of the product/service from module Product/Service |
| Comment for product/ service | Comment for products/service from Invoice/SO/PO/Q form |
| Quantity | Quantity defined in Invoice/SO/PO/Q |
| Unit | Unit of product/service from module Product/Service |
| List price | List Price from Invoice/SO/PO/Q |
| Total price | List price x Unit |
| Discount | Discount amount for each product/service |
| Discount (%) | Discount in % for each product/service |
| Total after discount | Total price after discount without TAX |
| TAX | TAX amount for each product/service |
| TAX (%) | TAX in % for each product/service |
| Total price with TAX | Total price with TAX for each product/service |
Mapping values for product block template item available in Invoices, Quotes, Sales Orders and Purchase Orders
6.8.1.Tax block
Tax block is a useful feature of PDF Maker if you need see all taxes you are using in your Invoices, Quotes and other modules which are using item details blocks.
You can manage your taxes in Vtiger CRM settings under INVENTORY – Tax management.
How to add Tax block to your PDF Maker template
- Go to your module for example we can use Invoice module
- Set the tax you need
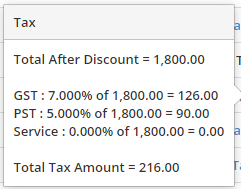
- If tax is added to your Invoice then go to your PDF Maker template
- In the template edit window add tax block via module variables
- The tax block is added to your template now and you can see block like this:

You can change the style of tax block if you know HTML and CSS via source code of template or remove, add columns (for example, many customers are removing Sum columns).
- Tax block was added to the template and this is the Export final preview of Invoice:

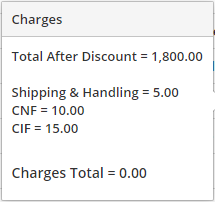
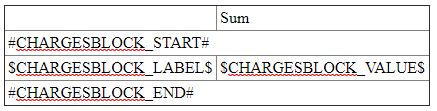
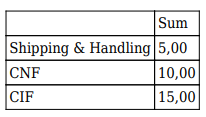
6.8.2.Charges block
Charges block is a useful feature of PDF Maker if you need have additional charges for your Invoices, Quotes and other modules which are using item details block.
You can manage your Charges in Vtiger CRM settings under INVENTORY – Tax management – Charges (& its taxes) tab.
How to add Charge block to your PDF Maker template
- Go to your module for example we can use Invoice module
- Set the charges you need (You can do this in Tax management too)
- If charges are added to your Invoice then go to your PDF Maker template
- In the template edit window add charge block via module variables
- The charges block is added to your template now and you can see block like this:
You can change the style of charge block if you know HTML and CSS via source code of template or remove, add columns (for example, many customers are removing Sum columns or changing the columns title).
- Charges block was added to the template and this is the Export final preview of Invoice with Charges block:
6.9.Template settings
6.9.1.File name
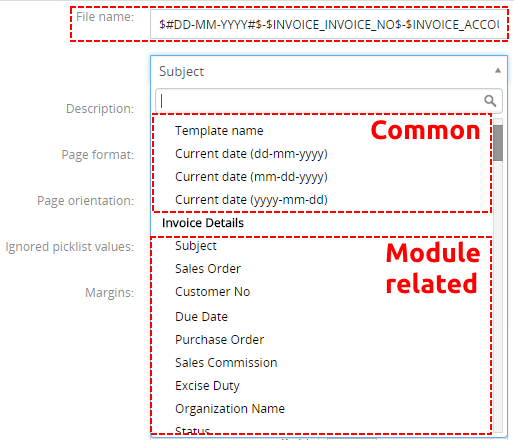
In Settings tab of PDF Maker you can find “File name” definition. This setup gives you the opportunity to set the name of generated PDF files according to your needs. You can combine strings, modules variables and some standard variables like Template name, Current date. File name will be used by saving PDF file into Documents and by sending PDF as attachment too. Dropdown list for file name depends on primary module as can be seen on the below image.
File name settings
6.9.2.Status
You can set status as active or inactive for each template. Please take into account that this can be set separately per logged user, it means this setting is not global. The inactive templates will not appear in the list of available templates in the PDF maker block. You can find status of existing templates in:
- ListView – “Status” column
- DetailView – Template information
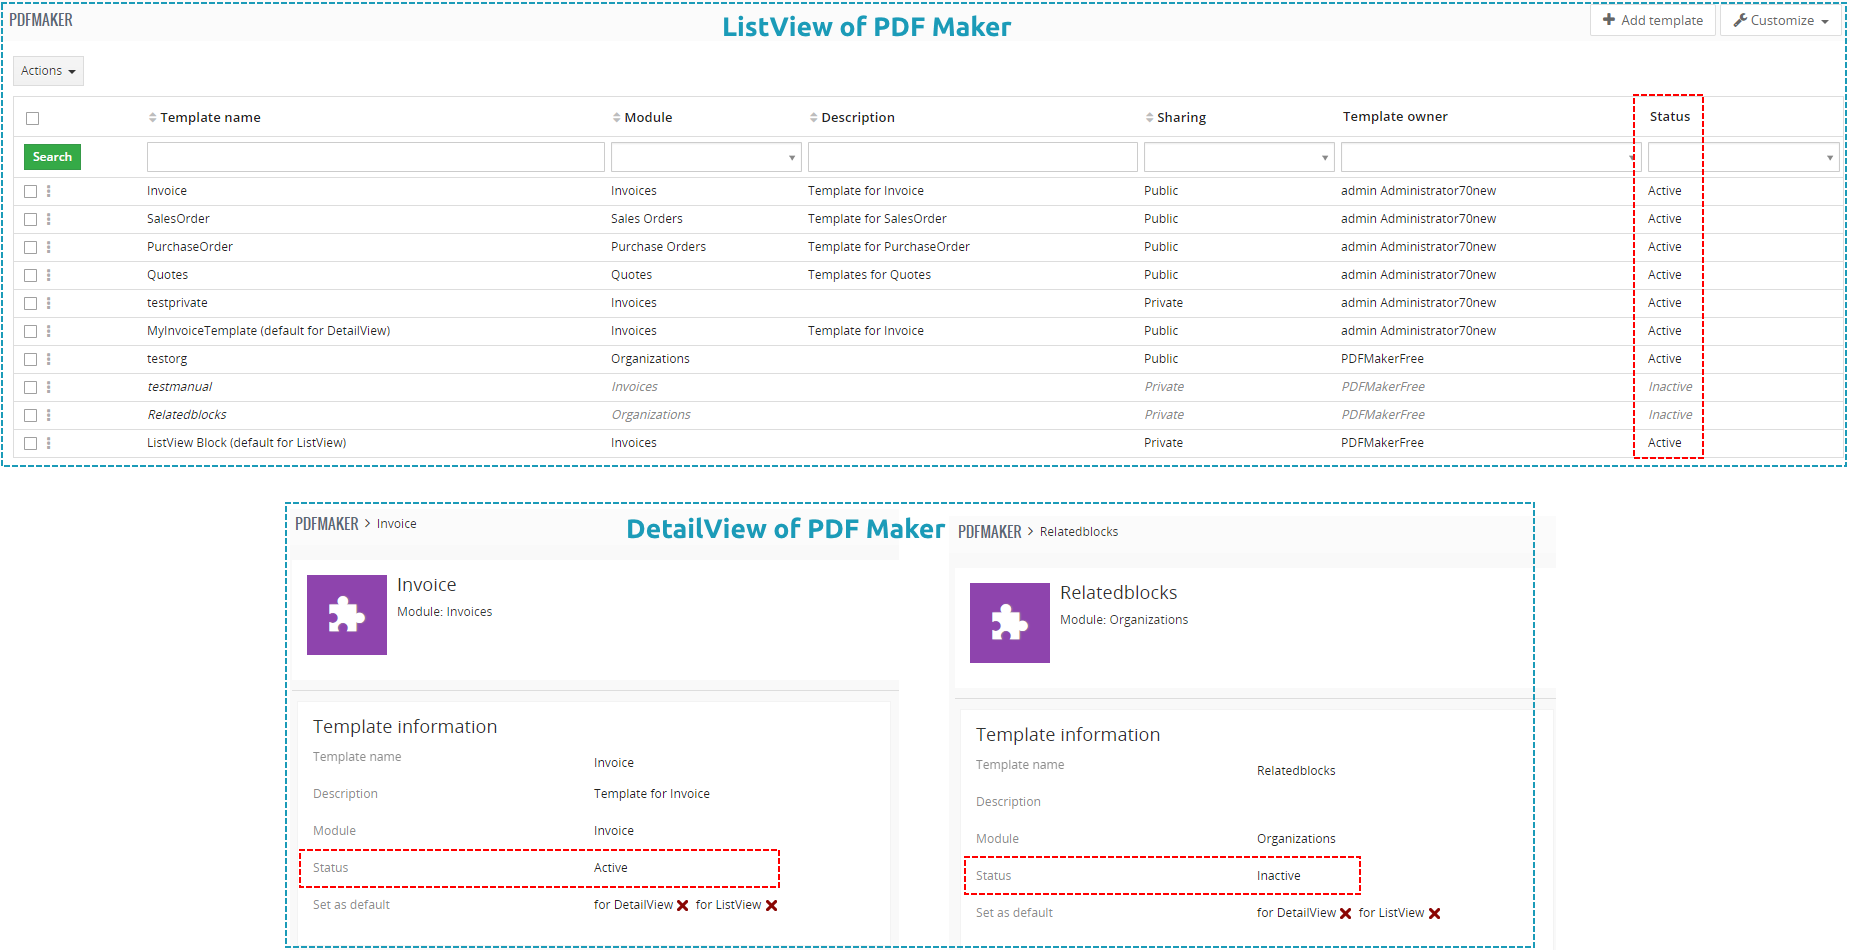
Status of template in ListView and EditView
To set PDF template as active / inactive you need to use Settings tab in EditView and select status from listbox.
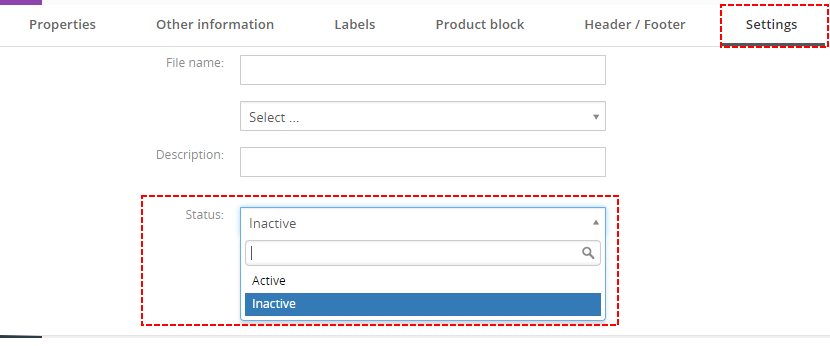
How to set status of PDF template
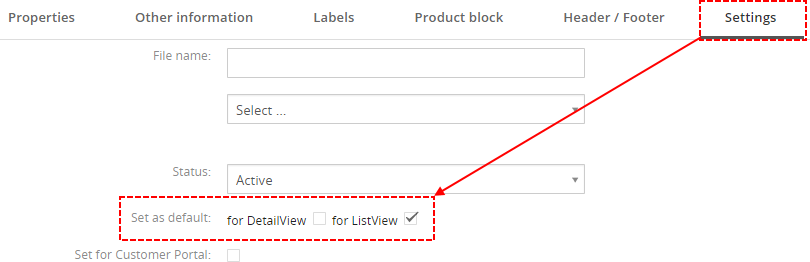
6.9.3.Set as default
The particular PDF Template can be set as default by a logged user, it means this setting is not global. This default template is specific to that user and to that module. It means that different users can set their own default templates for each module separately. It is possible to define template as default for DetailView and default for ListView separately. You can find whether the template is set as default or not in:
- ListView – the template default for DetailView is marked with text “(default for DetailView)”, template default for ListView is marked with text “(default for ListView)”. If the template is default for DetailView as well as for ListView, then in the template name column text “(default)” is written.
- DetailView – Properties tab
- PDF Maker block – the default template is highlighted and automatically selected in PDF Maker block. PDF template is also highlighted and selected in case that only one PDF template exists for module.

The default template in the PDF Maker block
To set PDF template as default you need to use Settings tab in EditView – check/uncheck the checkboxes to change this setting separately for EditView and ListView.
Setting default PDF template
Please take into account that templates using ListView block cannot be in parallel set as default for DetailView. The checkbox “for DetailView” in “Settings” tab is automatically inactive if you check checkbox “ListView block” in “Properties” tab

Setting default vs. ListView block
6.9.4.Watermark
Since PDF Maker 700.5.0, there is very useful functionality to set Watermark available. You can use image as well as text.
Text also should be static or dynamic based on module or related modules variables.
To set Watermark please provide following steps:
- Open your template in EditView and open Properties tab

Watermark – PDF Maker Vtiger 7
- Now choose image or text
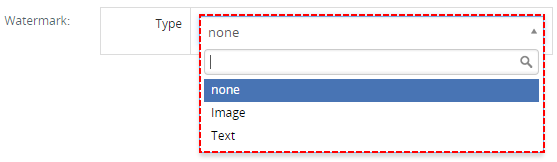
Watermark type – PDF Maker Vtiger 7
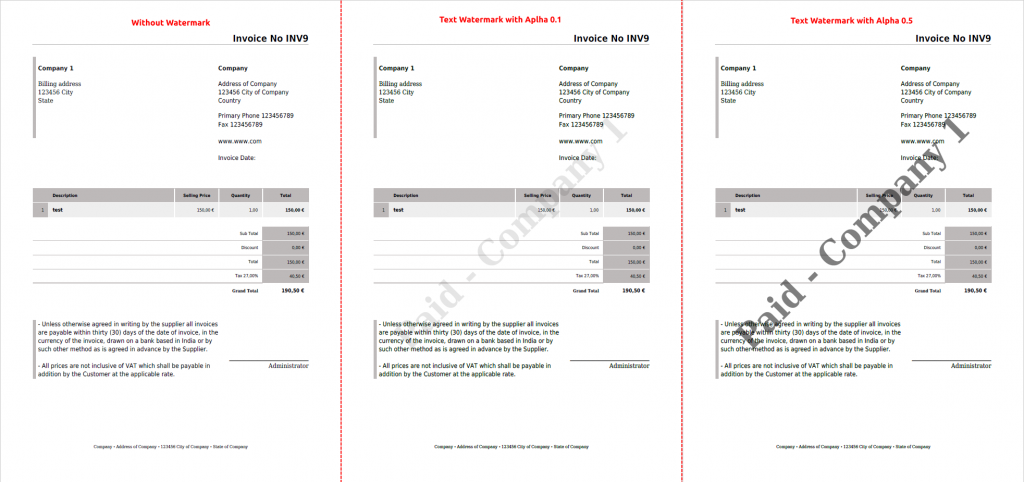
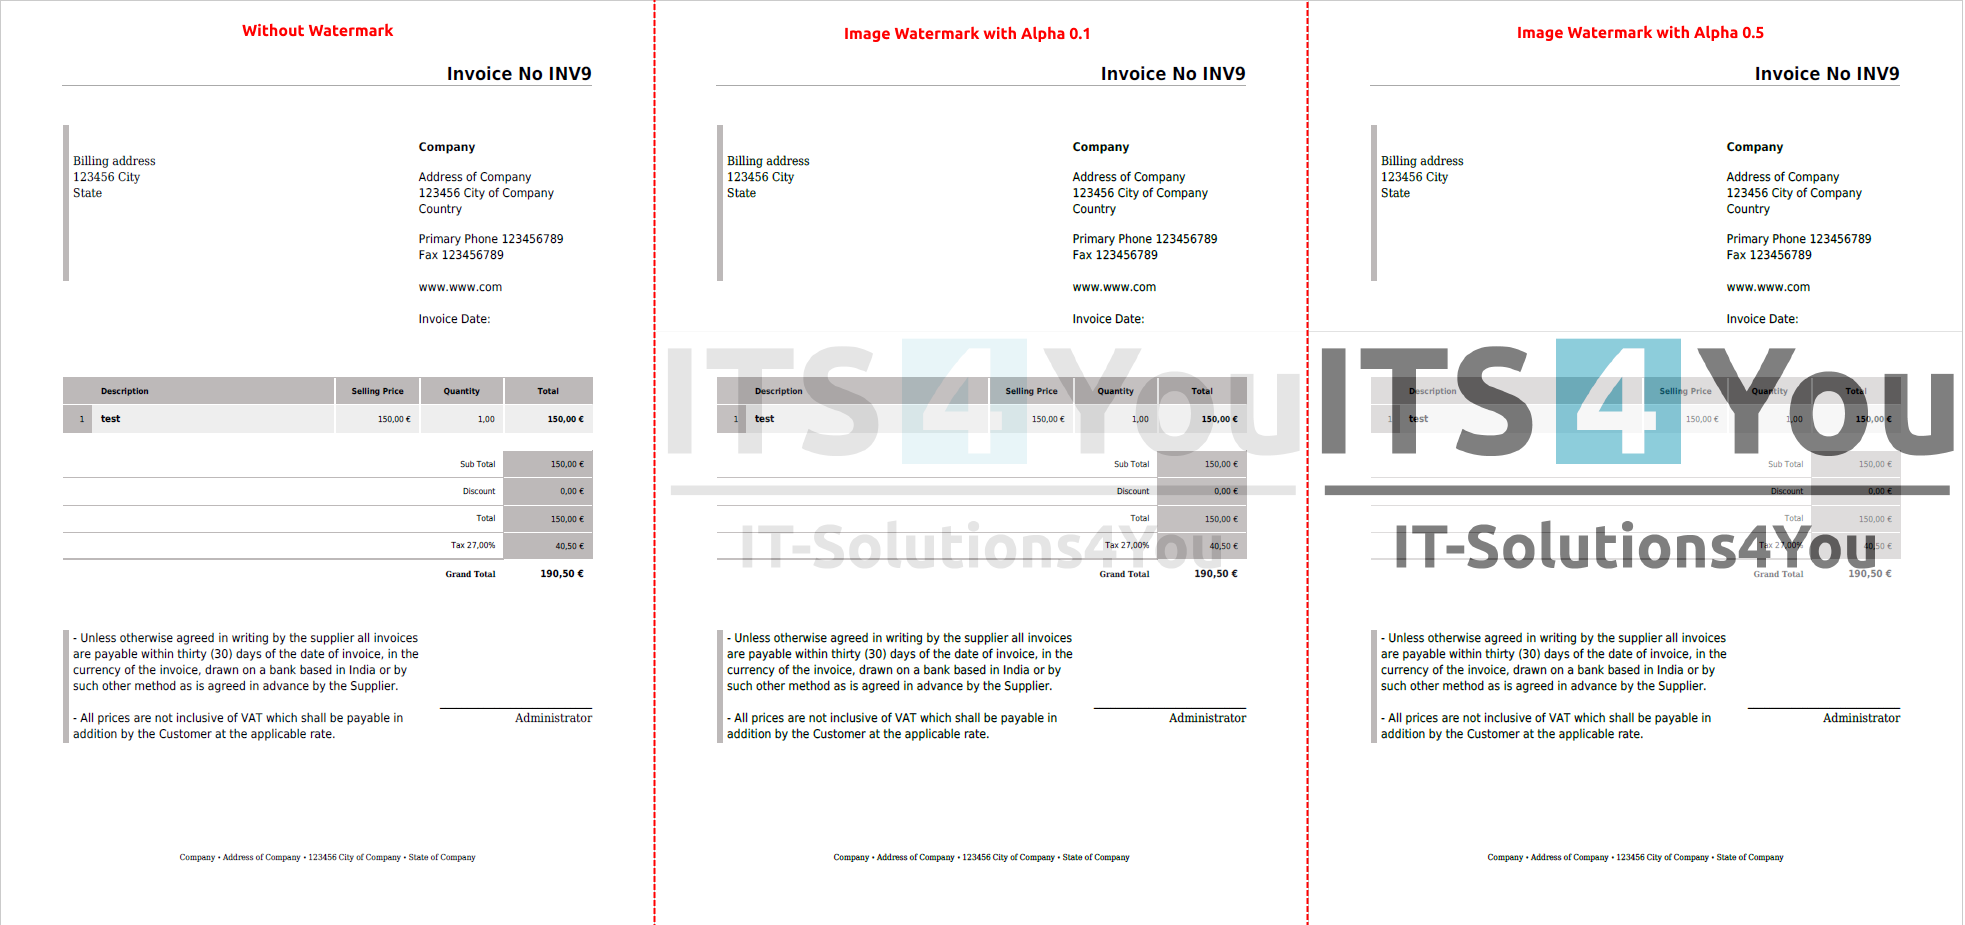
- If you select image, please upload your image and set Alpha (The Alpha property specifies the opacity/transparency of an element).
Default Alpha is 0.1 and possible values are from 0.1 to 1.0.
Image Watermark – PDF Maker Vtiger 7
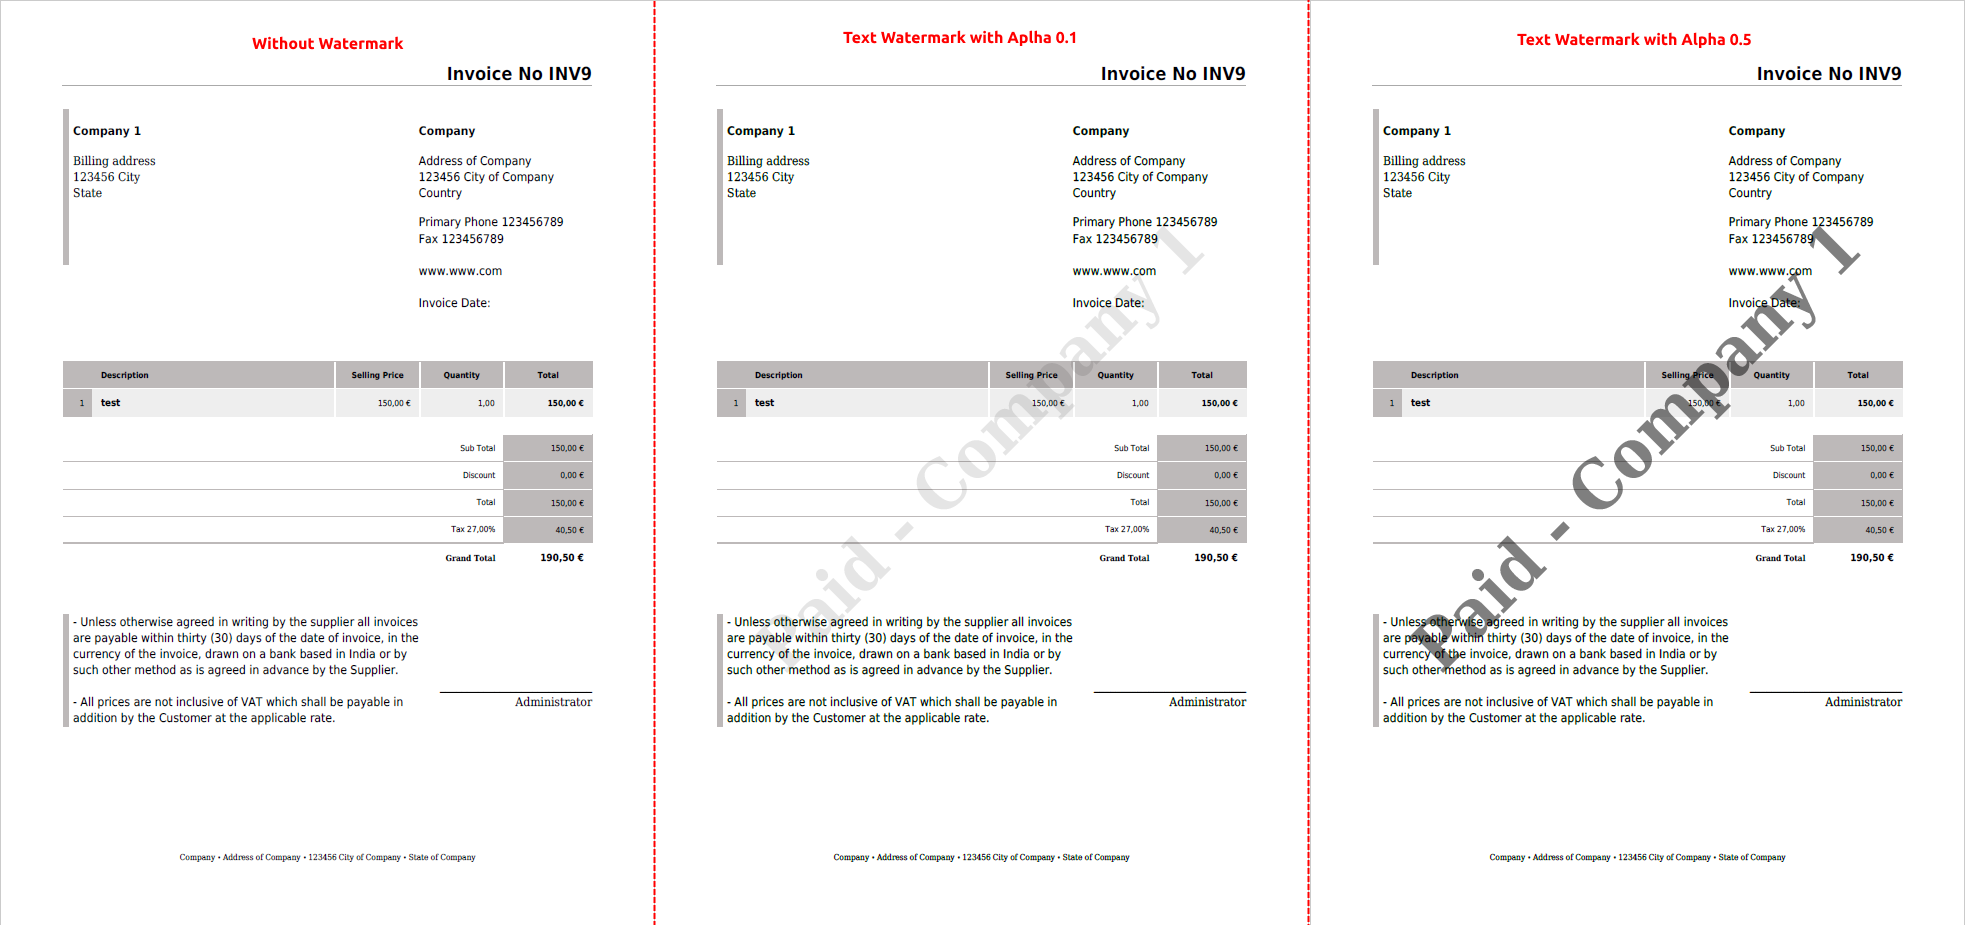
- If you select text you can set static text or dynamic based on values of module or related modules.
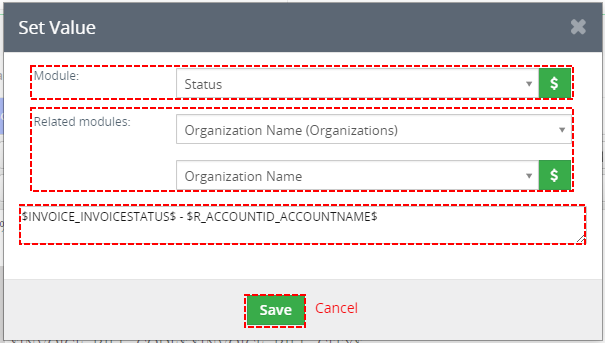
Watermark text setting – PDF Maker Vtiger 7
And also you can set Alpha property.
Watermark text – PDF Maker Vtiger 7
- If you select image, please upload your image and set Alpha (The Alpha property specifies the opacity/transparency of an element).
6.9.5.PDF Password
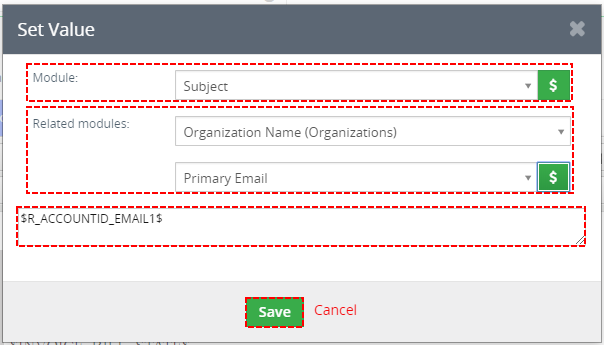
Since PDF Maker 700.5.0, there is also other very useful functionality to lock your PDF File with password. You can use static or dynamic password based on module or related modules variables.
To lock your PDF file please provide following steps:
- Open your template in EditView and open Settings tab

PDF password – PDF Maker Vtiger 7
- You can set static password or dynamic password based on values of module or related modules.
PDF password – PDF Maker Vtiger 7
For example, there is primary mail of Organization used like Password.
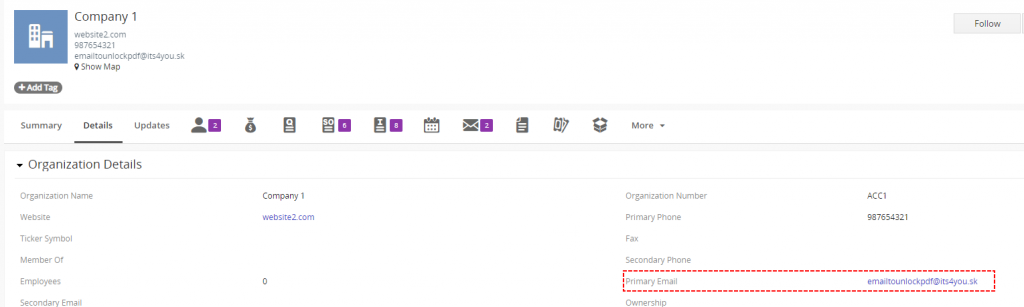
Organization mail like PDF password – PDF Maker Vtiger 7
To open your PDF file you need use Primary email of related Organization.
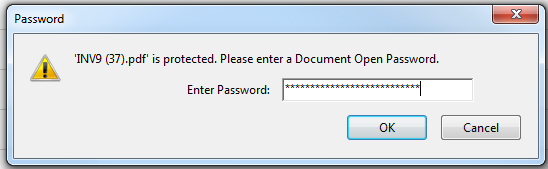
Organization mail like PDF password – PDF Maker Vtiger 7

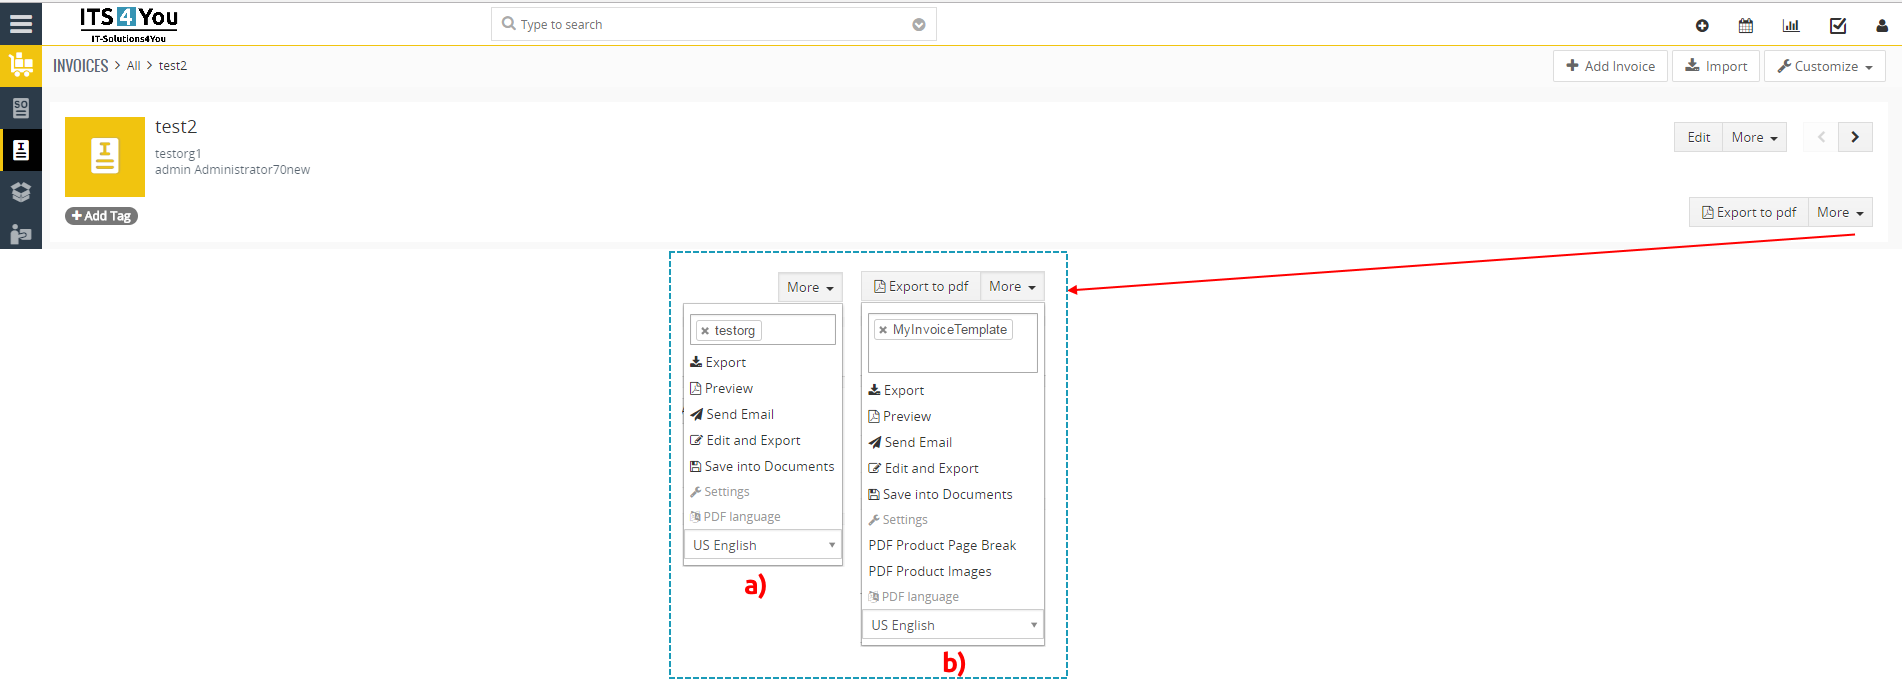
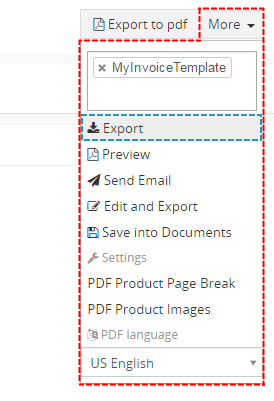
7.PDF Maker block actions
The PDF Maker block contains links to initiate several actions:
- Export
- Preview
- Send Email
- Edit and Export
- Save into Documents
- Settings
- PDF Product Page Break
- PDF Product Images
- PDF language
You can find description of above actions in the following sections. Please take into account that visibility of above links within PDF Maker block depends on user profile.
7.1.Export
The export of your documents/records to PDF files is the basic action of PDF Maker block.
- Go to the detail view of given Module and on the ride side of DetailView, click on button and in the PDF Maker block, choose your PDF Template. The template is selected automatically in case the only one exists for given module or in case the default template is already defined.
- Click on Export and export will be done. Please note that next step depends on used web browser.
Export to PDF
Preview of PDF Maker
7.2.Preview
- Go to the detail view of given Module and on the ride side of DetailView, click on button and in the PDF Maker block, choose your PDF Template. The template is selected automatically in case the only one exists for given module or in case the default template is already defined.
- Click on Preview and Preview window will appear. Here you can also find helpful options like Download file, Print, Send Email, Edit and Save into Documents.
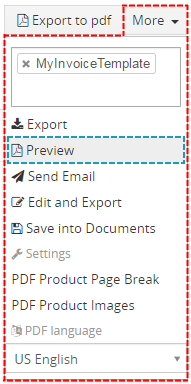
Preview of PDF file
7.3.Send Email
PDF Maker allows you to send your PDF documents via email in few easy steps:
- Go to the detail view of given Module and on the ride side of DetailView, click on button and in the PDF Maker block, choose your PDF Template. The template is selected automatically in case the only one exists for given module or in case the default template is already defined.
- Click on Send Email.
- A popup window “Compose Email” will appear on the screen with already attached PDF file. Please add subject and text according to your needs. You can add additional recipients if necessary as well.
- Click on
 button to send email with attached file(s).
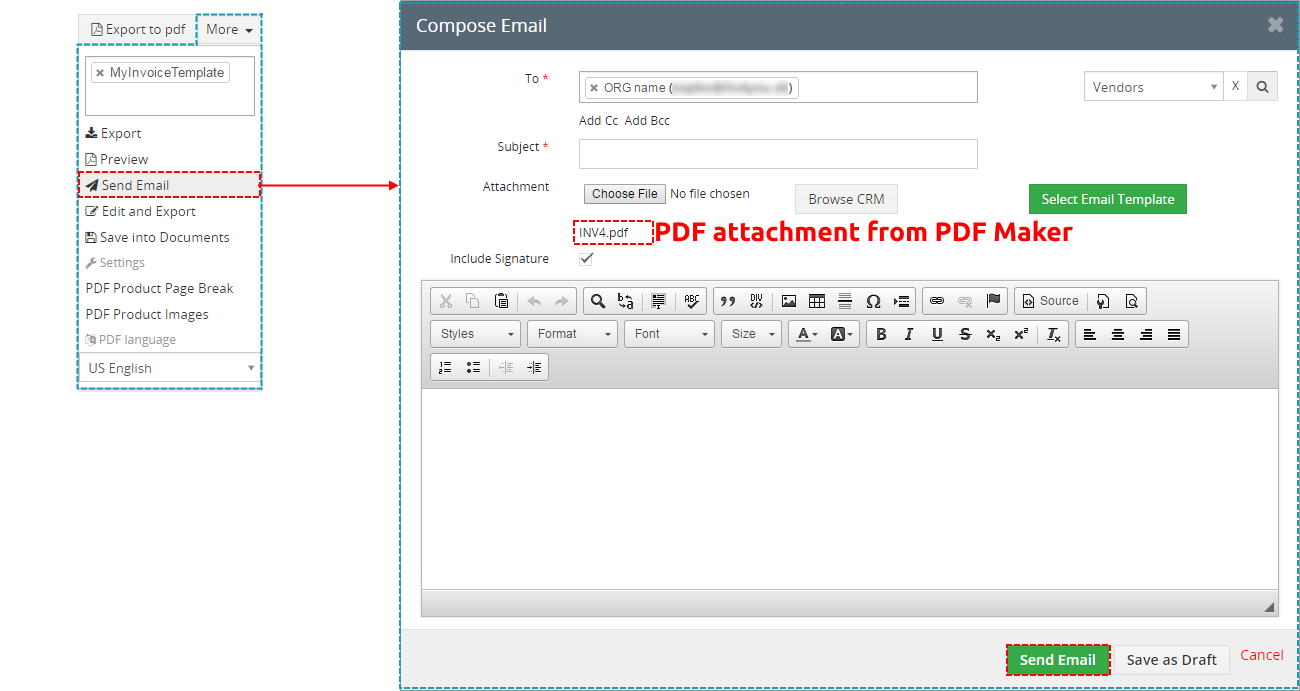
Send Email with PDF – Compose E-Mail
7.4.Edit and Export
From time to time it is necessary to edit your document before print or save. For example, you can change post address in one document but don’t want to change record in database because it is temporary necessity. In that case you can choose Edit and Export action item which gives you possibility to change not only layout of the document/template but in addition any text. In order to edit and export PDF file:
- Go to the detail view of given Module and on the ride side of DetailView, click on button and in the PDF Maker block, choose your PDF Template. The template is selected automatically in case the only one exists for given module or in case the default template is already defined.
- Click on Edit and Export link.
- A popup window with template will appear in the screen. You can start to modify your document now.
- Click on to export the final PDF file.
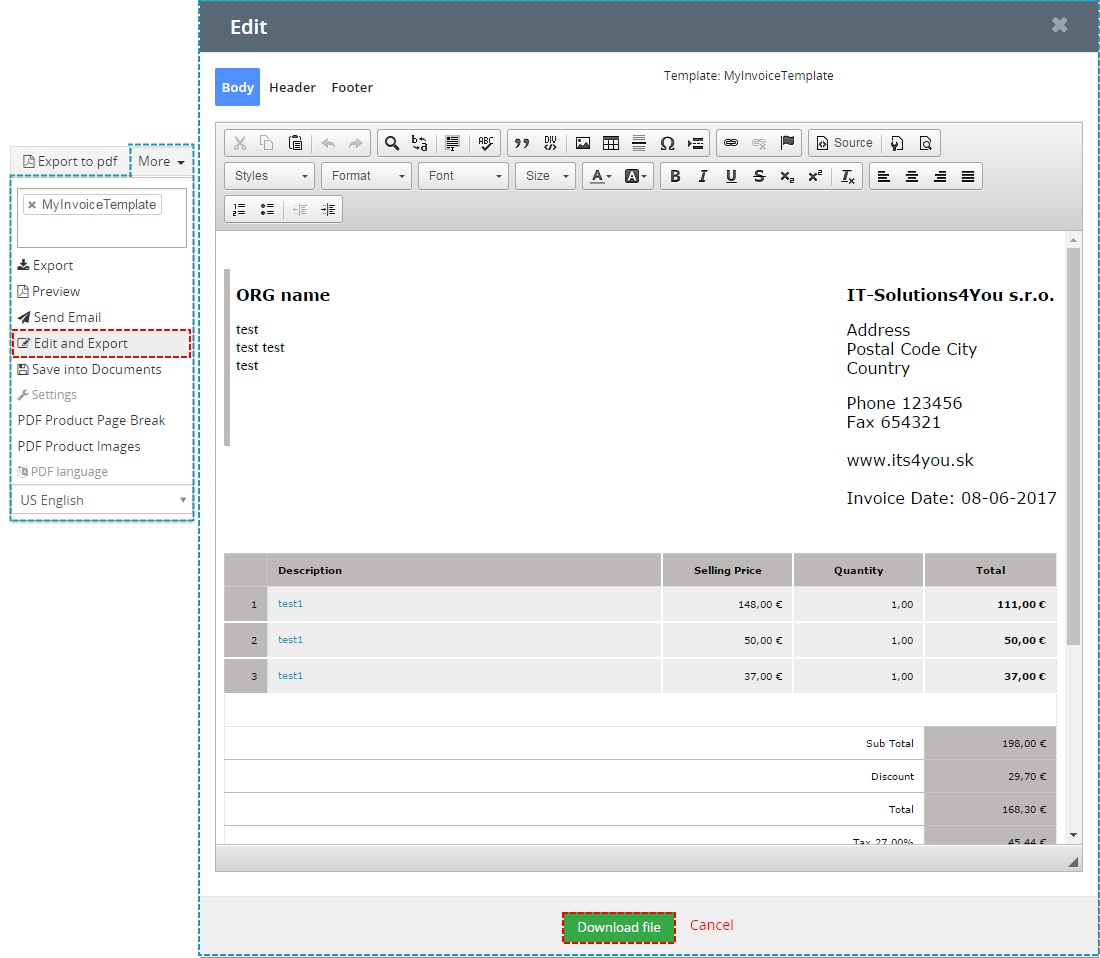
Edit and export to PDF
7.5.Save into Documents
You can save the template or merged templates into the module Documents using following steps:
- Go to the detail view of given Module and on the ride side of DetailView, click on button and in the PDF Maker block, choose your PDF Template(s). The template is selected automatically in case the only one exists for given module or in case the default template is already defined.
- Click on Save into Documents link. A popup window will appear on the screen.
- In the part “Documents” please write the title of the document and select the storage folder. You can also add a note.
- Click on
 button to save the PDF file into Documents.
 - After that the document can be find under module Documents.
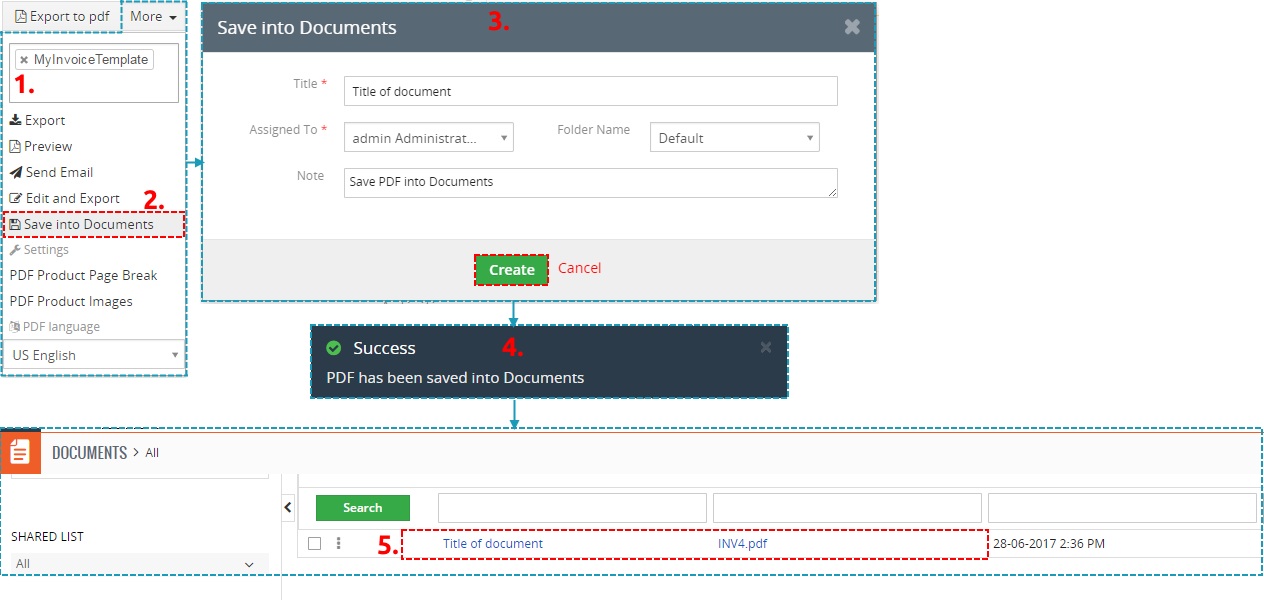
Save PDF into Documents
7.6.PDF Product Page Break
Product blocks are available for some modules (Invoice, SO, PO, Q). PDF Product Page Break action allows
you to setup additional settings according your needs. You can define:
- A position of the page break. The page break will be inserted after each selected product (blue line)
- Show table header after page break – a repetition of the table’s header on the next page (red line)
- Show subtotal before page break – a subtotal value at the end of the page (before page break) (yellow line)
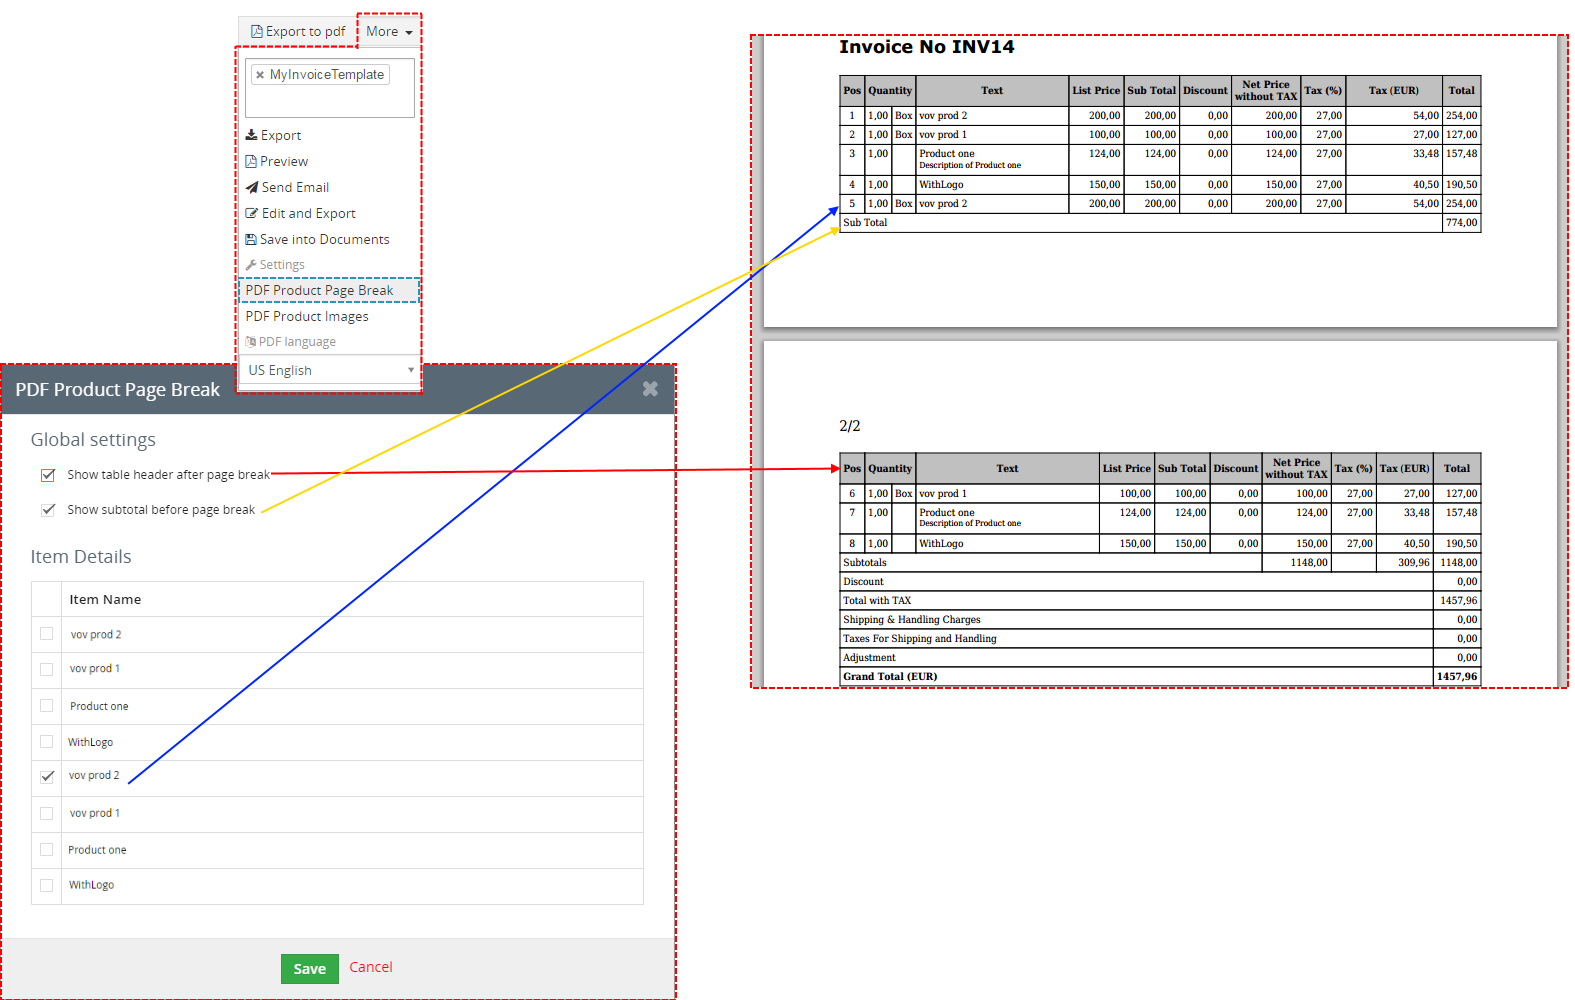
Product break settings
Also good option is modify subtotal before page break. You can edit it if you edit #PRODUCTBLOC_START# in your template.
Edit page break subtotal
7.7.PDF Product Images
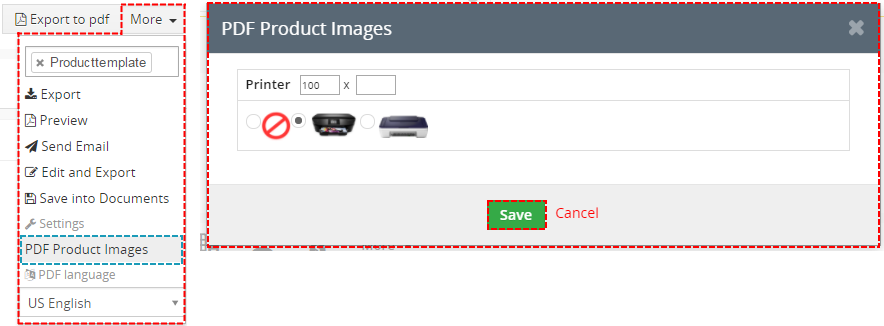
PDF Product Images action allows you to define some settings related to product images:
- used for product templates
- used inside product blocks
![]() Note: Please update your PDF Maker to version 700.13.2 in order to use this feature without any issues.
Note: Please update your PDF Maker to version 700.13.2 in order to use this feature without any issues.
This version was uploaded on 16 December 2019.
7.7.1.PDF Product Images in product templates
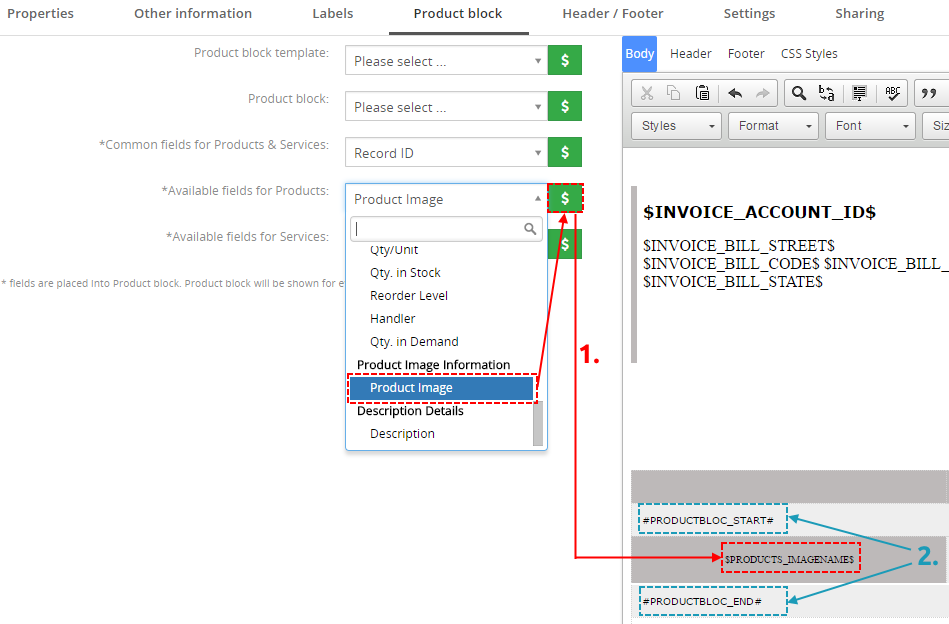
The link PDF Product Images is useful in case you are using more images for one product and you would like to select which image has to be used within your PDF exported files. Let’s suppose that variable $PRODUCTS_IMAGENAME$ is used in the template. In order to select which image will be used please provide following steps:
- Go to the detail view of given Module and on the ride side of DetailView, click on button and in the PDF Maker block, choose your PDF Template(s). The template is selected automatically in case the only one exists for given module or in case the default template is already defined.
- Click on PDF Product Images link.
- PDF Product Images window will appear on the screen.
- Select the picture and click on
 button.
PDF Product Images in product templates
Depending on your selection 4 different situations can happen:
- If more pictures are available only selected picture will be used.
- If only one picture is available it is used automatically.
- If picture is not available then no changes will be visible in the final document.
- In case you don’t want to use picture you are able to switch it off.
![]() Note: Please update your PDF Maker to version 700.13.2 in order to use this feature without any issues.
Note: Please update your PDF Maker to version 700.13.2 in order to use this feature without any issues.
This version was uploaded on 16 December 2019.
7.7.2.PDF Product Images in product blocks
![]() Note: Please update your PDF Maker to version 700.13.2 in order to use this feature without any issues.
Note: Please update your PDF Maker to version 700.13.2 in order to use this feature without any issues.
This version was uploaded on 16 December 2019.
The PDF Product Images also allows defining images which will be used in final exported PDF files within product blocks.
- Start editing of your PDF template. Go to the Product block tab, from “Available fields for Products” select “Product Image” and click on button.
- As can be seen below, it is required to insert the variable $PRODUCTS_IMAGENAME$ between #PRODUCTBLOC_START# end #PRODUCTBLOC_END#.
PDF Product images
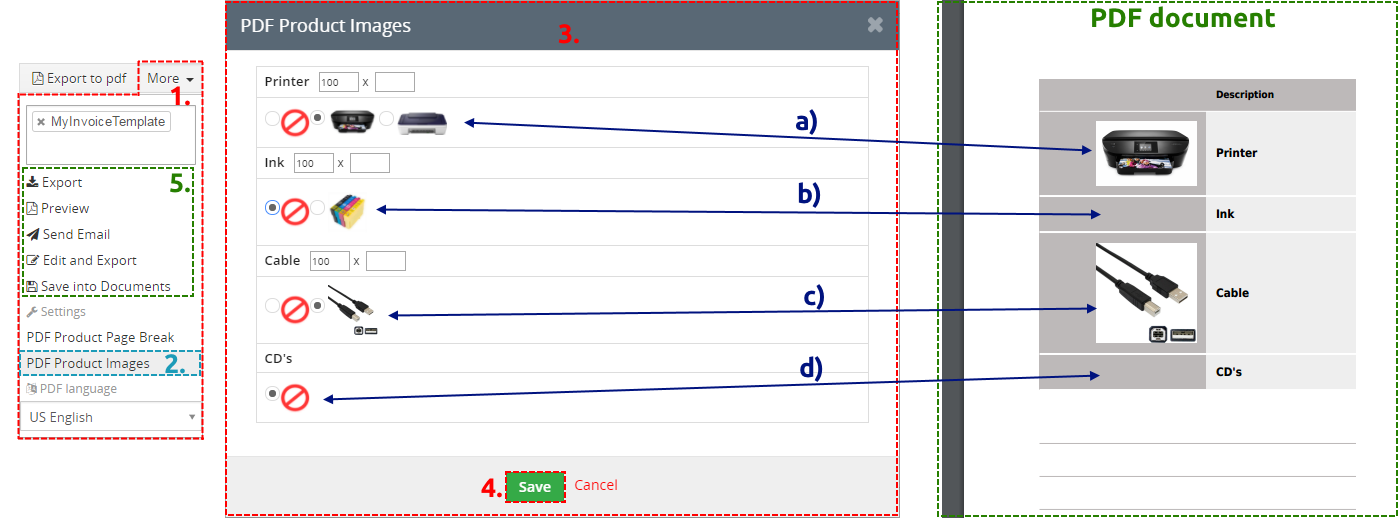
Let’s assume that your PDF template including product image variable is correctly prepared and saved. In order to apply PDF product images settings:
- Go to the detail view of given Module and on the ride side of DetailView, click on button and in the PDF Maker block, choose your PDF Template(s). The template is selected automatically in case the only one exists for given module or in case the default template is already defined.
- Click on PDF Product Images link.
- A popup window “PDF Product images” will appear on the screen. It displays all available pictures for each product from the selected record (for example invoice). The system selects automatically the first available picture but you can select which picture will be used in final PDF document, as well as its size. Depending on your selection 4 different situations can happen:
- If more pictures are available only selected picture will be used.
- In case you don’t want to use picture you are able to switch it off.
- If only one picture is available it is used automatically.
- If picture is not available the cell in the PDF document remains empty.
You can also set a width or height for the generated images. If you leave one of the parameter fields empty, the size of image will be proportional. If you leave both parameter fields empty, the image will be displayed in its original size.
- Click on button to save your setting.
- Now, PDF product images settings are saved and will be used for additional actions, like export to PDF, send email with PDF etc.
PDF Product images settings
8.Compatibility with other Extensions
PDF Maker can also work with our other extensions.
This greatly expands the use of PDF Maker, which brings users more benefit from the extension itself. In the next chapters, we will show you and describe in detail extensions that work with PDF Maker, or in other words, extensions that would not work without PDF Maker.
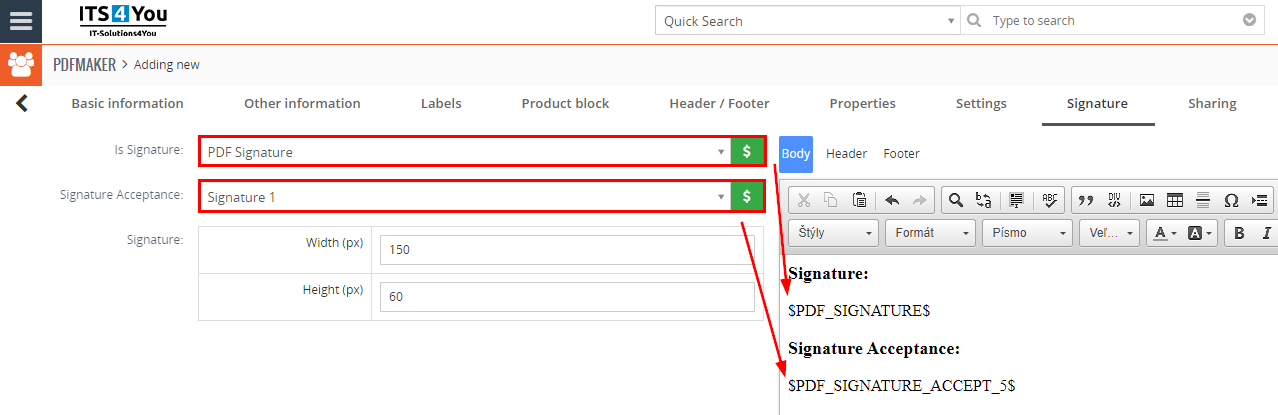
8.1.PDF Signature
PDF Signature works only with our PDF Maker, where signature variable is placed in to the template.
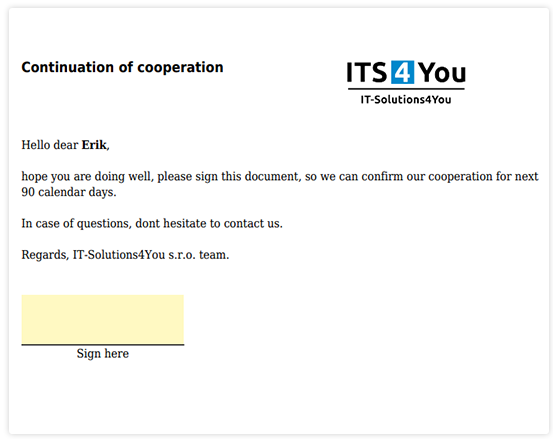
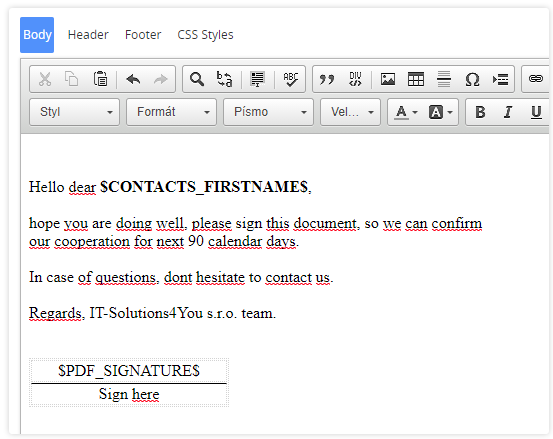
- Variable $PDF_SIGNATURE$ can be placed anywhere in the PDF template.
(variable can be found in PDF Maker template editor under Other Information tab). - You can define Width (px) and Height (px) of signature in PDF Maker template Settings.
- A signature will be presented in every template exactly where you placed it.
- The highlighted area indicates where the signature will be located.
For more detailed information how PDF Signature works, please visit a PDF Signature main page.
PDF Signature for Vtiger CRM
PDF Signature for Vtiger CRM – PDF Maker template
8.1.1.Signature Acceptance
This feature was added in version PDF Maker 4.49 on June 2023.
- Users or Admin can create Signatures in form of Image and then load them into the PDF Maker Templates
- This can be used for PDF Signature extension, the Acceptance Signature process
- With this feature both sides can agree on Document send via Email form
PDF Maker – Signature tab
Users can create an Acceptance Signatures from the PDF Maker template list view, by going to Customize – Signatures:
PDF Maker – Settings – Signatures
We will explain step by step how this process works:
- Firstly, create a Template or use an existing template in PDF Maker, for module which supports PDF Signature.
(As a demonstration we will use a Contacts module) - If you are using standard Signature variable as $PDF_SIGNATURE$ now, you can also add a PDF_Signature_ACCEPT variable to Acceptance Signature process. But firstly you need to create this signature as an Image.
- Navigate to PDF Maker list view, click on
 button and then select Signatgures.
 - Click on the
 button, upload the Signature Image, and you can also define size of it. We suggest use size 150×60.
Confirm via Save button.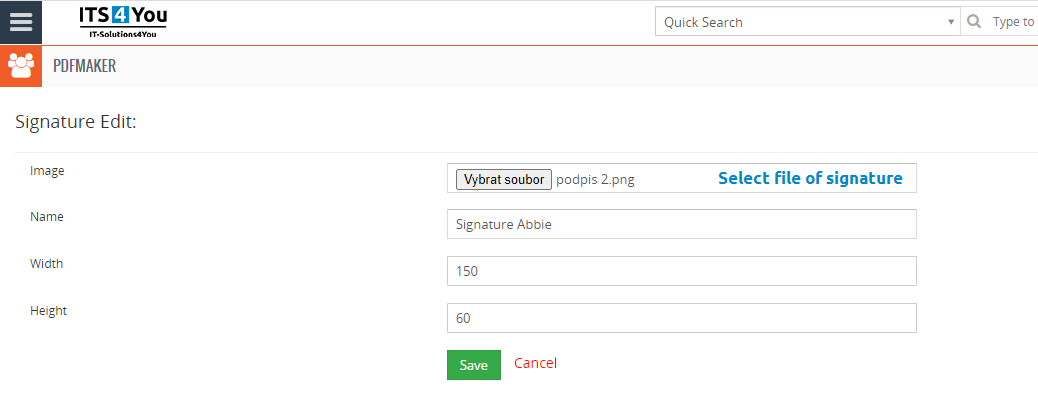
PDF Maker – Creation of Acceptance Signature
- Now when we created an Image Acceptance Signature, you can use it in the template.
Navigate to your Template, select Signature Tab, and under Signature Acceptance you can find your Image Signatures, simply enter variable to the template: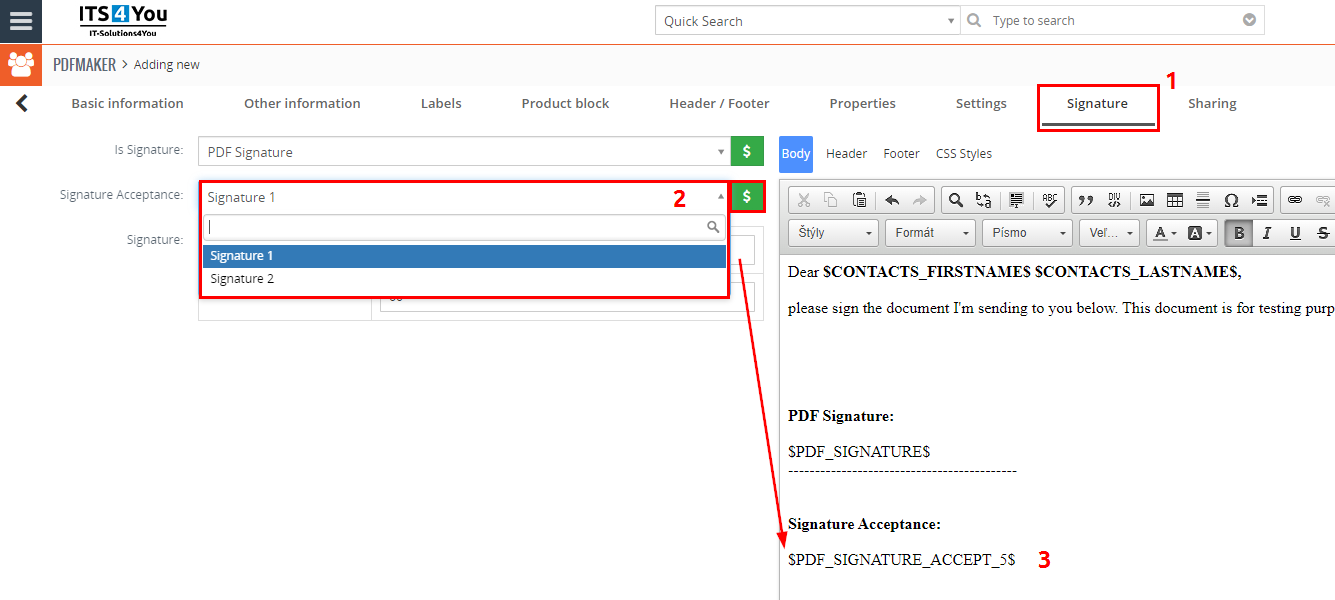
PDF Maker – adding Acceptance Signature variable
- Now head to the record detail view which you need to Sign, we selected the Contact module.
Click on More and then Send to Signature: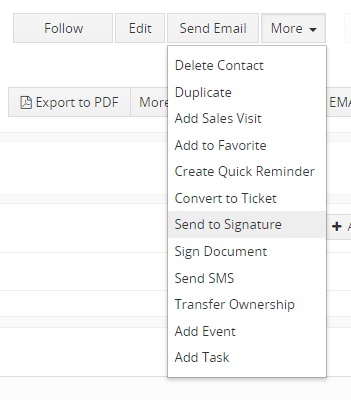
PDF Signature – Acceptance Signature
- Follow the standard Signature process, select the Contact Email, Email Message and then Send Signature Email.
- The recipient will receive an email with a signature, which he will review and then sign with his own signature and confirms it.
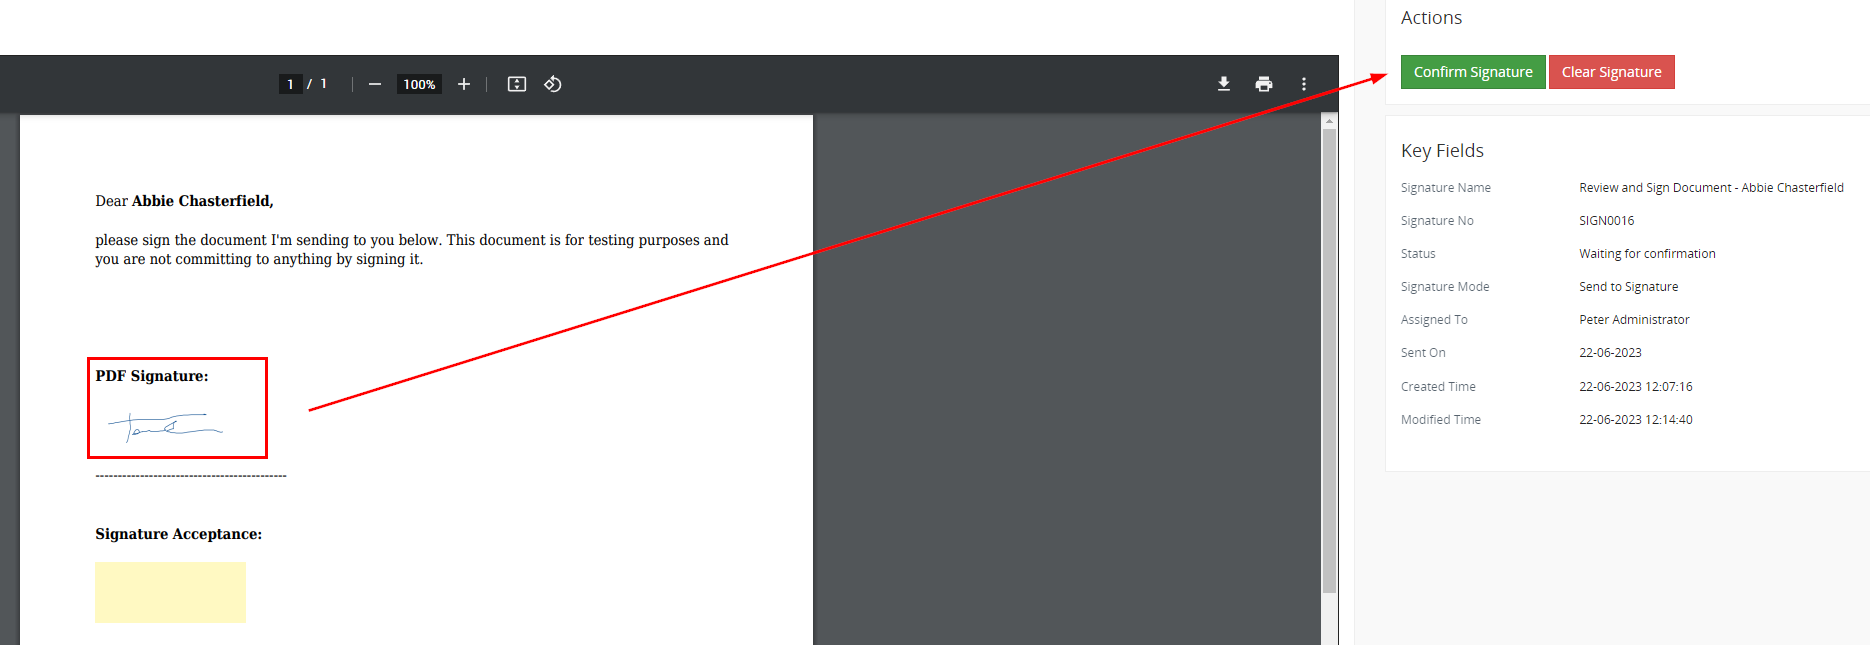
PDF Signature – Sign and Confirm signature
- Once the signature is confirmed, recipient will see under Actions message “Signed and waiting for acceptance by: Peter Administrator”:
(Peter Administrator is the Sender of Signature)
- At this moment, the time is set for the Signature Acceptance process that we added, the sender of the document for signature has the right to accept the document in the detail view of Contac under button More – Accept Signature:
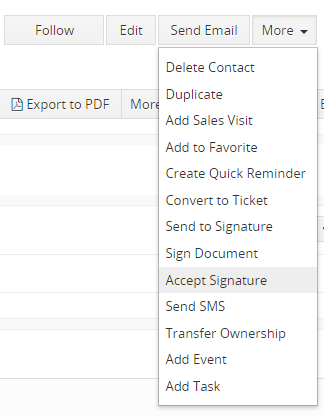
PDF Signature – Accept Signature detail view
- Following window will appear, please click on the button

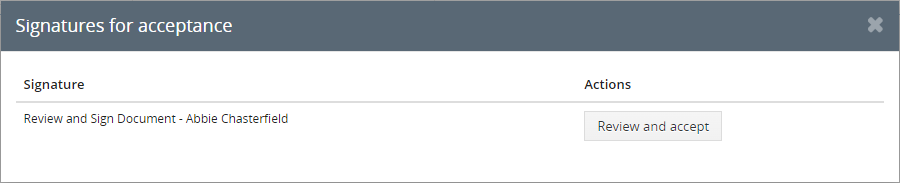
PDF Signature – Acceptance Signature
- Signature window will be open again and you as the Sender of the Signature document can Accept the Signature of the recipient via
 button.
Then the created Acceptance Signature will be placed into the document as an Image: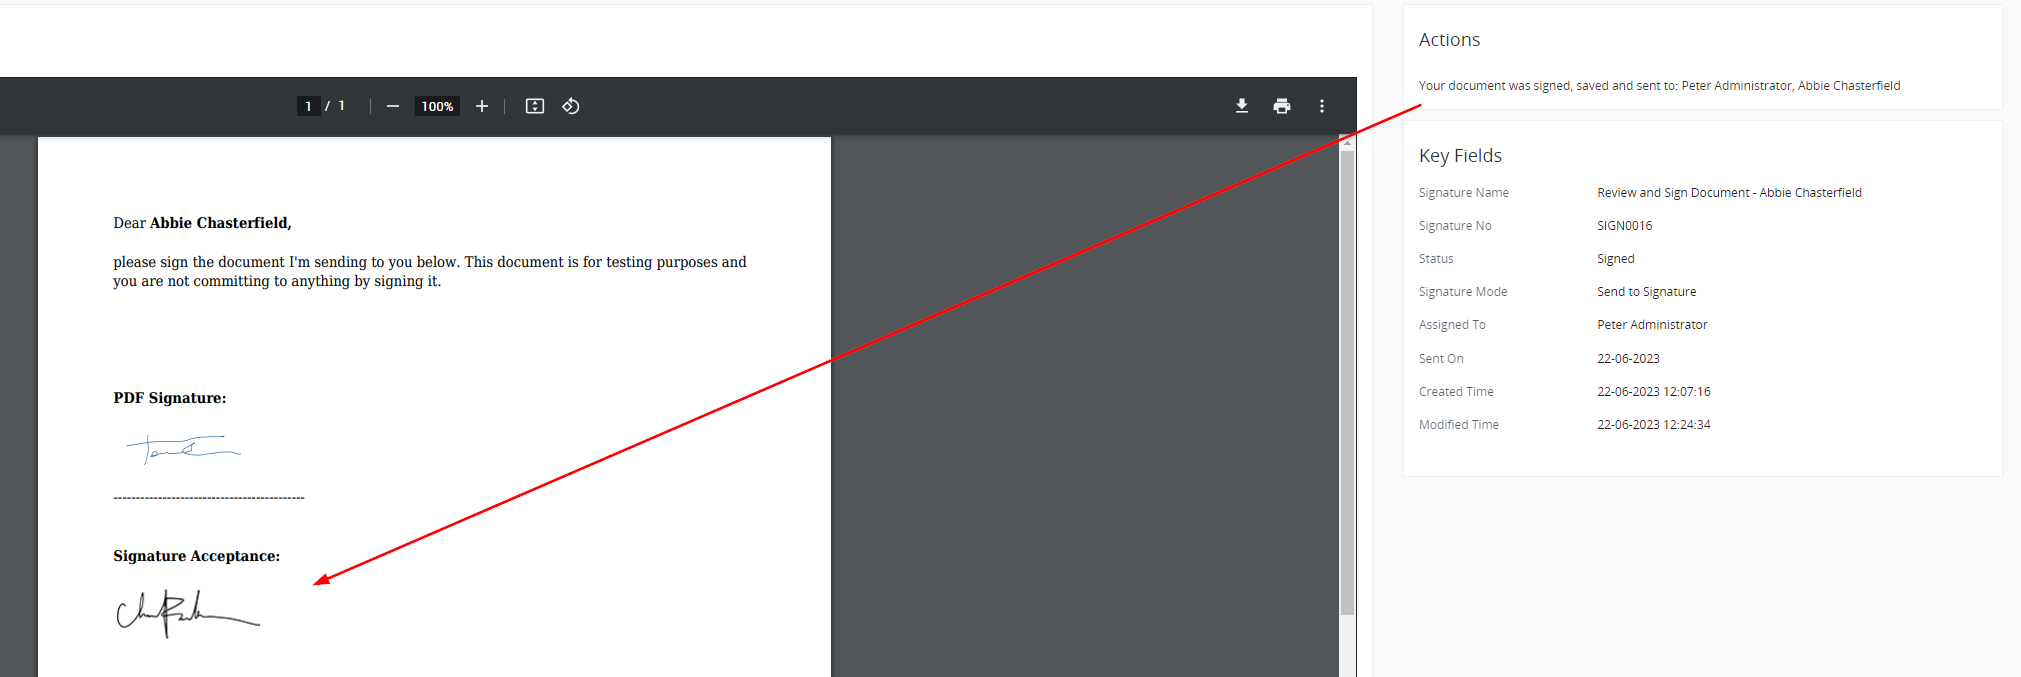
PDF Signature – Acceptance Signature added to the Document
The Document is now accepted by both sides. You can preview the Document in the Vtiger CRM under Signature Extension or under the Contact record as a Related Tab:
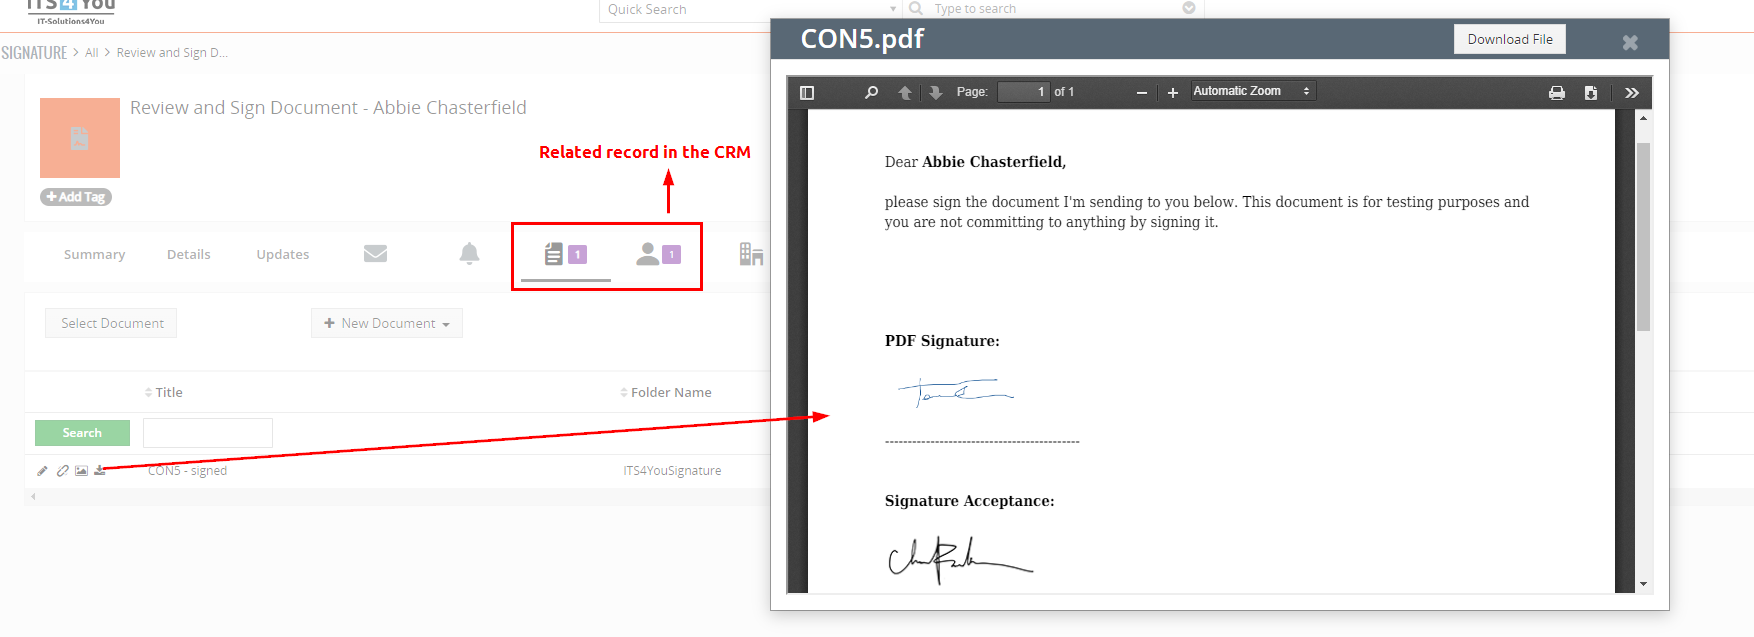
PDF Signature – Signed Document saved in the Vtiger CRM
8.1.2.Acceptance User for PDF Signature
This feature has been added to the PDF Maker version 4.50 and PDF Signature 4.17.
With this feature, you can select an active User or Assigned To user for the record who will be the only one entitled to use an Acceptance Signature feature, and that means will be the only one who can accept signatures.
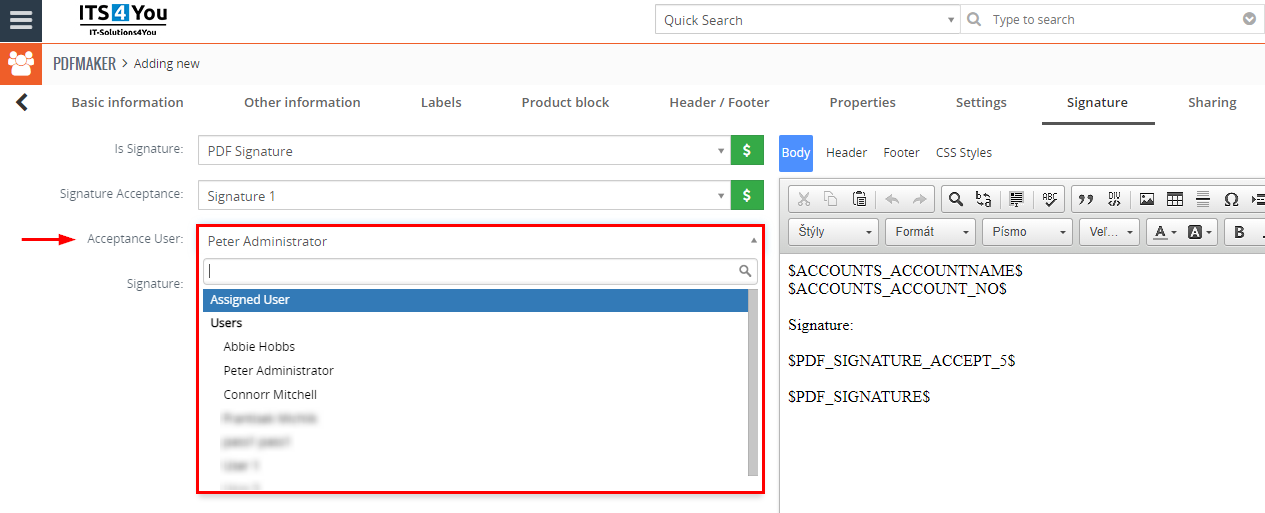
PDF Maker – Acceptance User for PDF Signature
9.Additional features
The PDF Maker tool itself is very extensive, so in the next chapters we will show you its other features that can be used.
9.1.How to add Fonts for PDF Maker
Please read before we start
- PDF Maker is working via mPDF Library
- PDF Maker also cooperates with CKEditor, which is used to create/customize your own templates
- However, its not possible to change fonts styles in your template via CKEditor layout
* You can use all features of the CK Editor for fonts like: styles, formats, size, colors but not the fonts

- Fonts can be only defined via source code of the template, using HTML or CSS tags, or via our free extension Styles 4 You by creating a style
Example: <p style=”font-family: frutiger”>Text in Frutiger</p> - mPDF supports Truetype fonts, reading and embedding directly from the .ttf font files
- Truetype collections (.ttc files) and Opentype files (.otf) in Truetype format are also supported
- That’s why you should read next section how to use custom fonts in the PDF Maker
More info about using mPDF fonts in mPDF 7.x
How to add new fonts for PDF Maker
- Find the font you want, we will use Comic Sans MS (make sure your font is .ttf font)
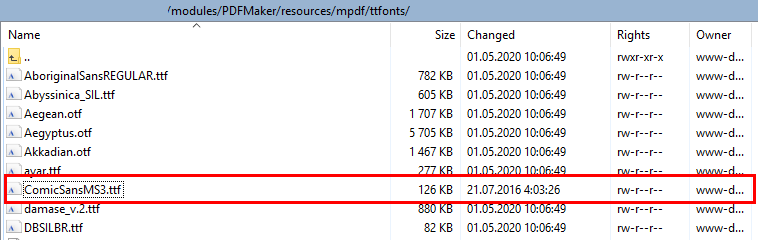
- Upload the Truetype font file to the fonts directory (vtigerfolder/modules/PDFMaker/resources/mpdf/ttfonts)
- Next open the file modules/PDFMaker/mpdf/config_fonts.php

- Now, we need to define this font by adding array so we can use it as HTML or CSS in our templates
In the file we have opened config_fonts.php:around line 83: “$this->fontdata = array” you can see how other fonts are defined
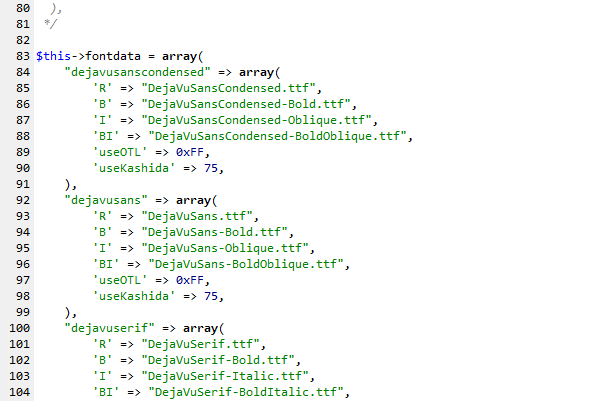
We need to add our array:“comicsansms” => array(
‘R’ => “ComicSansMS3.ttf”,
),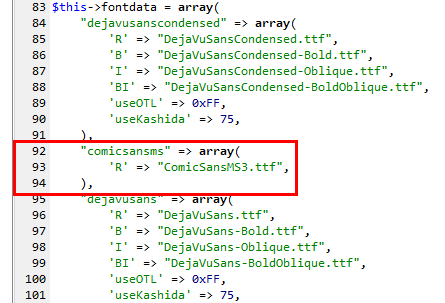
Short explanation of some definitions we added:“”comicsansms” = will be used in a template/styles to define font, you can name it as you want
‘R’ = means regular font, you can also use bold font ‘B’ if you uploaded bold fonts too
*(will be explained in the next section)
“ComicSansMS3.ttf” = is the name of the font we uploaded in the step 2 Note: We suggest naming fonts with lower case fonts and if possible do not use separate words like comic sans, this may work for some fonts but for another not.
Example: Good = comicsansms / Bad = Comic Sans – MS - When done, save the changes in file config_fonts.php
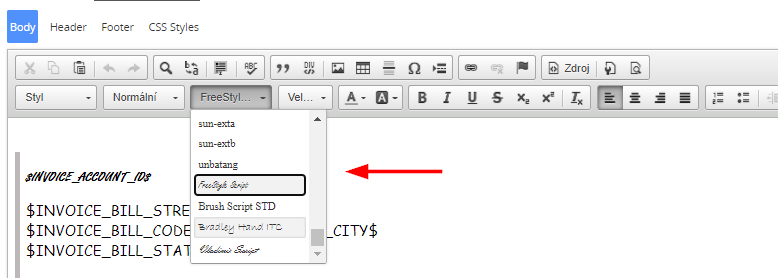
Applying new fonts to the template
Directly via CK Editor by selecting fonts:
![]() Note: This is supported only from version 4.21 of PDF Maker.
Note: This is supported only from version 4.21 of PDF Maker.
Manually by creating/editing the HTML code:
- Open the PDF Maker template with your text, and click on the “Source” button via CKEditor layout
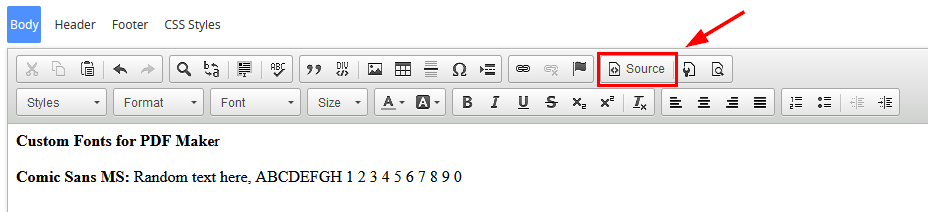 The template will switchto source code HTML format, we need now define font we uploaded in order to change text style
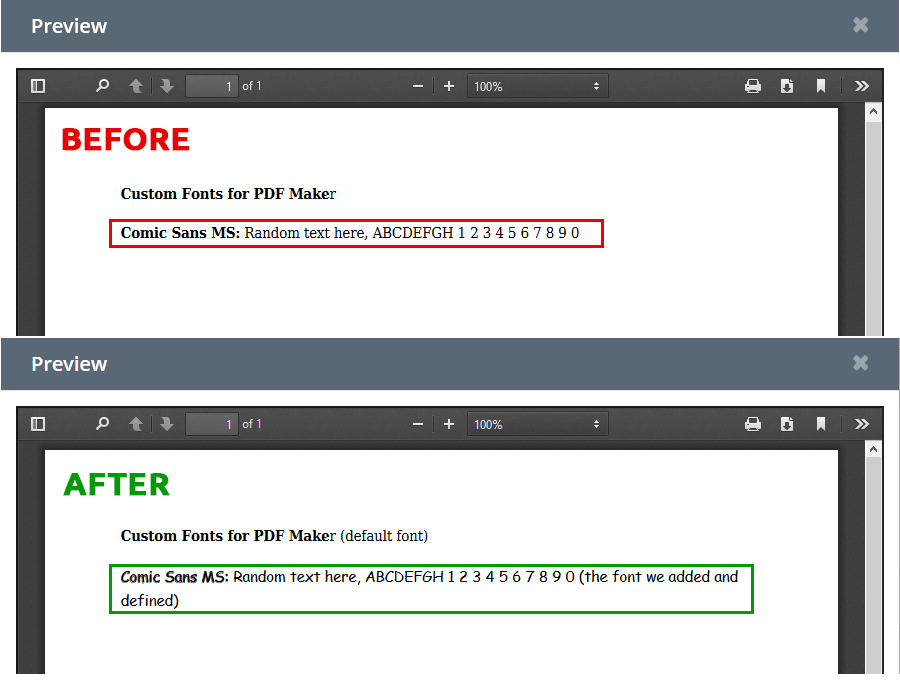
By default you should see code:<html>
<head>
<title></title>
</head>
<body><strong>Custom Fonts for PDF Make</strong>r<br />
<br />
<strong>Comic Sans MS:</strong> Random text here, ABCDEFGH 1 2 3 4 5 6 7 8 9 0</body>
</html>
Now we need to add style for our font, should look like this:<html>
<head>
<title></title>
</head>
<body><strong>Custom Fonts for PDF Make</strong>r<br />
<br />
<span style=”font-family:comicsansms”><strong>Comic Sans MS:</strong> Random text here, ABCDEFGH 1 2 3 4 5 6 7 8 9 0</span></body>
</html> You can use any font styles html/css you prefer to define fonts: span style=”font-family, p style=”font-family. - Save/Apply the changes and try Export or Preview template
9.1.1.F.A.Q Custom Fonts
Can I use custom fonts in combination with your Styles 4 You?
Yes! you can visit our Styles 4 You section to see more details. All you need to do is define fonts via CSS/HTML.
All fonts are supported?
mPDF supports Truetype fonts, reading and embedding directly from the .ttf font files. Fonts must follow the Truetype specification and use Unicode mapping to the characters. Truetype collections (.ttc files) and Opentype files (.otf) in Truetype format are also supported.
Does mPDF already contain some other fonts in addition to the fonts I want to use?
Yes, you can check the list here: Available fonts v6 and v7
When I uploaded the fonts I noticed in the config_fonts.php array lines like are ‘R’ / ‘B’ / ‘I’ what does that mean?
[‘R’] = Regular (normal font)
[‘B’] = Bold (bold font)
[‘I’] = Italic (italic font)Each font-family must have a Regular (‘R’) file defined – the others (Bold ‘B’, Italic ‘I’, bold-italic ‘BI’) are optional.
This is used when you have 3 .ttf files and each is unique for his font variant.
“cambria” => array(
‘R’ => “cambria.ttf”,
‘B’ => “cambriab.ttf”,
‘I’ => “cambriai.ttf”,
9.2.Font Awesome Icons

With the new feature Font Awesome you can add a lot of icons to your PDF Maker template just with few clicks!
How to add Font Awesome Icons to your PDF Maker template?
- Make sure you have installed PDF Maker version 700.7.0 or higher
- Open your template and go to Other information tab, where you can find a Font Awesome menu with the following options:
A) List of Icons – in this list you can see the names of icons which you can choose by clicking on any of them
B) Icon preview / Icon import button – here is icon preview and also an icon import button (click on the image icon and icon will be imported to your template)
C) Font Awesome icon detailed list view – you can find here: Icon, CSS Class, & Unicode Cheatsheet
D) Icon imported to your template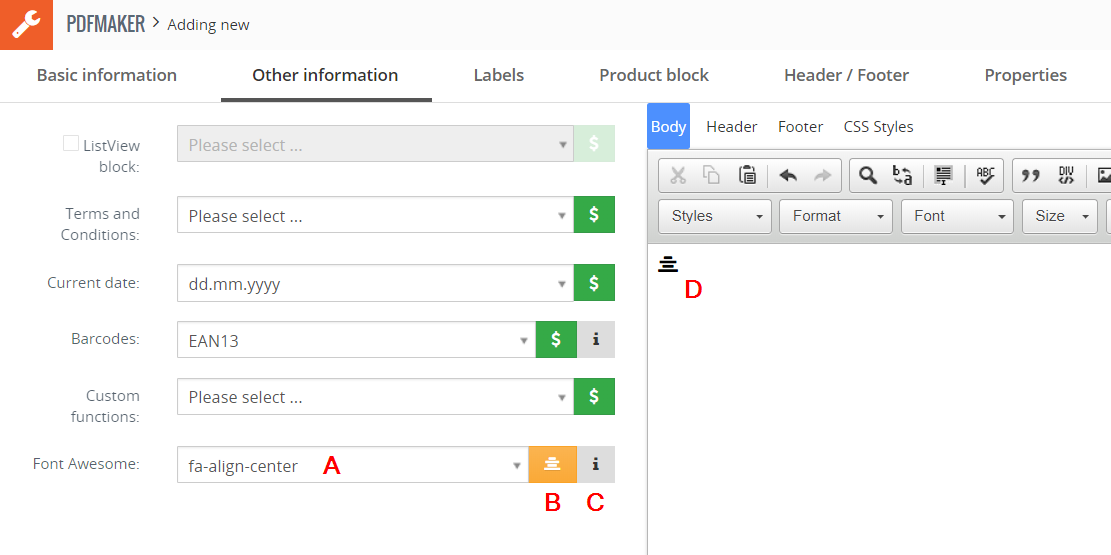
PDF Maker – Font Awesome
- Full process how to add Icons to your template is shown on following picture:
Note: On the picture, you can see that there is also an option to change size, color, background color. There is also option to align icons.
PDF Maker – Font Awesome
9.3.Mass export and merging templates
In the chapter Export was described how to export documents via PDF Maker block. There is additional possibility of the export to PDF via ListView. In addition, ListView allows you mass export and merging templates. To do mass export in ListView please provide following steps:
- Inside ListView, select one or more document.
- Click on .
- PDF Maker batch export window will appear on the screen.
- Select the PDF template.
- Click on .
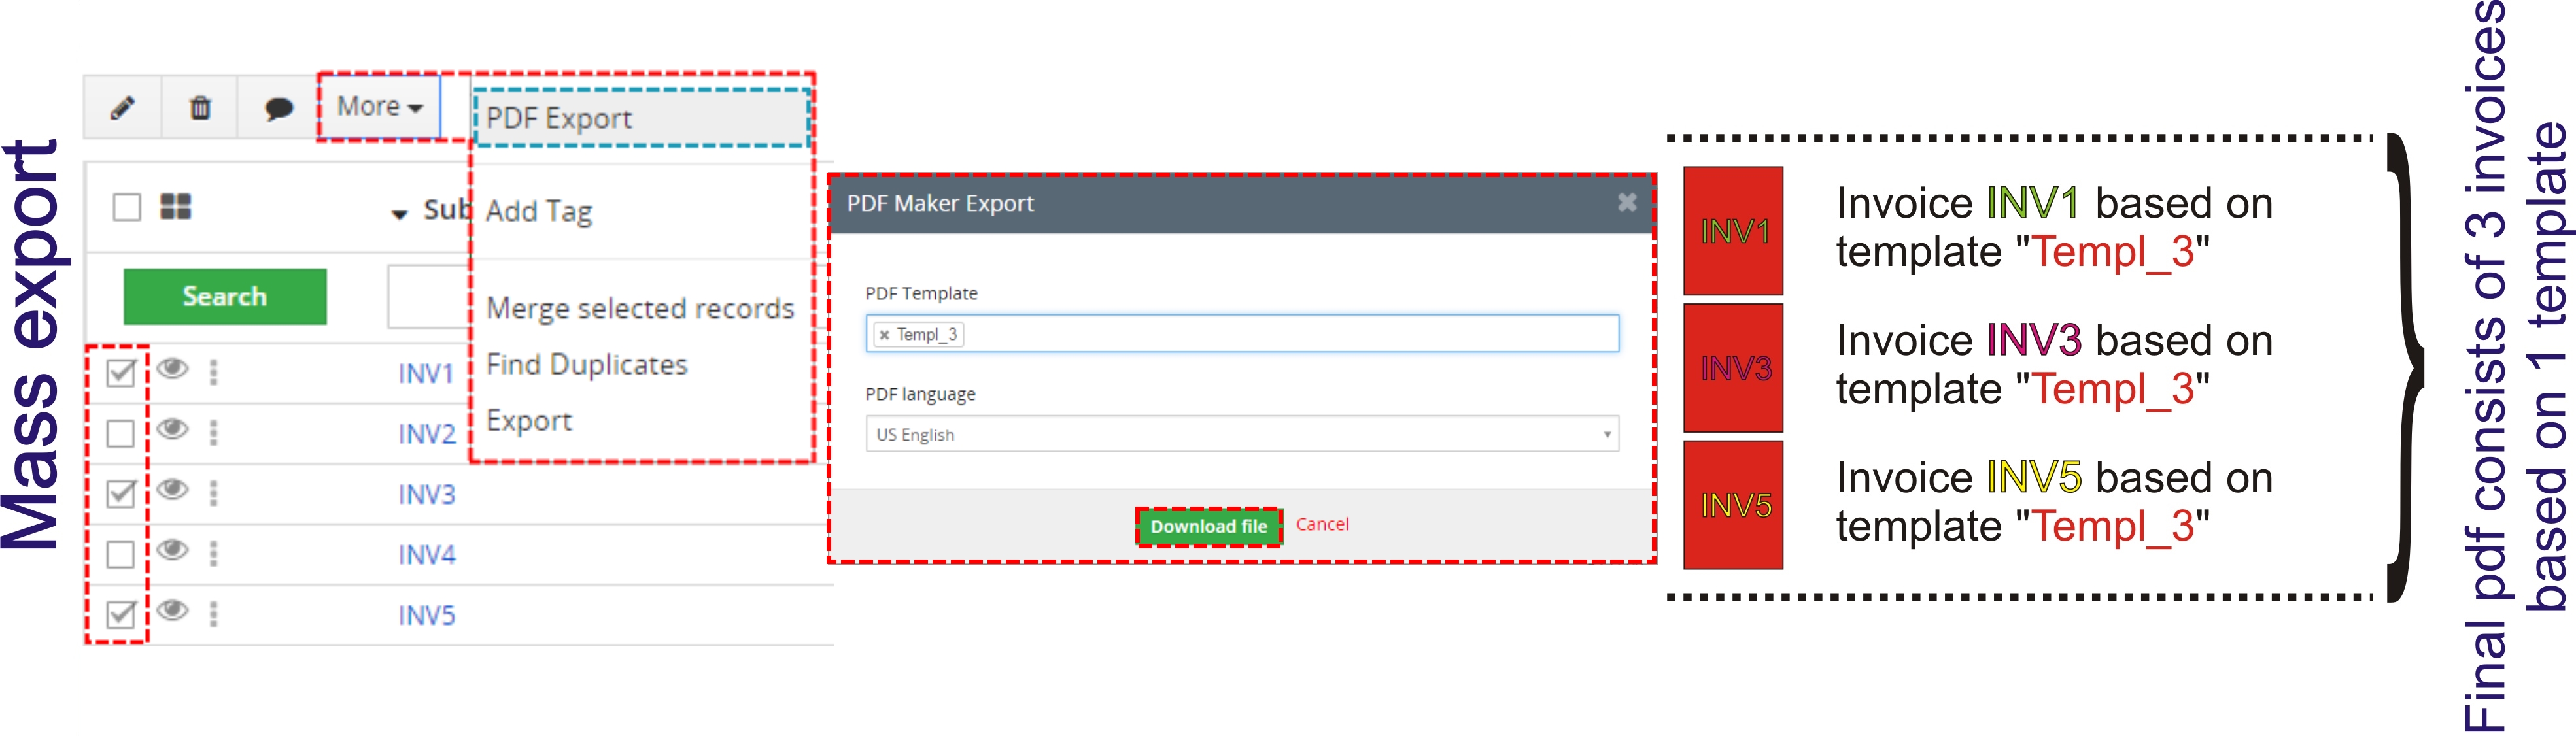
Mass export
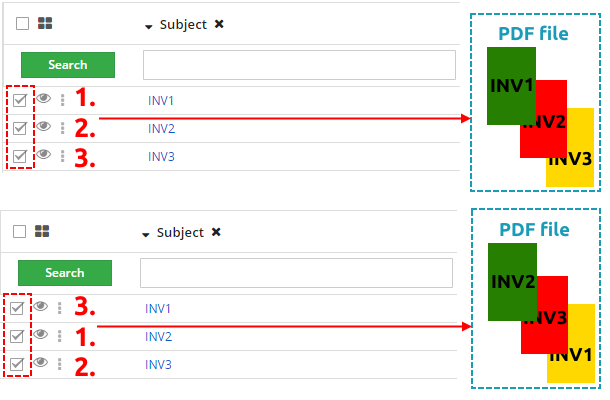
The merging of the templates allows you to print one or more documents using more templates at once.
Next picture shows the merging of the templates.
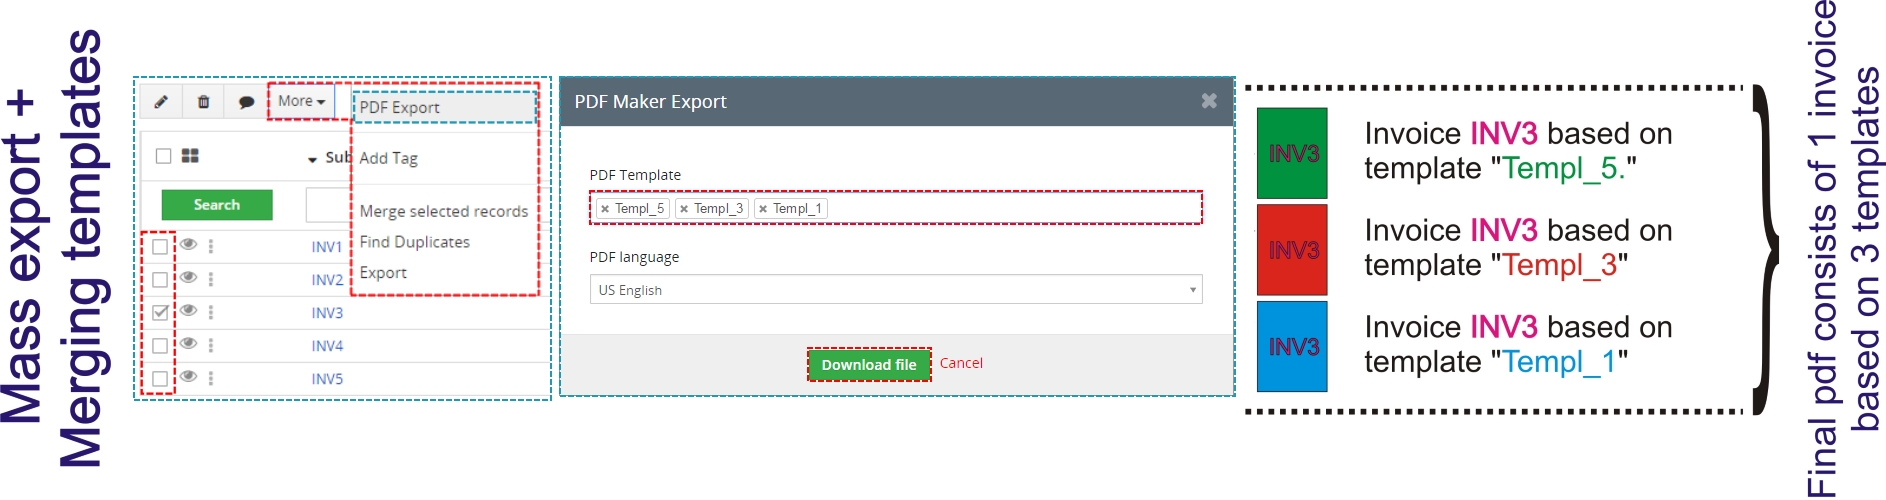
Merging templates
If you combine mass export and merging templates you will obtain final PDF document as is shown in the
next picture.
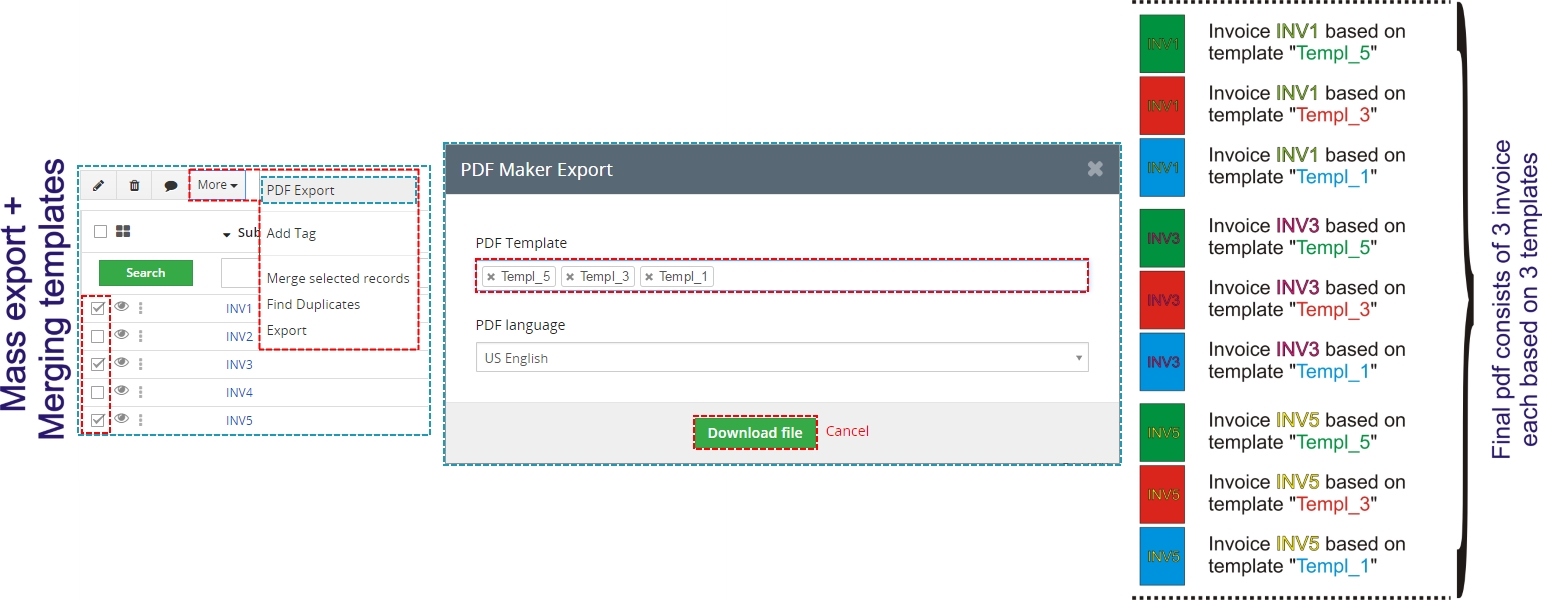
Mass export combined with merging templates
9.3.1.Sorting within mass export
The order of the records exported in the pdf file within mass export depends on sorting used in the ListView. So if you change sorting of the records in the ListView then the final PDF file will correspond this sorting, i.e. records will be ordered as sorted in the ListView and the order will depend on sequence of choosing records.
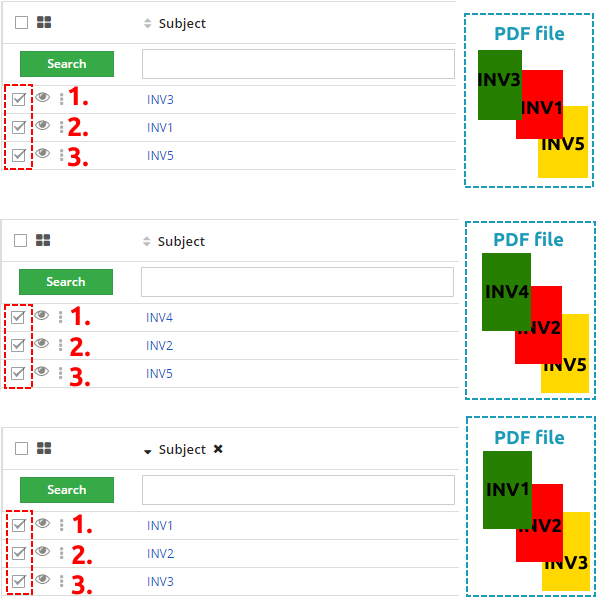
Sorting within mass export
You are able to manage your records in PDF file according to choosing records in ListView.
Manage records in PDF
9.4.Download all records in one click
Since version of PDF Maker 4.19 from 19 January 2021 there is option to Download all records with one click.
Downloaded records will be exported as a .zip file.
You can select one or more templates for download.
![]() Note: However, if more templates are selected and you select 5 records, for example, only 5 .pdf files will be exported as by default, selecting more templates is merged into the one file.
Note: However, if more templates are selected and you select 5 records, for example, only 5 .pdf files will be exported as by default, selecting more templates is merged into the one file.
![]() Note: Filename must be unique or empty, so that files are not overwritten. Check template Settings.
Note: Filename must be unique or empty, so that files are not overwritten. Check template Settings.
Please follow the next steps to perform this operation:
- Make sure 4.19 PDF Maker is installed/updated
- Go to the List view of any module you like and select all records you wish to export with one click
- Click on the
 button and select “PDF Export”
 - On the next screen pick template/s and click
 button:
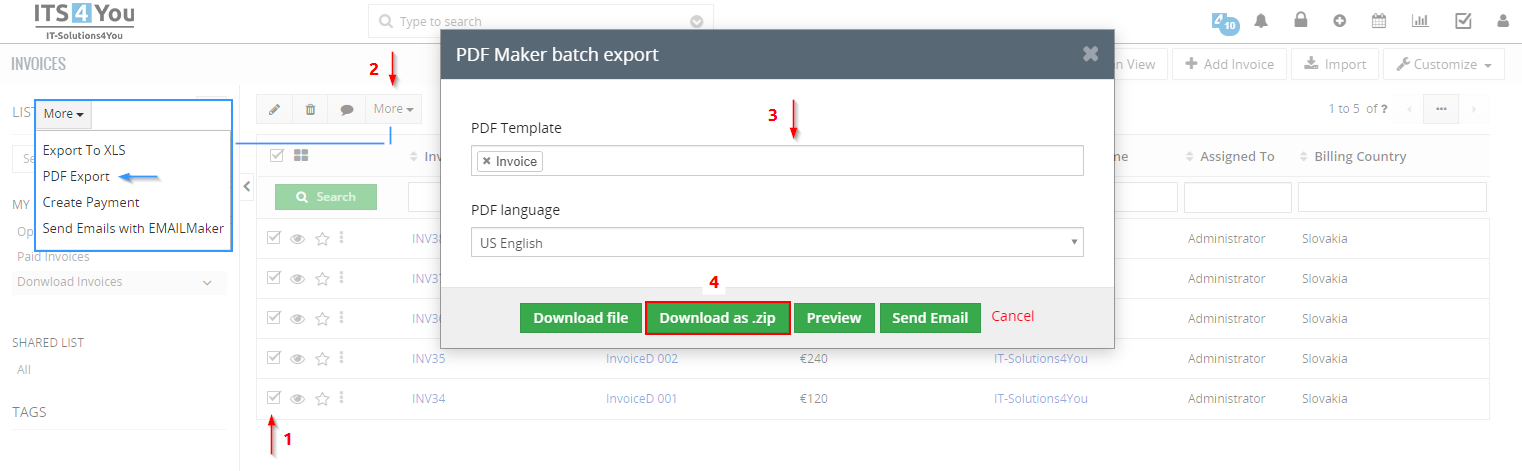
PDF Maker – Once click download all, list view steps
- Zip file will be downloaded with all records (. pdf’s)
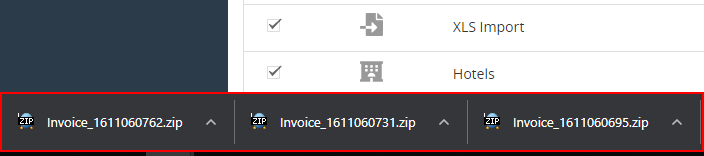
PDF Maker – Once click download all, downloaded .zip file
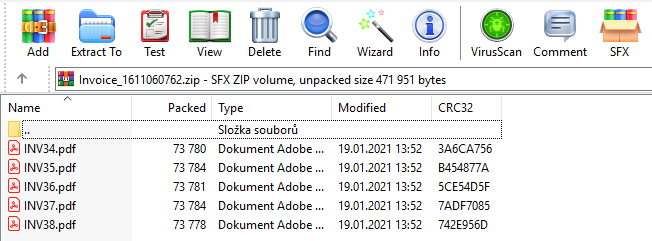
PDF Maker – Once click download all, packged .pdf files in the .zip file
![]() Note: Filename must be unique or empty, so that files are not overwritten. Check template Settings.
Note: Filename must be unique or empty, so that files are not overwritten. Check template Settings.
9.5.Pay by Square
With PDF Maker Professional you can use the feature Pay by Square easy and load a values for payments from the records via variables used in the template.
Paying with Square is more than a mobile cash register. It also offers free apps for making payments with your smartphone and using bank apps for sending money to your friends or clients.
In order to use the Pay by Square in your templates. Please follow steps below:
- Open your template (in our example we will use Invoice module)
- In the template go to Other information tab and then Custom functions, search for payBySquare function

- Insert the function where you want it in to your template, function should look like by default:
[CUSTOMFUNCTION|payBySquare|iban|amount|currency|vs|ss|cs|note|due_date|size|CUSTOMFUNCTION]
- Custom function has own parameters which should be replaced with values or variables, see an example:
[CUSTOMFUNCTION|payBySquare|SK2811110000009999983002|$TOTAL$|$CURRENCYCODE$|1234567890|1234567890|1234|$INVOICE_DESCRIPTION$|$INVOICE_DUEDATE$|100|CUSTOMFUNCTION]
- When the parameters are added, Save the template and you can export it or do additional operations, like preview, send it etc.
This is how Pay by Square QR code looks like upon export from our template:
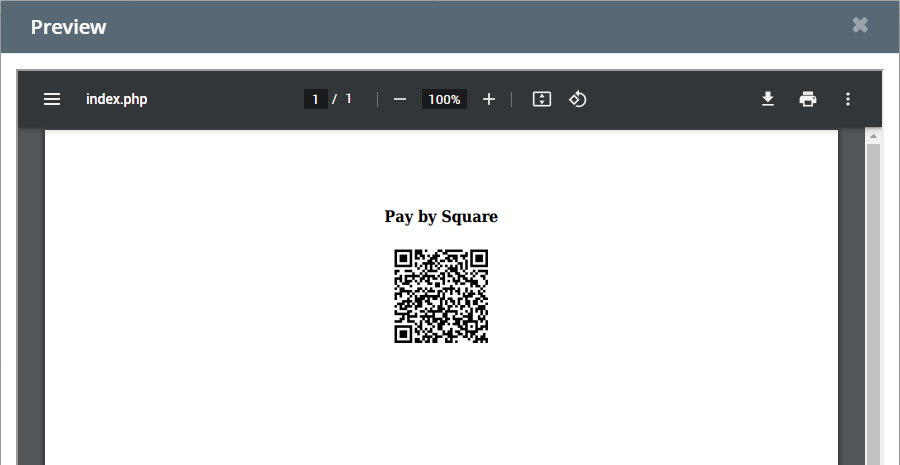
PDF Maker – Pay by Square QR Code
Parameters of the custom function definition:
[CUSTOMFUNCTION|payBySquare|iban|amount|currency|vs|ss|cs|note|due_date|size|CUSTOMFUNCTION]
- iban = iban of the person / organization which will be receiving a payment, you can aswell use a variable and load a Custom field from Vtiger CRM which has this value filled
- amount = payment amount, same here can be used variable from an Invoice module like $TOTAL$
- currency = currency in which payment should be made, we suggest using a $CURRENCYCODE$ variable which will load specific record symbol of the currency
- vs = variable symbol
- ss = specific symbol
- cs = constant symbol
- note = payment note for recipient
- due_date = most of the payments need to have a due date, so it has to be filled, we suggest using Due Date variable $INVOICE_DUEDATE$ (each module has own variable for due date)
- size = size of the QR code symbol, here you define only one number for example 200 means = 200 x 200
![]() Note: Some of the parameters can be removed if not needed, for example:
Note: Some of the parameters can be removed if not needed, for example:
[CUSTOMFUNCTION|payBySquare|iban|amount|currency||||note|due_date|size|CUSTOMFUNCTION]
You need only delete the text like “vs/ss/cs” but keep the separators “|”
9.6.Export and import templates
Export and import of the PDF templates makes it easy to work with PDF Maker templates by migration process or moving templates from development to productive installation.
In order to export PDF templates to external sources in PDF Maker tool do following steps:
- In the PDF Maker ListView page select one or more templates which would you like to export.
- Click on
 and “Export”.
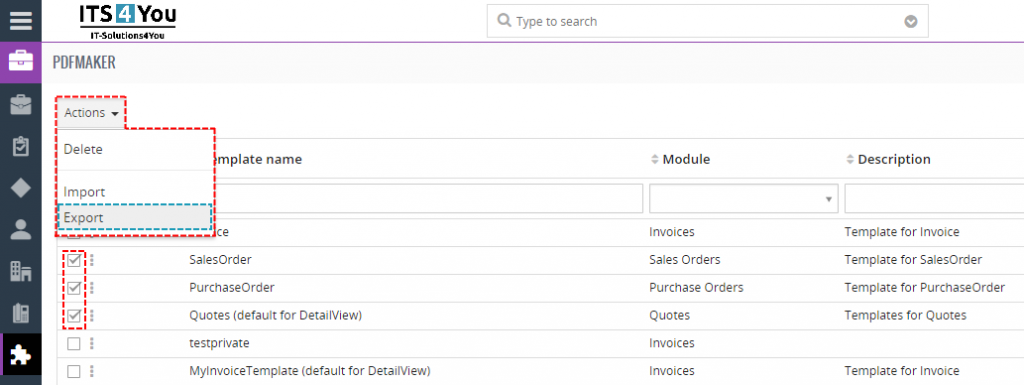
Export of the templates
- Confirm export with
 or choose other option to export and then export.
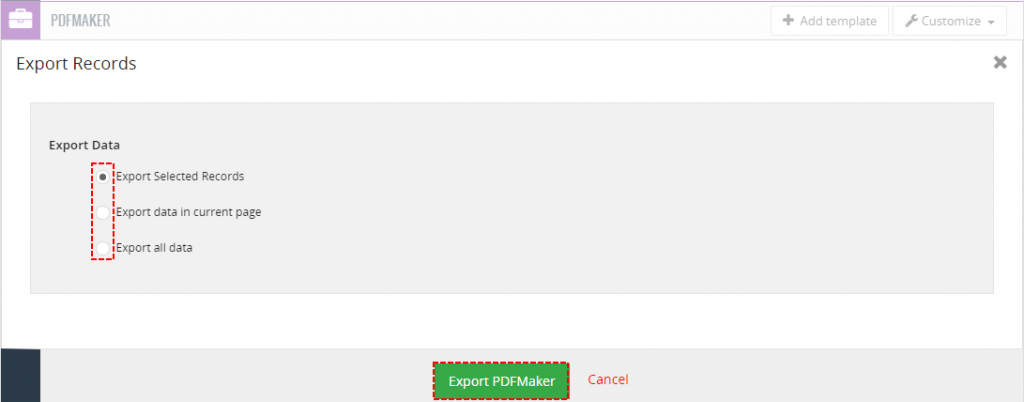
Export of the templates

To import PDF templates from external sources click on the “Import” from (see Picture 6.7 point 2.). After click the new import page will appear on the screen.
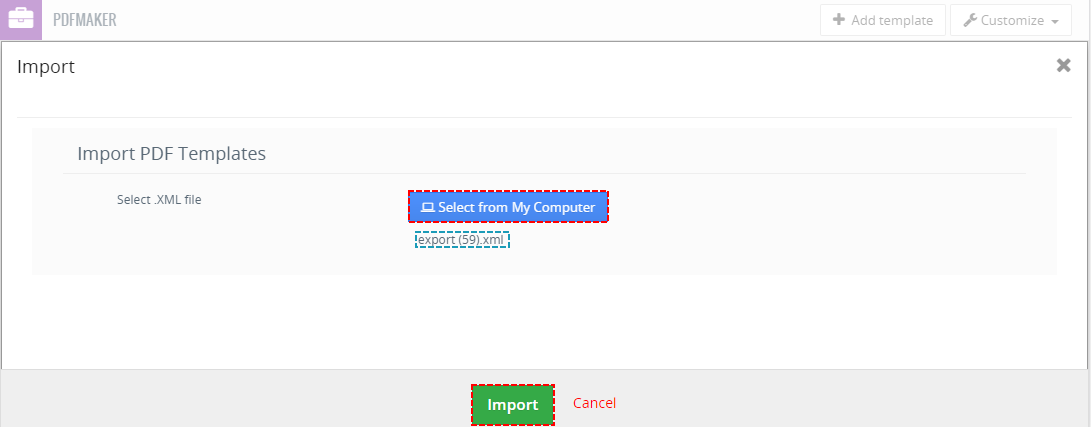
Import PDF templates page
In the Import PDF templates page, browse the PDF Maker template-related data in *.xml format and then click the  button. It will take a few seconds to complete the import. The imported templates can be found in PDF Maker ListView page.
9.7.Colorize Product Bundles
By default Product bundles are shown as light grey, sometimes this is not good for users which have grey background or require to have these bundles more visible.
So we added option to use CSS style, you can use it via Styles 4 You which is our Free extension or directly add this CSS into the template Source code.
For example we wanted a blue color so we used CSS style:
(no need to use any HTML code, just CSS)
- .SubProductsForProductName { color: blue; }
- Added via our Styles free extension:
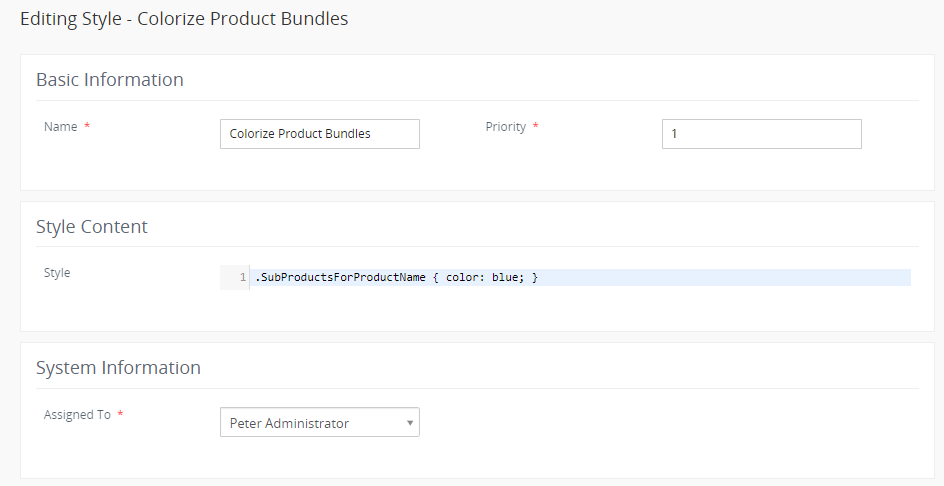
Before
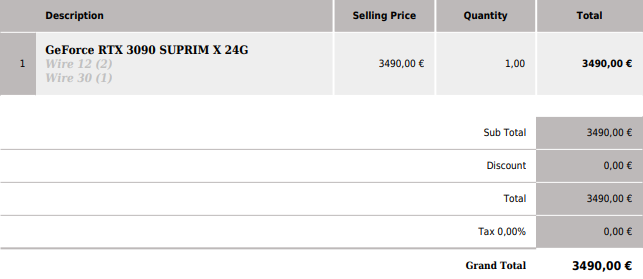
After
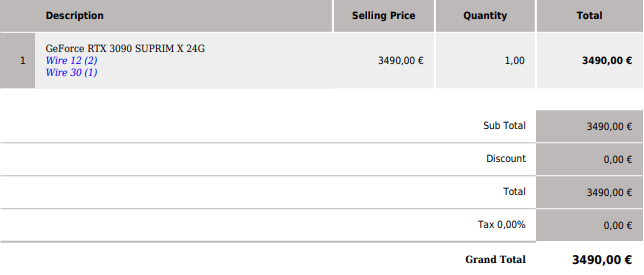
9.8.Sharing
Using Sharing tab you can define template owner and how to share your template between you and other users or groups. You can setup sharing for different entities & members. In order to share your template:
- Select “Share” from the list.
- Choose groups, roles, roles & subordinates or users to share.
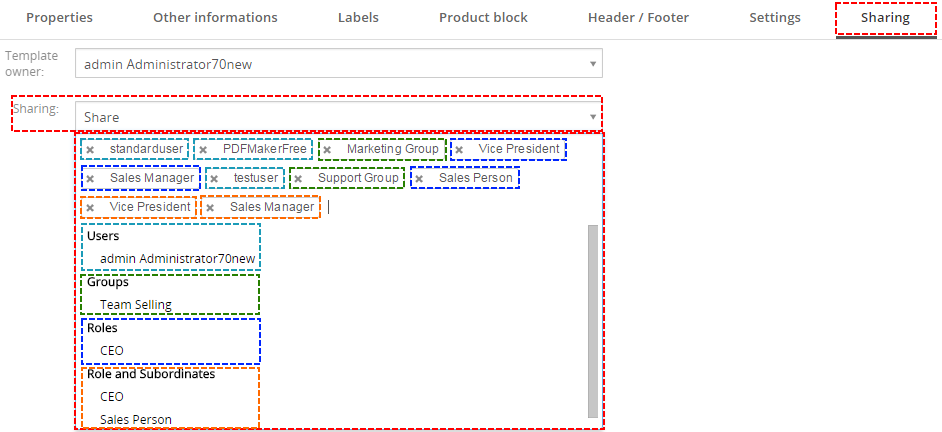
Sharing
9.9.Disable Export Edit
![]() Note: This feature was added in version 4.21 of PDF Maker
Note: This feature was added in version 4.21 of PDF Maker
We have added new feature Disable Export Edit, with this feature you can disable editing template before export.
Simply check the checkbox for specific template and when this template is selected, users are unable select option ![]() and also make any changes to it upon export and preview.
and also make any changes to it upon export and preview.
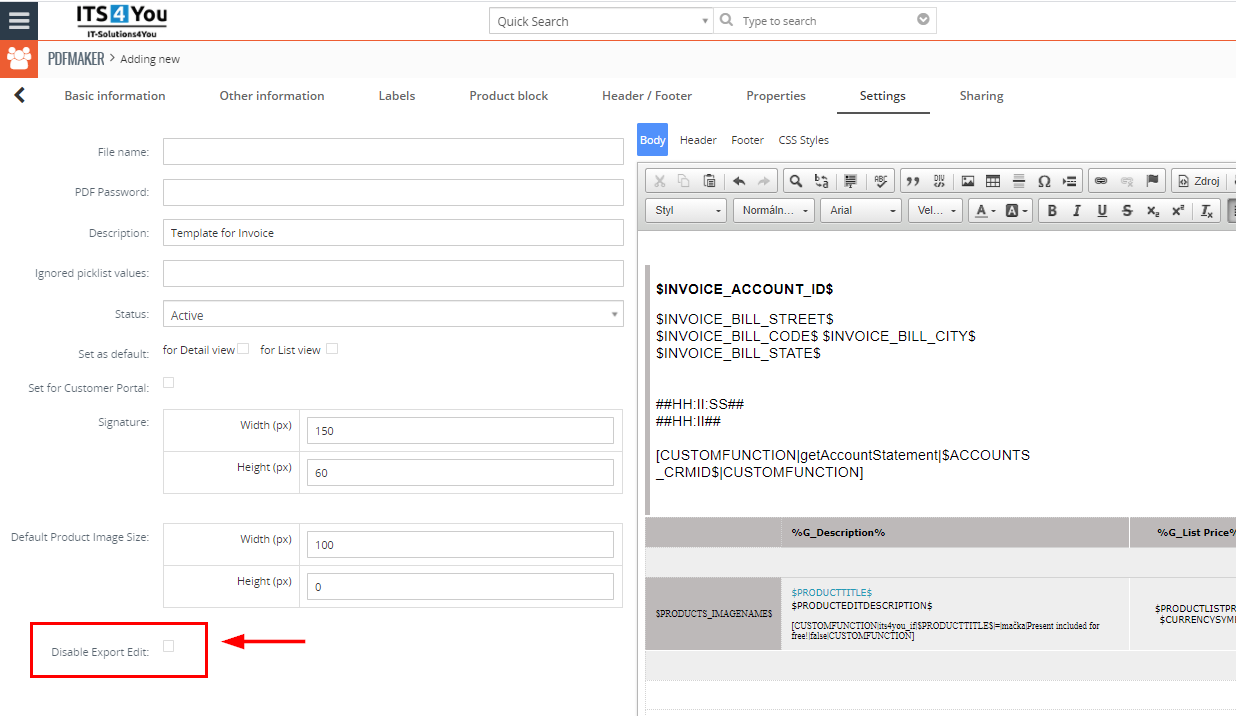
PDF Maker – Disable Edit before Export, template settings
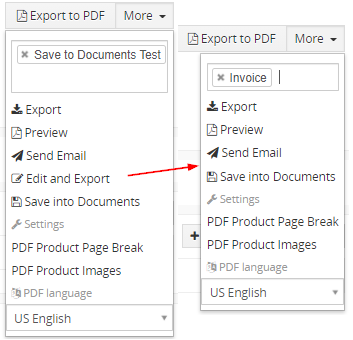
Not Disabled Edit vs Disabled Edit
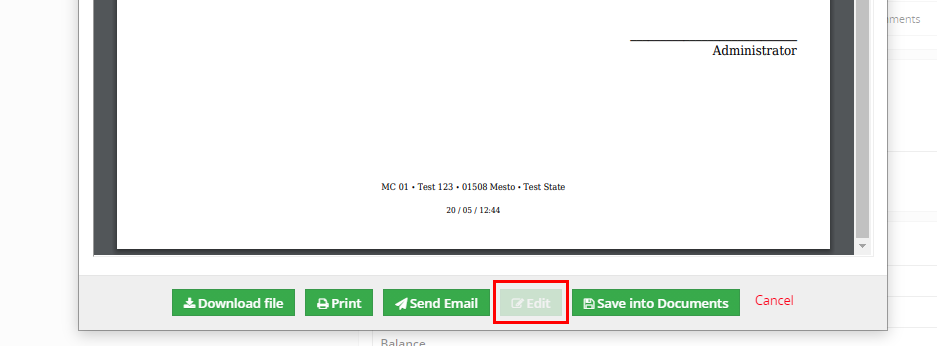
PDF Maker – Disable Edit before Export, preview
9.10.Custom functions
Custom functions work only with PDF Maker Professional.
Also, there is an option to use standard PHP functions with our PDF Maker like:
[CUSTOMFUNCTION|round|$PRODUCTQUANTITY$|CUSTOMFUNCTION]
If you need a special treatment of vtiger data in your template, you can use custom (your own) functions. There is a folder functions under [vTigerROOT]/modules/PDFMaker/resources/, where you can place your own .php file with functions which would you like to use. This file will be included automatically. Inside this folder is file „its4you.php“, which contains our functions. These functions are listed in the Table 6-1 and are provided for you for free. Do not modify this file, because by next version it will be overwritten. If you would like to use your own functions, please create your own file/files, it means create new .php file under [vTigerROOT]/modules/PDFMaker/resources/functions and place here your functions. In order to insert custom function into template provide following:
- Go to EditView, and in Other information tab select custom function from selectbox „Custom functions“. You can choose one of our functions (its4you_*), or your own function.
- Click on button. It adds function in form
[CUSTOMFUNCTION|functionname|param1|param2|…|CUSTOMFUNCTION]. - Finally you have to define parameters of the function as shown in the picture.
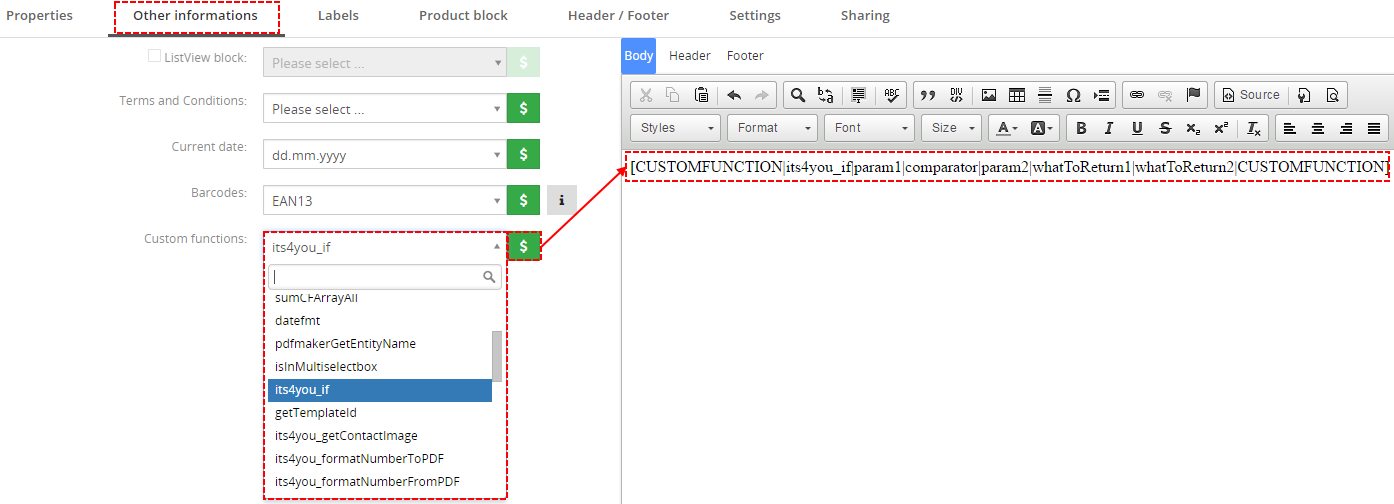
Custom functions
In the above example function with 5 parameters was used, i.e. [CUSTOMFUNCTION|functionname|param1|param2|param3|param4|param5|CUSTOMFUNCTION]. It is possible to use functions without parameters as well. In this case use just notation [CUSTOMFUNCTION|functionname|CUSTOMFUNCTION].
Here you can find list of functions available for PDF Maker Pro version:
- addToCFArray
- implodeCFArray
- addToCFArrayALL
- implodeCFArrayALL
- sumCFArray
- sumCFArrayAll
- datefmt
- pdfmakerGetEntityName
- isInMultiselectbox
- its4you_if
- getTemplateId
- its4you_getContactImage
- its4you_formatNumberToPDF
- its4you_formatNumberFromPDF
- its4you_multiplication
- its4you_deduct
- its4you_sum
- its4you_divide
- its4you_nl2br
- setCFGNumberValue
- sumCFGNumberValue
- deductCFGNumberValue
- mathCFGNumberValue
- showCFGNumberValue
- its4you_NumberFormat
- setCFNumberValue
- sumCFNumberValue
- deductCFNumberValue
- mathCFNumberValue
- showCFNumberValue
- semantic_ru
- num2str_ru
- convert_number_to_words
Following sections contain short description of some our its4you_* functions which you can use in your PDF templates.
9.10.1.datefmt function
Syntax
[CUSTOMFUNCTION|datefmt|date|outFormat|CUSTOMFUNCTION]
Description
This function will change any date in your desired format. For example, from 10-11-2018 to 10 November 2018, November 10 2018 or 10/11/2018 and more.
Parameters
datefmt
a parameter which needs to always stay in a custom function, you don’t need to change it or remove it
date
inserting your date here or variable from the CRM system, for example: $INVOICE_INVOICEDATE$
outFormat
the most important parameter where you need to set your date format for example: from 10-11-2018 to 10 November 2018 you will use the values: “d F Y” instead of “outformat”. You can check PHP values here: PHP date format values
Usage
Do you want change your due date format for example from 10-11-2018 to 10 November 2018? Follow next steps:
First you need to place function into template.
[CUSTOMFUNCTION|datefmt|date|outFormat|CUSTOMFUNCTION]
Then modify Parameters:
- keep datefmt
- replace date with: $INVOICE_DUEDATE$
- replace outFormat with: d Y F
Finally, your function is:
[CUSTOMFUNCTION|datefmt|$INVOICE_DUEDATE$|d F Y|CUSTOMFUNCTION]
Result: 10-11-2018 ——> 10 November 2018
9.10.2.its4you_if function
Syntax
[CUSTOMFUNCTION|its4you_if|param1|comparator|param2|whatToReturn1|whatToReturn2|CUSTOMFUNCTION]
Description
This function executes if-else statement based on given parameters.
Parameters
- param1
- first parameter of comparison
- comparator
- you can use one of these possible attributes ==,!=,<,>,<=,>=
- == – equal to
- != – not equal
- < – less than
- > – greater than
- <= – less than or equal to
- >= – greater than or equal to
- param2
- second parameter of comparison
- whatToReturn1
- value returned when comparison succeeded
- whatToReturn2
- value returned when comparison didn’t succeed
Usage
You want to show “Thanks message” if Grand Total is more than 500€.
First you need to place function into template.
[CUSTOMFUNCTION|its4you_if|param1|comparator|param2|whatToReturn1|whatToReturn2|CUSTOMFUNCTION]
Now replace please:
- param1 with $TOTAL$
- Comparator with > (Possible attributes are ==,!=,<,>,<=,>= )
- param2 with 500
- whatToReturn1 with Present included for free!
- whatToReturn2 leave empty
Finally, your function is:
[CUSTOMFUNCTION|its4you_if|$TOTAL$|>|500|Present included for free!||CUSTOMFUNCTION]
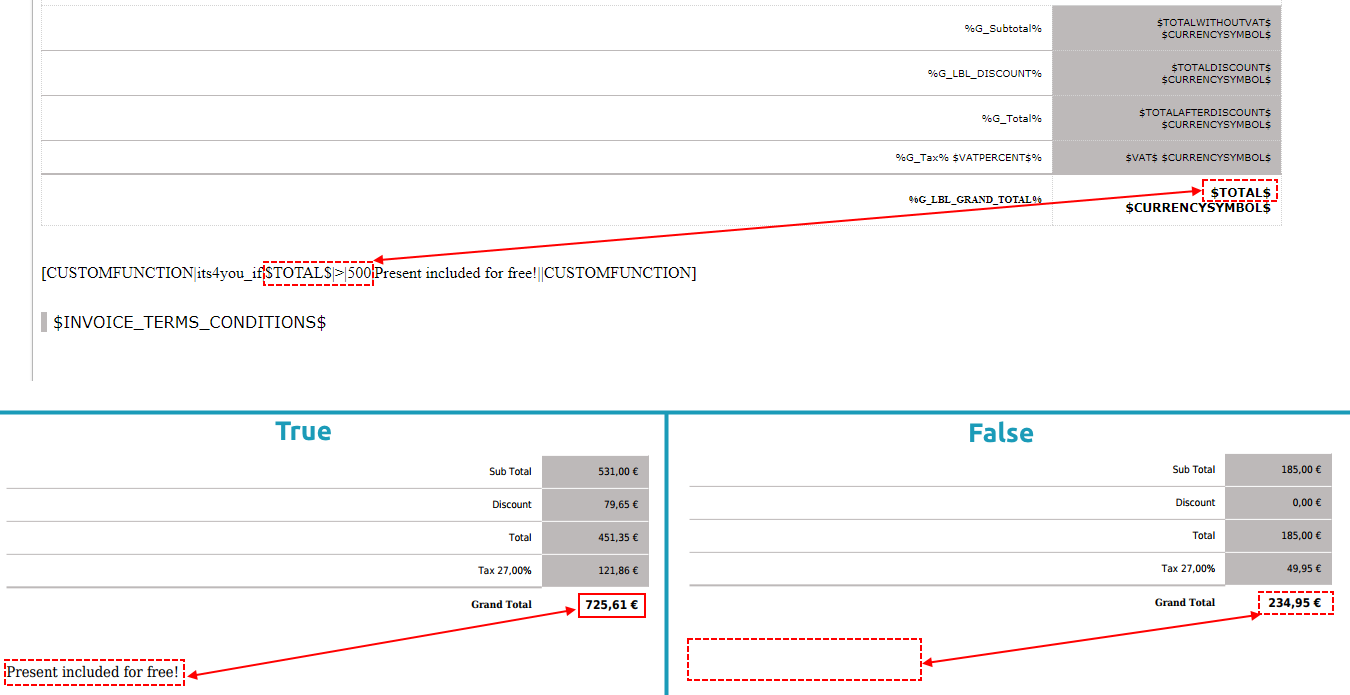
its4you_if Custom function
9.10.3.its4you_ifnumber
Syntax
[CUSTOMFUNCTION|its4you_ifnumber|param1|comparator|param2|whatToReturn1|whatToReturn2|CUSTOMFUNCTION]
Description
This function executes if-else statement based on given parameters. its4you_ifnumber is similar like its4you_if but it is more suitable for comparing numbers because it convert param1 and param2 into number format.
Parameters
- param1
- first parameter of comparison
- comparator
- you can use one of these possible attributes ==,!=,<,>,<=,>=
- param2
- second parameter of comparison
- whatToReturn1
- value returned when comparison succeeded
- whatToReturn2
- value returned when comparison didn’t succeed
Usage
You want to show “Thanks message” if Grand Total is more than 500€.
First you need to place function into template.
[CUSTOMFUNCTION|its4you_ifnumber|param1|comparator|param2|whatToReturn1|whatToReturn2|CUSTOMFUNCTION]
Now replace please:
- param1 with $TOTAL$
- Comparator with > (Possible attributes are ==,!=,<,>,<=,>= )
- param2 with 500
- whatToReturn1 with Present included for free!
- whatToReturn2 leave empty
Finally, your function is:
[CUSTOMFUNCTION|its4you_ifnumber|$TOTAL$|>|500|Present included for free!||CUSTOMFUNCTION]
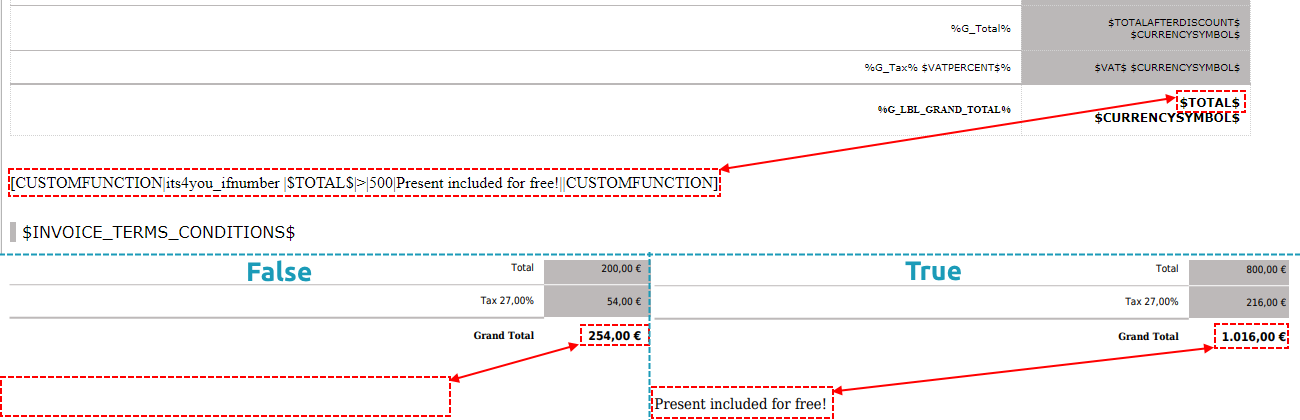
its4you_ifnumber Custom function – PDF Maker Vtiger 7
9.10.4.its4you_isnull
Syntax
[CUSTOMFUNCTION|its4you_isnull|param1|whatToReturn1|whatToReturn2|CUSTOMFUNCTION]
Description
This function executes if-else statement based on given parameters. its4you_isnull is similar like its4you_if but it is created to find if param1 is NULL or 0.
Parameters
- param1
- first parameter of comparison if it is NULL or 0
- whatToReturn1
- value returned when comparison succeeded (param1 = NULL or 0)
- whatToReturn2
- value returned when comparison didn’t succeed (param1 != NULL or 0)
Usage
You want to show “Sorry message” if Discount is more 0.
And “Info message” is there is any Discount.
First you need to place function into template.
[CUSTOMFUNCTION|its4you_ifnull|param1|whatToReturn1|whatToReturn2|CUSTOMFUNCTION]
Now replace please:
- param1 with $TOTALDISCOUNT$
- whatToReturn1 with Today you do not receive any discount
- whatToReturn2 with Your discount for today is $TOTALDISCOUNT$
Finally, your function is:
[CUSTOMFUNCTION|its4you_isnull|$TOTALDISCOUNT$|Today you do not receive any discount|Your discount for today is $TOTALDISCOUNT$|CUSTOMFUNCTION]
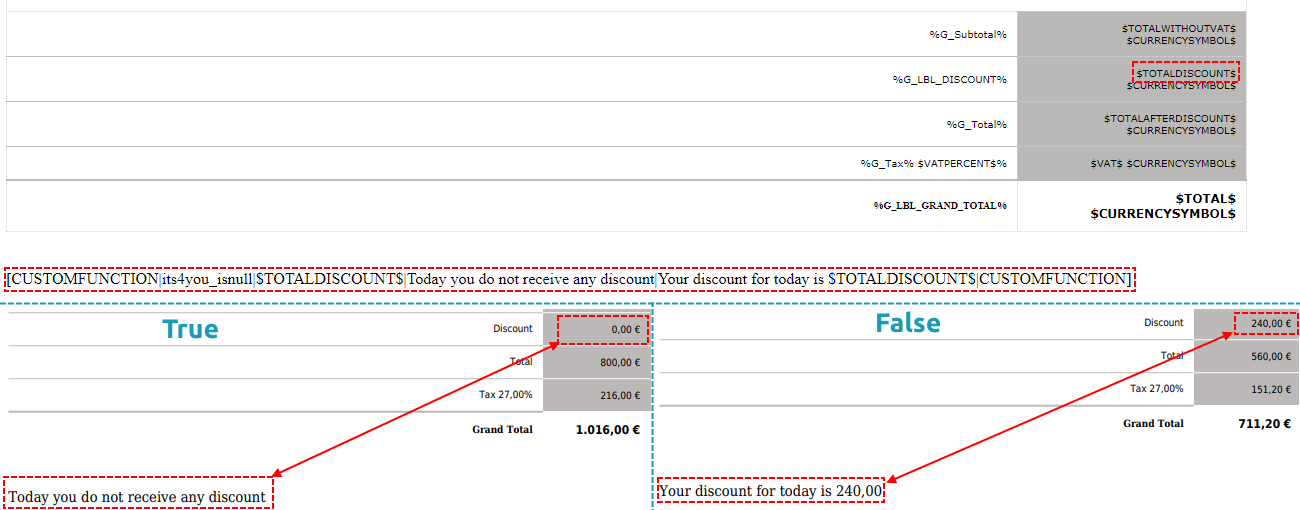
its4you_isnull Custom function – PDF Maker Vtiger 7
9.10.5.#HIDETR#
First at all, #HIDETR# is not exactly custom function. It is functionality that you can use in combination with custom function(most common with its4you_if, its4you_ifnumber, its4you_isnull)
Syntax
[CUSTOMFUNCTION|its4you_*****|param1|#HIDETR#||CUSTOMFUNCTION]
Description
If you use #HIDETR# functionality in custom function, it hide <tr> from your table.
Parameters
- without parameters
Usage
Try to imagine that you have PDF template with Discount line. Until now, yow had to have 2 different templates if you wanted hide Discount line when Discount is 0 (One template with discount line and one without).
Since now, you can use #HIDETR# if Discount is 0.
First at all choose and insert right custom function (its4you_if, its4you_ifnumber, its4you_isnull) into <tr> which you want to show/hide.
For example:
[CUSTOMFUNCTION|its4you_isnull|param1|whatToReturn1|whatToReturn2|CUSTOMFUNCTION]
Now replace please:
- param1 with $TOTALDISCOUNT$
- whatToReturn1 with #HIDETR#
- whatToReturn2 leave empty
Finally, your function with #HIDETR# is:
[CUSTOMFUNCTION|its4you_isnull|$TOTALDISCOUNT$|#HIDETR#||CUSTOMFUNCTION]
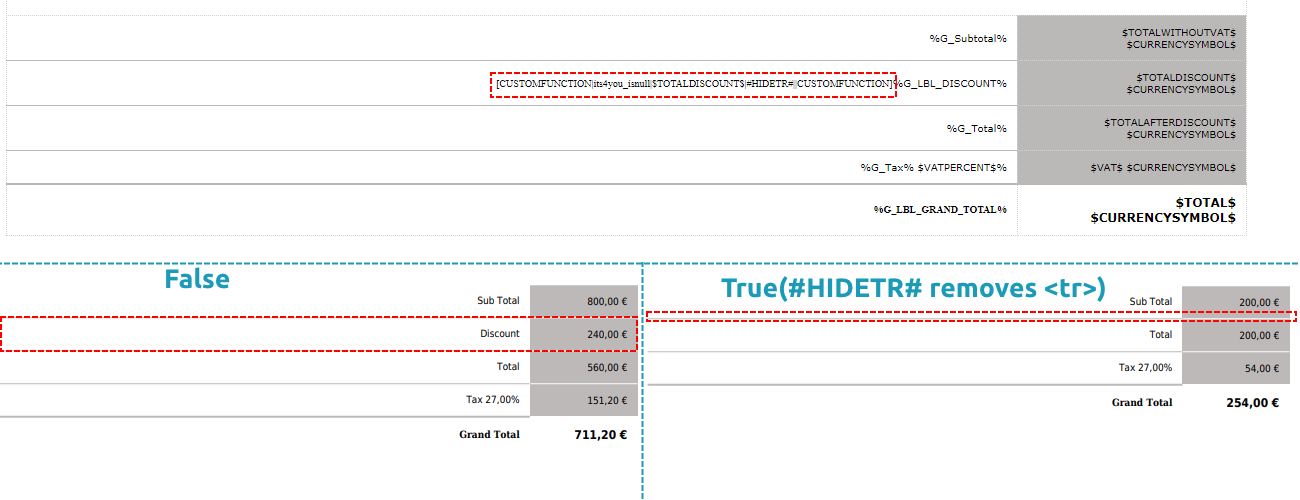
#HIDETR# functionality – PDF Maker Vtiger 7
9.10.6.getTemplateId function
Syntax
[CUSTOMFUNCTION|getTemplateId|CUSTOMFUNCTION]
Description
This function returns id of current template.
Parameters
This function is without additional parameters.
Usage
Just insert function into your template:
[CUSTOMFUNCTION|getTemplateId|CUSTOMFUNCTION]
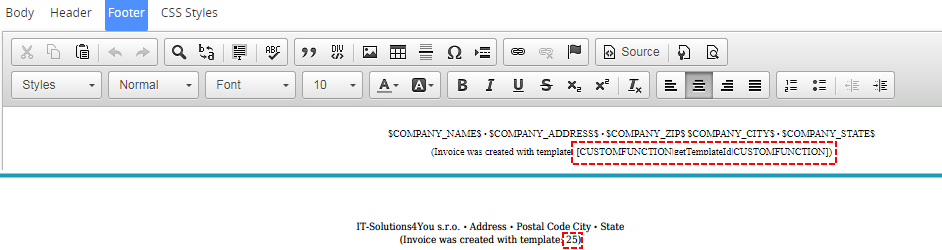
getTemplateId Custom function
9.10.7.its4you_getContactImage function
Syntax
[CUSTOMFUNCTION|its4you_getContactImage|id|width|height|CUSTOMFUNCTION]
Description
This function returns image of contact.
Parameters
- id
- contact id
- width
- width of returned image (10%, 100px)
- height
- height of returned image (10%, 100px)
Usage
Do you want to insert image of contact related to Invoice.
Please provide following steps:
First you need to place function into template.
[CUSTOMFUNCTION|its4you_getContactImage|id|width|height|CUSTOMFUNCTION]
Now replace please:
- id with id of contact (in our case it is $R_CONTACTS_CRMID$)
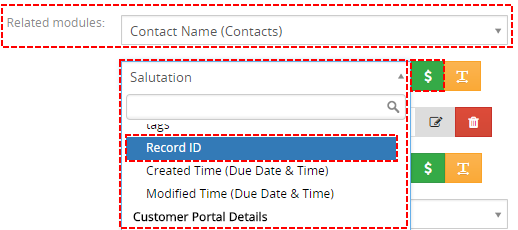
Contact ID
- width with for example 20%
- height with for example 20%
Finally, your function is:
[CUSTOMFUNCTION|its4you_getContactImage|$R_CONTACTS_CRMID$|20%|20%|CUSTOMFUNCTION]
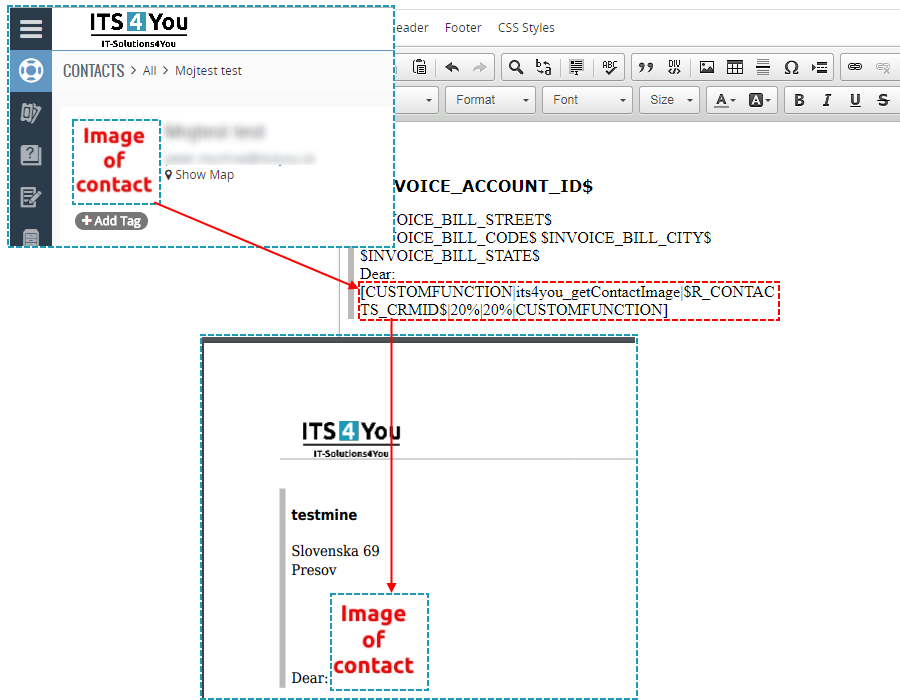
its4you_getContactImage Custom function
9.10.8.its4you_formatNumberToPDF function
Syntax
[CUSTOMFUNCTION|its4you_formatNumberToPDF|value|CUSTOMFUNCTION]
Description
This function returns formatted value and also is used by other functions.
Parameters
- value
- integer that you want to format (example: 123456.78)
Usage
Do you want to format integer number to format of PDF Maker numbers?
First you need to place function into template.
[CUSTOMFUNCTION|its4you_formatNumberToPDF|value|CUSTOMFUNCTION]
Now please replace:
- value with your number (123456.78)
Finally, your function is:
[CUSTOMFUNCTION|its4you_formatNumberToPDF|123456.78|CUSTOMFUNCTION]

its4you_formatNumberToPDF Custom function
9.10.9.its4you_formatNumberFromPDF function
Syntax
[CUSTOMFUNCTION|its4you_formatNumberFromPDF|value|CUSTOMFUNCTION]
Description
This function returns converted value into integer and is used by other functions.
Parameters
- value
- formatted value that you want to convert in to integer (1.452,76)
Usage
Do you want to format integer number to format of PDF Maker numbers?
First you need to place function into template.
[CUSTOMFUNCTION|its4you_formatNumberFromPDF|value|CUSTOMFUNCTION]
Now please replace:
- value with $TOTAL$ (1.452,76)
Finally, your function is:
[CUSTOMFUNCTION|its4you_formatNumberFromPDF|$TOTAL$|CUSTOMFUNCTION]

its4you_formatNumberFromPDF Custom function
9.10.10.its4you_multiplication function
Syntax
[CUSTOMFUNCTION|its4you_multiplication|CUSTOMFUNCTION]
Description
This function returns multiplication of all input values: arg1*arg2*…*argN.
Parameters
- arg1
- first argument to multiplication
- …
- …
- argN
- Nth argument to multiplication
Usage
Do you want to multiplication some fields/numbers from your record?
First you need to place function into template.
[CUSTOMFUNCTION|its4you_multiplication|CUSTOMFUNCTION]
Now please add arguments to sum and separate it with |:
- arg1 is $PRODUCTQUANTITY$
- arg2 is $PRODUCTLISTPRICE$
Finally, your function is:
[CUSTOMFUNCTION|its4you_multiplication|$PRODUCTLISTPRICE$|$PRODUCTQUANTITY$|CUSTOMFUNCTION]
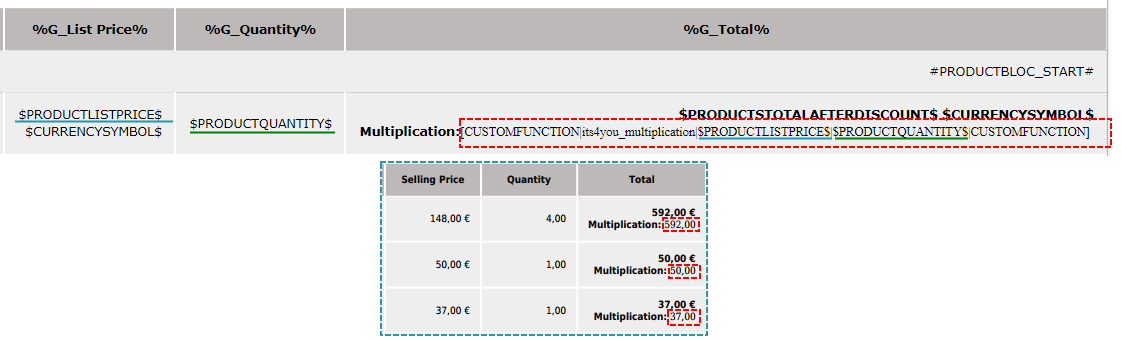
its4you_multiplication Custom function
9.10.11.its4you_deduct function
Syntax
[CUSTOMFUNCTION|its4you_deduct|CUSTOMFUNCTION]
Description
This function returns deducted value arg1-arg2-…-argN (all following values are deducted from the first one).
Parameters
- arg1
- first argument to deduct (all following values are deducted from the this one)
- …
- …
- argN
- Nth argument to deduct
Usage
Do you want to deduct one field from other?
First you need to place function into template.
[CUSTOMFUNCTION|its4you_deduct|CUSTOMFUNCTION]
Now please add arguments to sum and separate it with |:
- arg1 is $TOTALWITHOUTVAT$
- arg2 is $TOTALDISCOUNT$
Finally, your function is:
[CUSTOMFUNCTION|its4you_deduct|$TOTALWITHOUTVAT$|$TOTALDISCOUNT$|CUSTOMFUNCTION]

its4you_deduct Custom function
9.10.12.its4you_sum function
Syntax
[CUSTOMFUNCTION|its4you_sum|CUSTOMFUNCTION]
Description
This function returns sum of input values: arg1+arg2+…+argN. Function is inserted without arguments by default but you can add arguments and separate it with |.
Parameters
- arg1
- first argument to sum
- …
- …
- argN
- Nth argument to sum
Usage
Do you want to sum some of fields from record?
First you need to place function into template.
[CUSTOMFUNCTION|its4you_sum|CUSTOMFUNCTION]
Now please add arguments to sum and separate it with |:
- arg1 is $TOTALWITHOUTVAT$
- arg2 is $VAT$
- arg3 is $ADJUSTMENT$
Finally, your function is:
[CUSTOMFUNCTION|its4you_sum|$TOTALWITHOUTVAT$|$VAT$|$ADJUSTMENT$|CUSTOMFUNCTION]
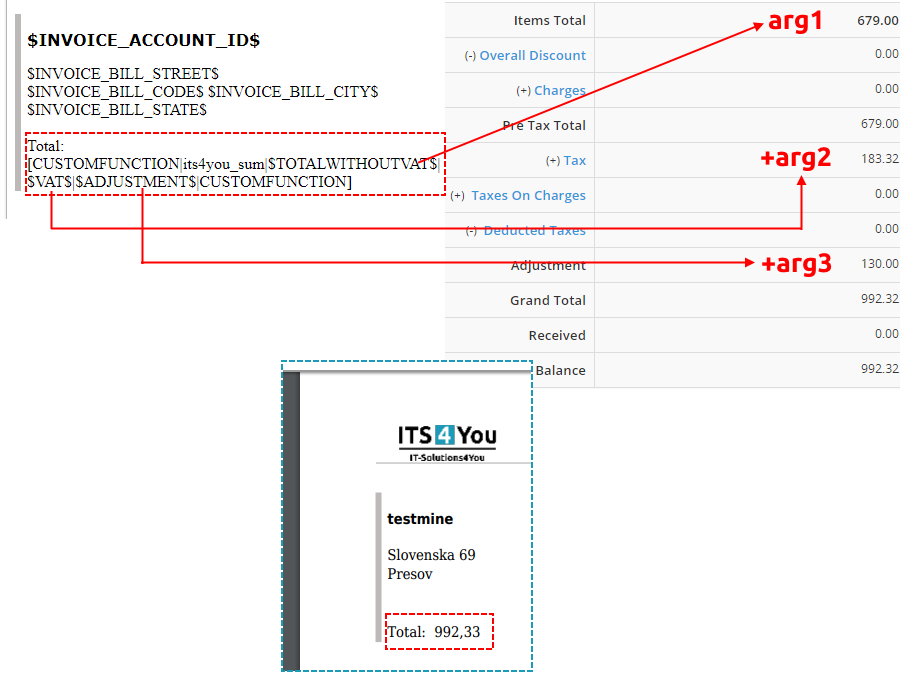
its4you_sum Custom function
Youtube video for this Custom Function (click on Youtube Icon):
![]()
9.10.13.its4you_divide function
Syntax
[CUSTOMFUNCTION|its4you_divide|CUSTOMFUNCTION]
Description
This function returns divided value arg1/arg2/…/argN.
Parameters
- arg1
- first argument to multiplication
- …
- …
- argN
- Nth argument to multiplication
Usage
Do you want to show product discount for 1 product?
First you need to place function into template.
[CUSTOMFUNCTION|its4you_divide|CUSTOMFUNCTION]
Now please add arguments to sum and separate it with |:
- arg1 is $PRODUCTDISCOUNT$
- arg2 is $PRODUCTQUANTITY$
Finally, your function is:
[CUSTOMFUNCTION|its4you_divide|$PRODUCTDISCOUNT$|$PRODUCTQUANTITY$|CUSTOMFUNCTION]
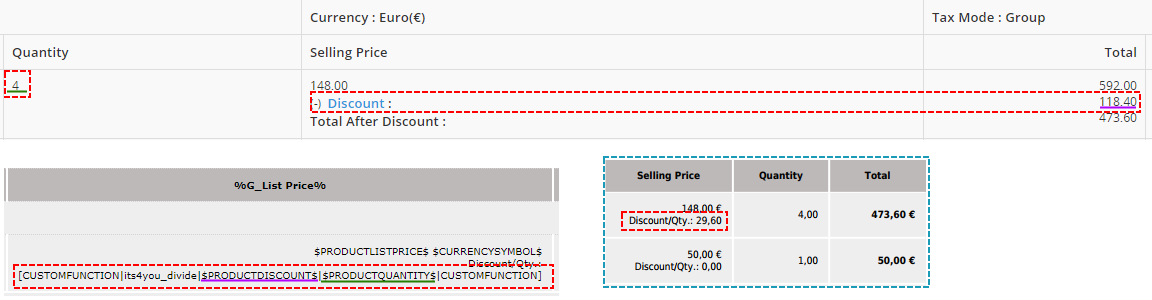
its4you_divide Custom function
9.10.14.its4you_NumberFormat function
Syntax
[CUSTOMFUNCTION|its4you_NumberFormat|number|decimals|new_decimal_point|new_thousands_sep|CUSTOMFUNCTION]
Description
This function will convert numbers/variables to your desired format. You can add decimals and decimal separators or remove them. For example: 1,00 —> 1
Parameters
its4you_NumberFormat
– a parameter which needs to always stay in a custom function, you don’t need to change it or remove it
number
– a parameter which needs to be replaced and represent the value you are changing. For example, you want change quantity number format, then you add variable: $PRODUCTQUANTITY$
decimals
– a number of decimals you need ( 2 decimals = 1,00 / 5 decimals = 5,00000)
new_decimal_point
– symbol for decimals separator, can be used any symbol you need ( , | . | / | * )
new_thousands_sep
– separator for thousands, again, you can use any symbol you need or remove this parameter
– to make a space use value “sp”, example: [CUSTOMFUNCTION|its4you_NumberFormat|$PRODUCTQUANTITY$|0|,|sp|CUSTOMFUNCTION]
Usage
Do you want in your invoice change quantity format from 1,00 to 1? Follow next steps:
First you need to place function into template.
[CUSTOMFUNCTION|its4you_NumberFormat|number|decimals|new_decimal_point|new_thousands_sep|CUSTOMFUNCTION]

its4you_NumberFormat Custom function
Then modify Parameters:
- replace number with: $PRODUCTQUANTITY$
- replace decimals with: 0
- replace new_decimal_point with: 0
- detele new_thousands_sep
Finally, your function is:
[CUSTOMFUNCTION|its4you_NumberFormat|$PRODUCTQUANTITY$|0|0|CUSTOMFUNCTION]

its4you_NumberFormat Custom function
Result when you export or preview:
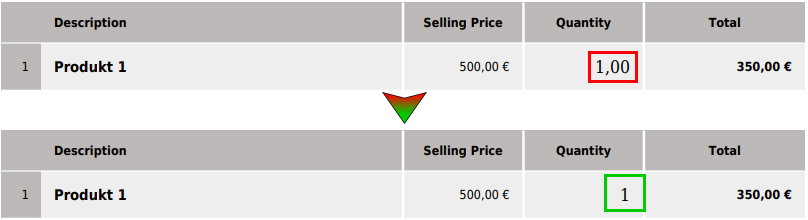
its4you_NumberFormat Custom function
9.10.15.convert_number_to_words function
Syntax
[CUSTOMFUNCTION|convert_number_to_words|number|CUSTOMFUNCTION]
Description
This function will convert numbers to words. Can be used on any number which you can add manually to function or can be used with variables from PDF Maker.
Parameters
convert_number_to_words
a parameter which needs to always stay in a custom function, you don’t need to change it or remove it
number
a number which you want to convert. This parameter can be manually replaced with any number you want, or you can replace it with variable. For example: $TOTAL$
Usage
Do you also want in your invoice show total as words? Example: 350,00 € —> three hundred and fifty point zero zero
First you need to place function into template.
[CUSTOMFUNCTION|convert_number_to_words|number|CUSTOMFUNCTION]
Then modify Parameter:
- replace number with: $TOTAL$
Finally, your function is:
[CUSTOMFUNCTION|convert_number_to_words|$TOTAL$|CUSTOMFUNCTION]
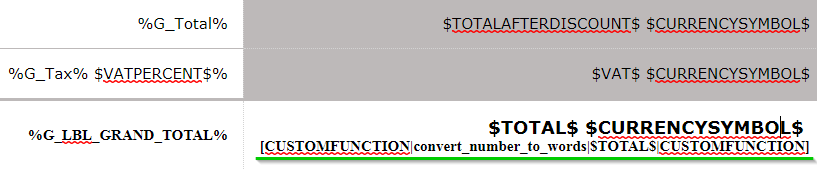
convert_number_to_words function Custom function
Result when you export or preview:
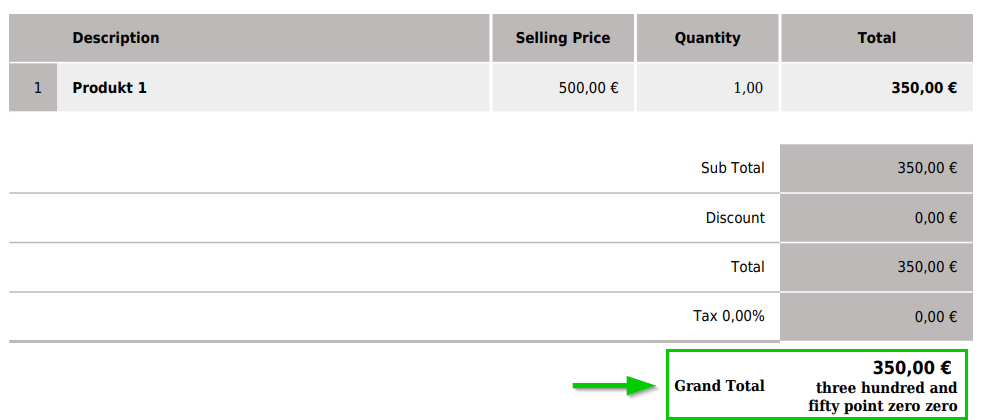
convert_number_to_words function Custom function
9.10.15.1.Function with Currency format
If users want to use Curreny Format from the template’s Properties setting (is Active = Yes), they must use the definition in the function by adding currency::
It should look like this:
[CUSTOMFUNCTION|convert_number_to_words|currency::$TOTAL$|CUSTOMFUNCTION]
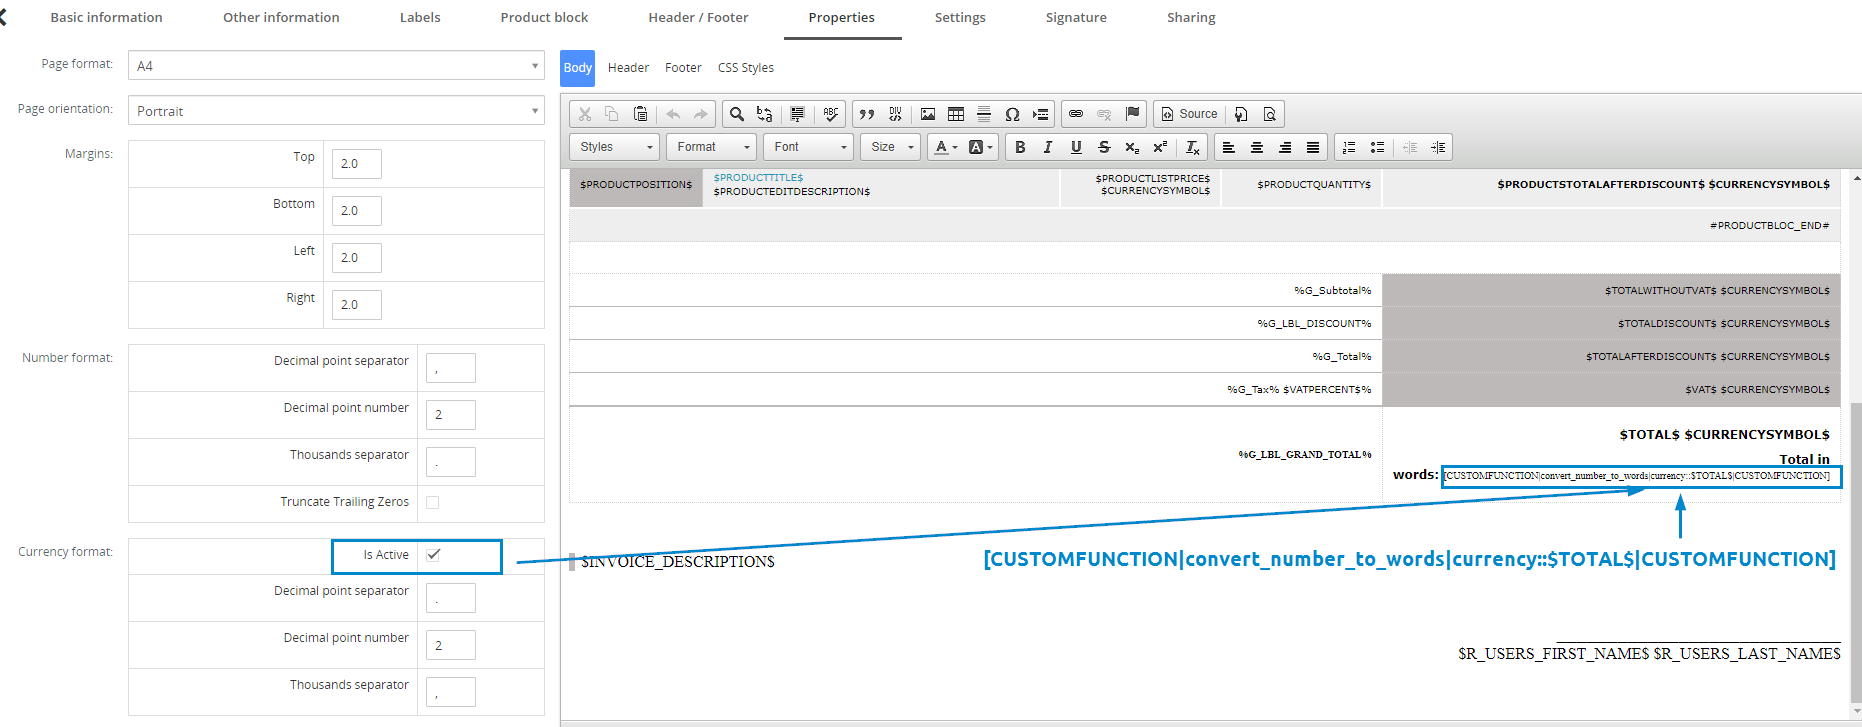
9.11.Template for Header/Footer
It is useful functionality that allows you create Header/Footer template and use it in PDF template. Then if you need to provide any change in Header or Footer you just provide changes in Header/Footer template and this changes will be applied in all PDF templates where you use Header/Footer template.
You can still use Header or Footer in PDF template. If you do not use Header/Footer template in PDF template EditView you can see tabs Header/Footer and this custom Header/Footer is used for creation of PDF file.

Custom Header/Footer in PDF template – PDF Maker Vtiger 7
Also you can create and select Header or (and) Footer template for your PDF template and then this (these) Header/Footer template is used for creation of PDF file. If you add Header/Footer template to your PDF template there is no tab of Header/Footer in EditView of PDF template visible anymore.

Header template used – PDF Maker Vtiger 7

Footer template used – PDF Maker Vtiger 7
If you use Header and Footer template then only Body tab is visible in EditView of PDF template.
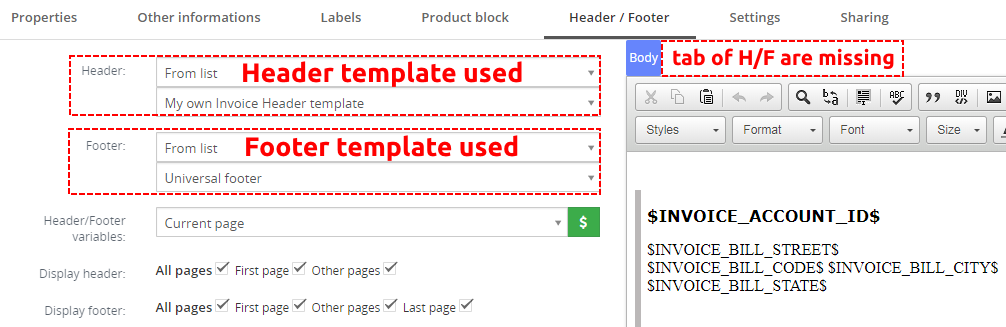
Header and Footer templates are used – PDF Maker Vtiger 7
How to use Header/Footer template
There is few simple steps how to start using Header/Footer template functionality. Please see following steps:
- First at all you need to create your Header/Footer template (Create the simple Header/Footer template)
- Then your template is available in ListView of Header/Footer (ListView of Header/Footer)
- Open your PDF template and select Header/Footer tab
- Choose Header or (and) Footer template for your PDF Maker template from list of Headers/Footers (Header/Footer)
- Now you can generate PDF file with your Header/Footer template
- If you need to provide changes in header you do not need edit all PDF templates just your Header or Footer template
10.Settings
The PDF Maker settings are accessible directly from the List view and consist of:
- Extensions – manage extensions: Workflows, Styles4You
- Signatures – users or Admin can create Signatures in form of Image and then load them into the Templates
This can be used for PDF Signature extension, the Acceptance Signature process - Profiles – manage user-specifics PDF Maker access to different roles
- Self-defined labels – manage your own labels
- Product block templates – manage your own product block templates
- Module Requirements – here you can check if all module Requirements are meet and green. If not, they should be corrected
- License settings – manage all settings related to your license
- Upgrade – update manually via ZIP file to a higher version or same version
- Uninstall – remove PDF Maker completely from your vTiger
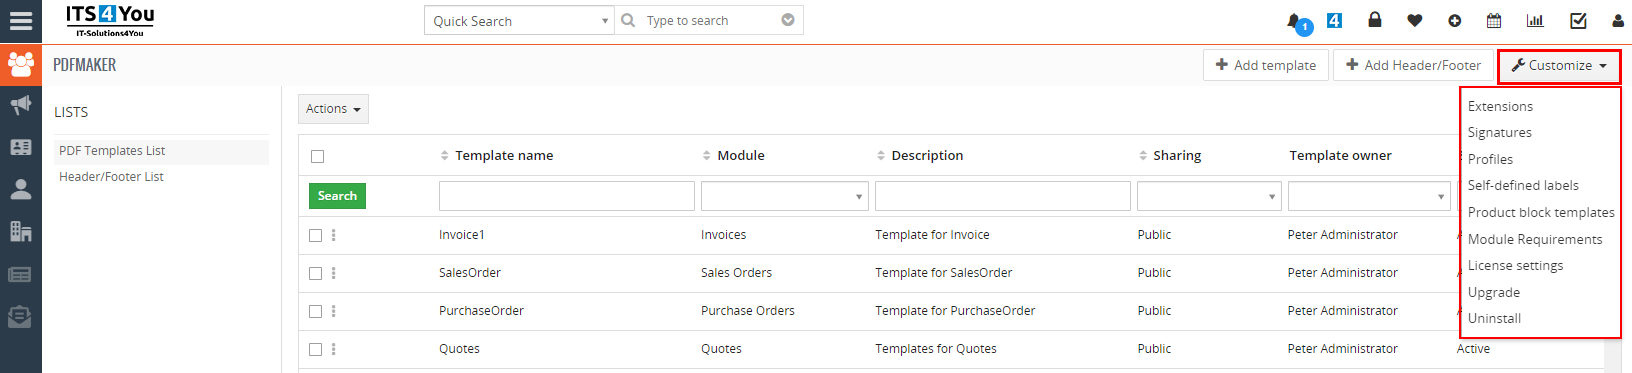
PDF Maker – Settings
10.1.Extensions

Available extensions for the PDF Maker
10.1.1.Workflows
PDF Maker Workflow extension is a new package which provides features to enhance usability of standard workflow of the vtiger in cooperation with our PDF Maker. It allows you to create completely new tasks “Save Document from PDF Maker” and “Send Email with PDF Maker attachments” for any workflow.
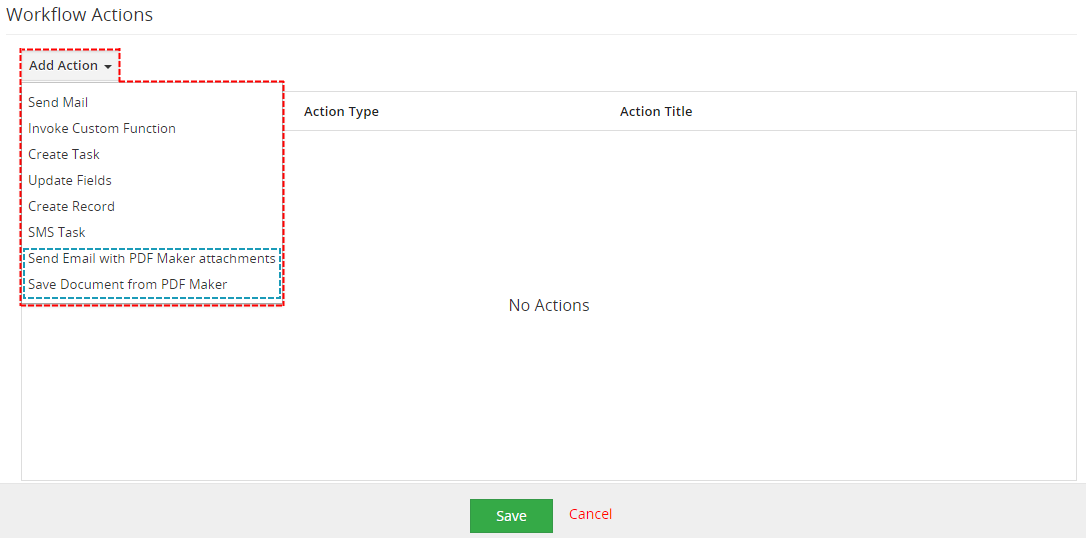
PDF Maker tasks for workflows
“Save Document from PDF Maker” task brings you the possibility to automatically create and save Documents from PDF Maker templates for module you create workflow for. All you need to do is to create new Workflow for chosen module and create a new Task “Save Document from PDF Maker”.
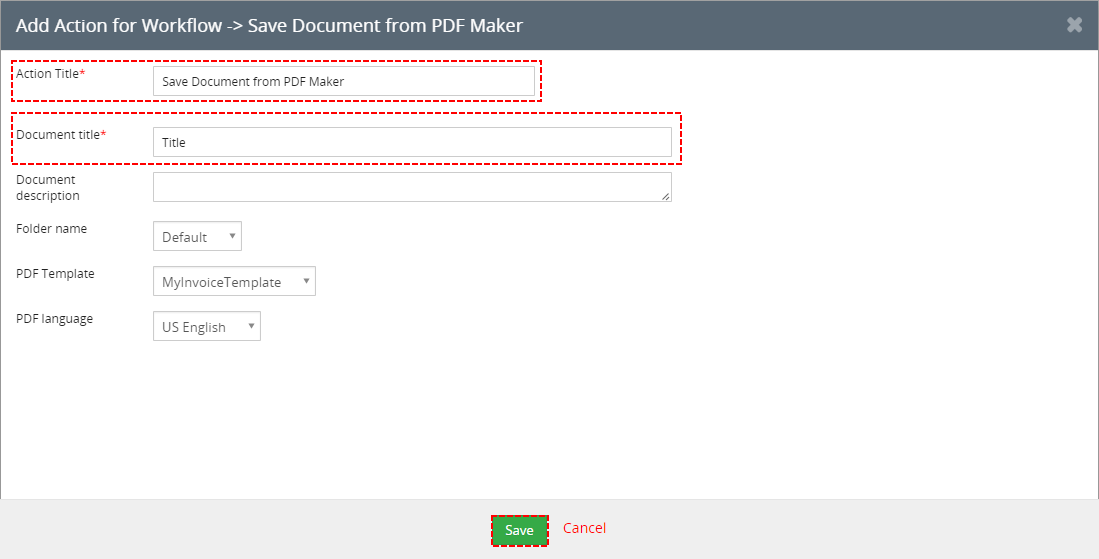
Save Document from PDF Maker for workflows
“Send Email with PDF Maker attachments” task brings you the possibility to automatically send email with attached PDF file based on PDF Template(s). When you create new Workflow for chosen module just create a new Task ” Send Email with PDF Maker attachments” and select PDF Template which has to be used .
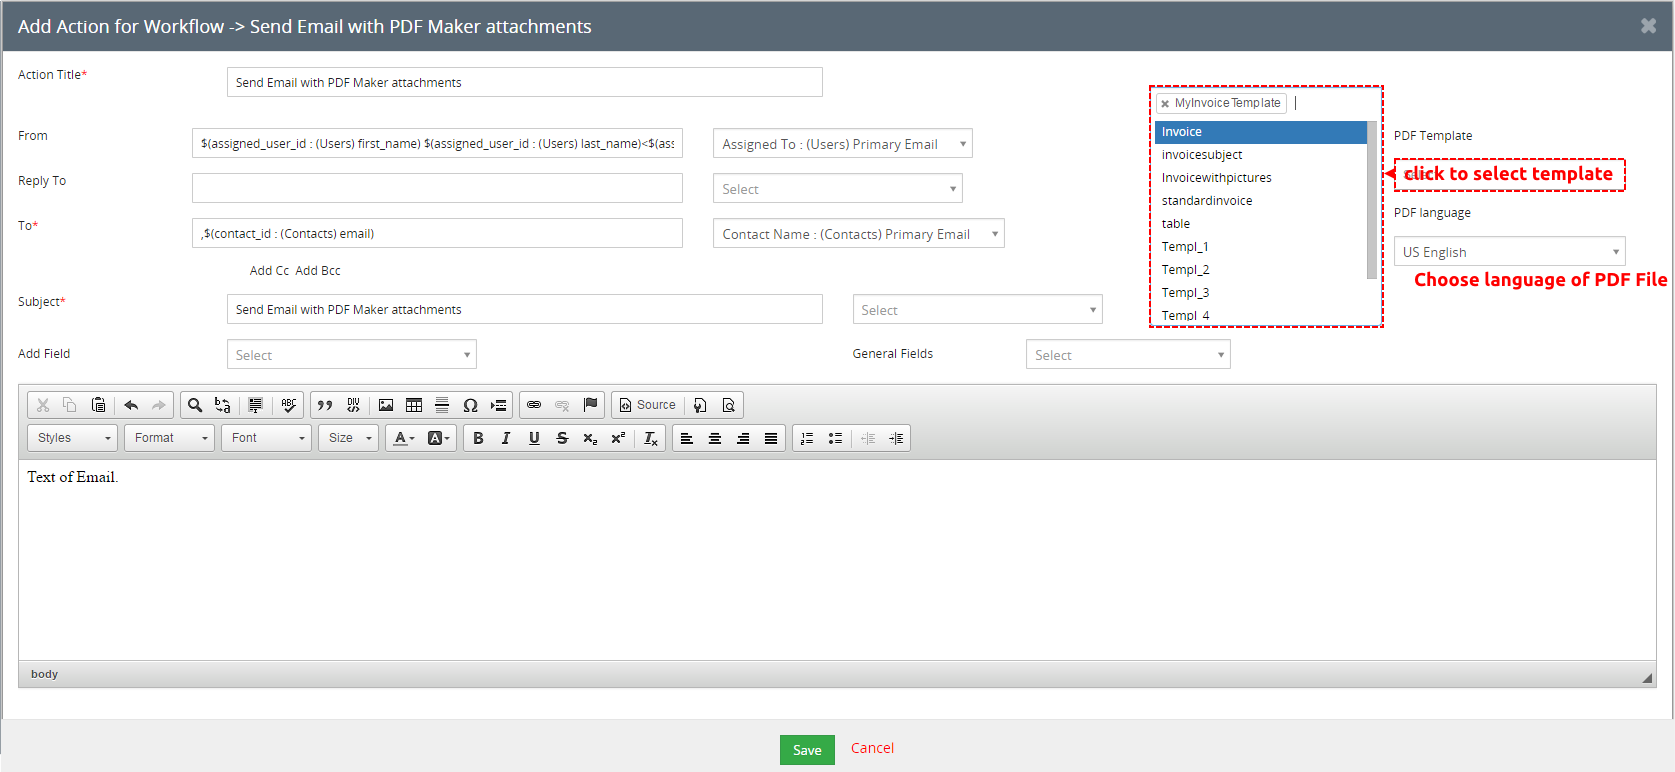
Send email with PDF maker attachments for workflows
10.1.1.1.Merge templates/documents
Since version 4.26 you can merge selected templates when creating an action Send Email with PDF Maker attachments.
Select templates you need (A), and then confirm the checkbox Merge documents (B). Selected templates will be merged into one pdf file.
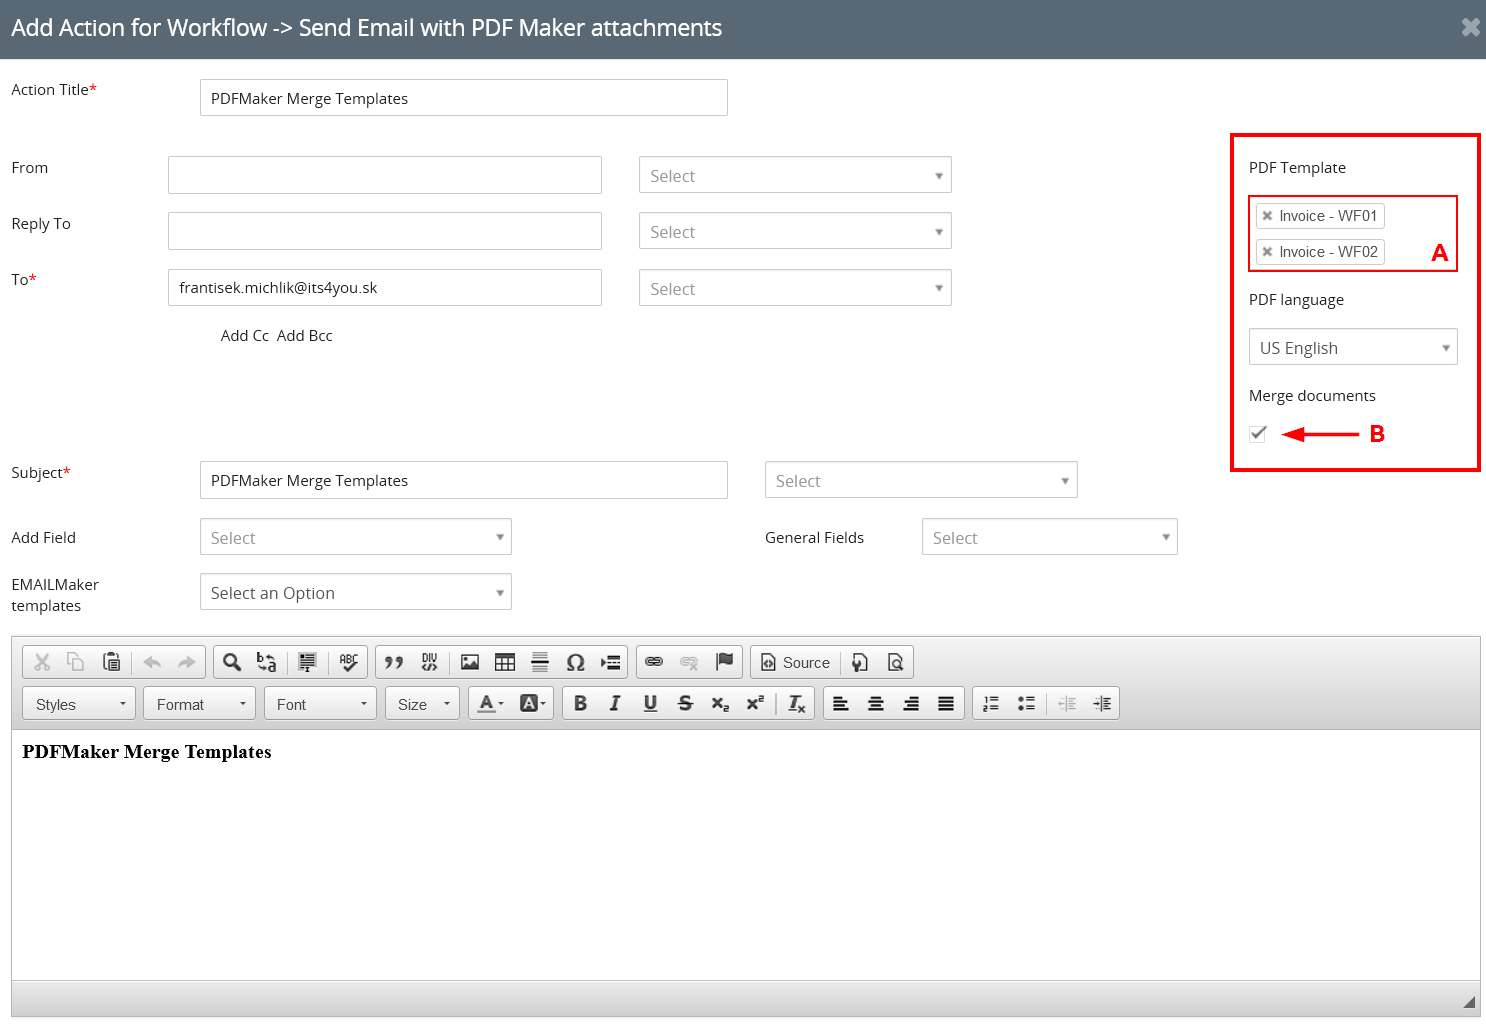
PDF Maker – merge templates in the workflow
10.1.1.2.Execute action after save
![]() This feature is available from version 0.55 and higher.
This feature is available from version 0.55 and higher.
After checking this feature, PDF Maker emails will be sent immediately according to the conditions set in the workflow.
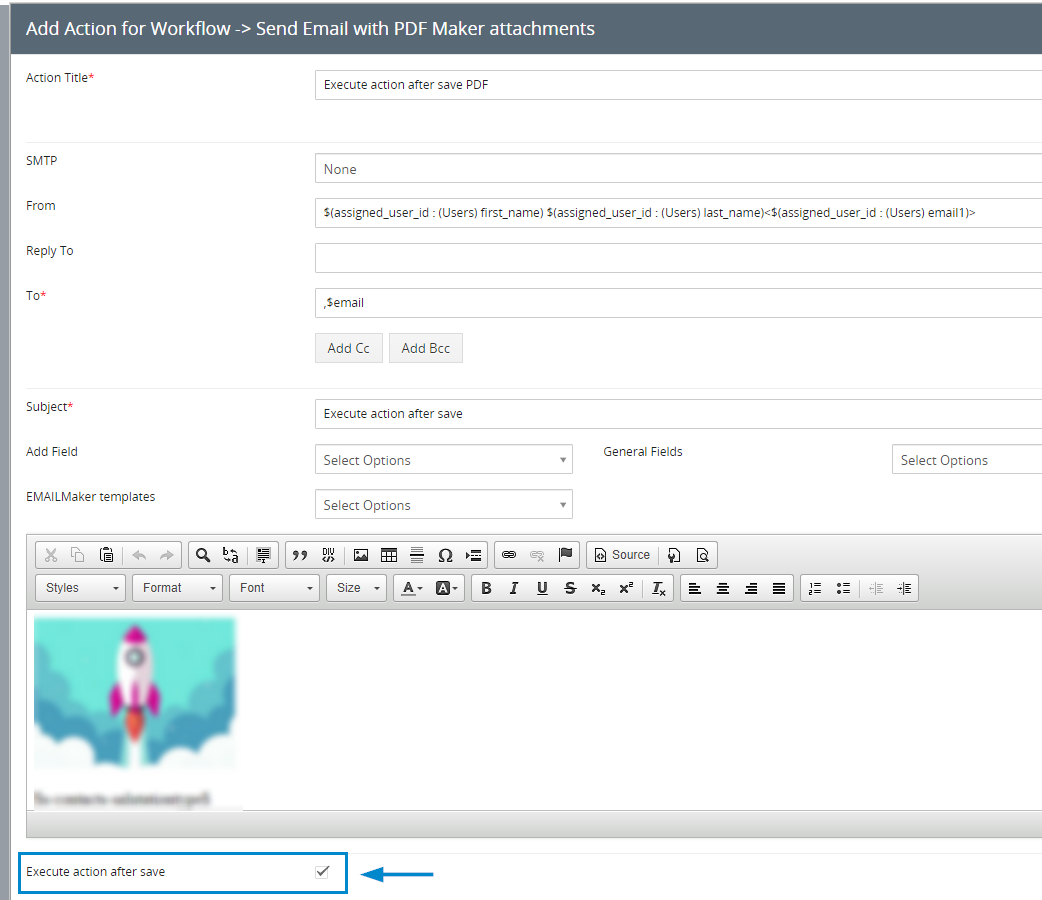
10.1.2.Styles 4 You
Styles4You extension allows to you manage your CSS styles and assigned it to templates.
To install Styles4You please provide following steps:
- Open PDF Maker
- Click on
 button and choose Extensions
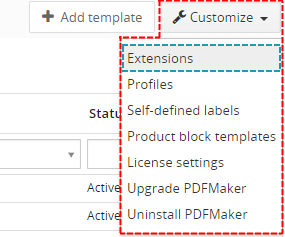
How to install Styles4You
- Download zip file by Download button
- Install Styles4You via module manager or Install button

How to install Styles4You
Now Styles4You has been installed into PDF Maker.
Here you can also add new Style or select your created Style. To add your Style to template please open your template click on  button or click on
  button to select style.
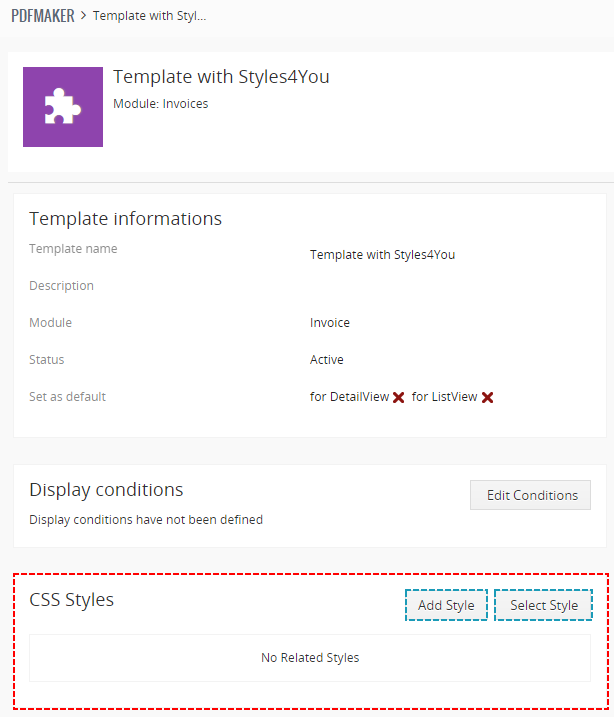
How to add style to template
Fill name, insert your style and choose priority. Priority is used when you add more styles to one template. PDF Maker takes CSS with smaller number of priority.
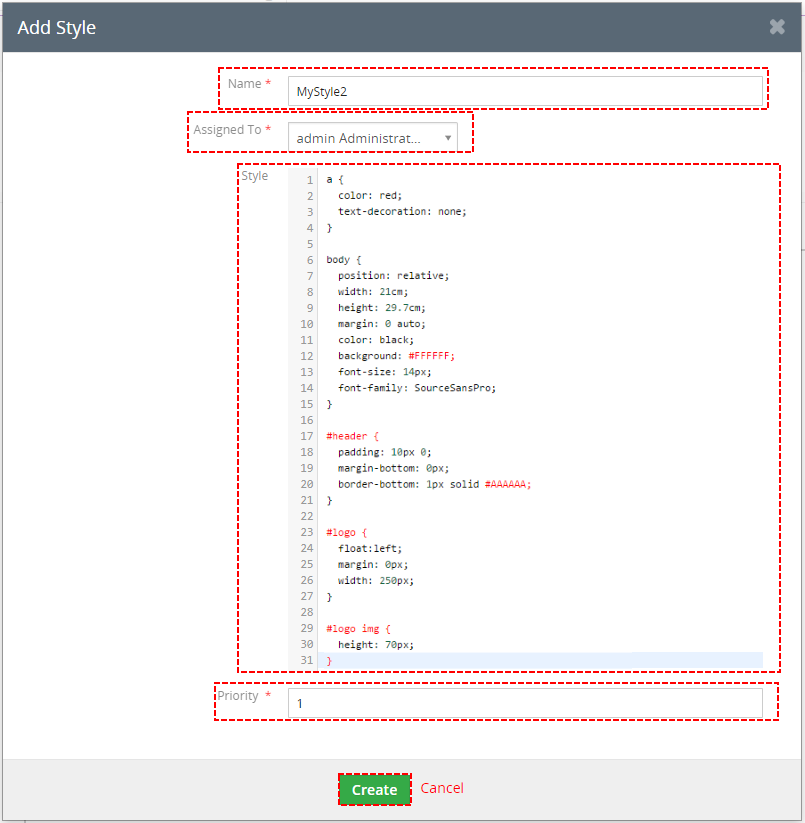
How to create Styles4You
Now, your style has been added to your template.

Styles4You
Style used in your template you can also find in edit view of template in CSS Style tab.
Style in EditView of template
10.2.Signatures
This feature was added in version PDF Maker 4.49 on June 2023.
Users or Admin can create Signatures in form of Image and then load them into the Templates.
This can be used for PDF Signature extension, the Acceptance Signature process.
PDF Maker – Settings – Signatures
PDF Maker – Signature tab
10.3.Profiles
You may define PDF Maker privileges for all profiles. You may define Create/Edit, View and Delete privileges.
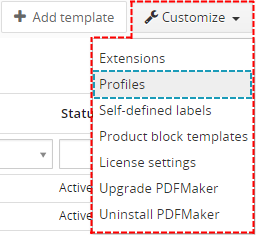
How to set profiles for PDF Maker
In order to change privileges click on  , use the checkboxes and click on button to save changes.
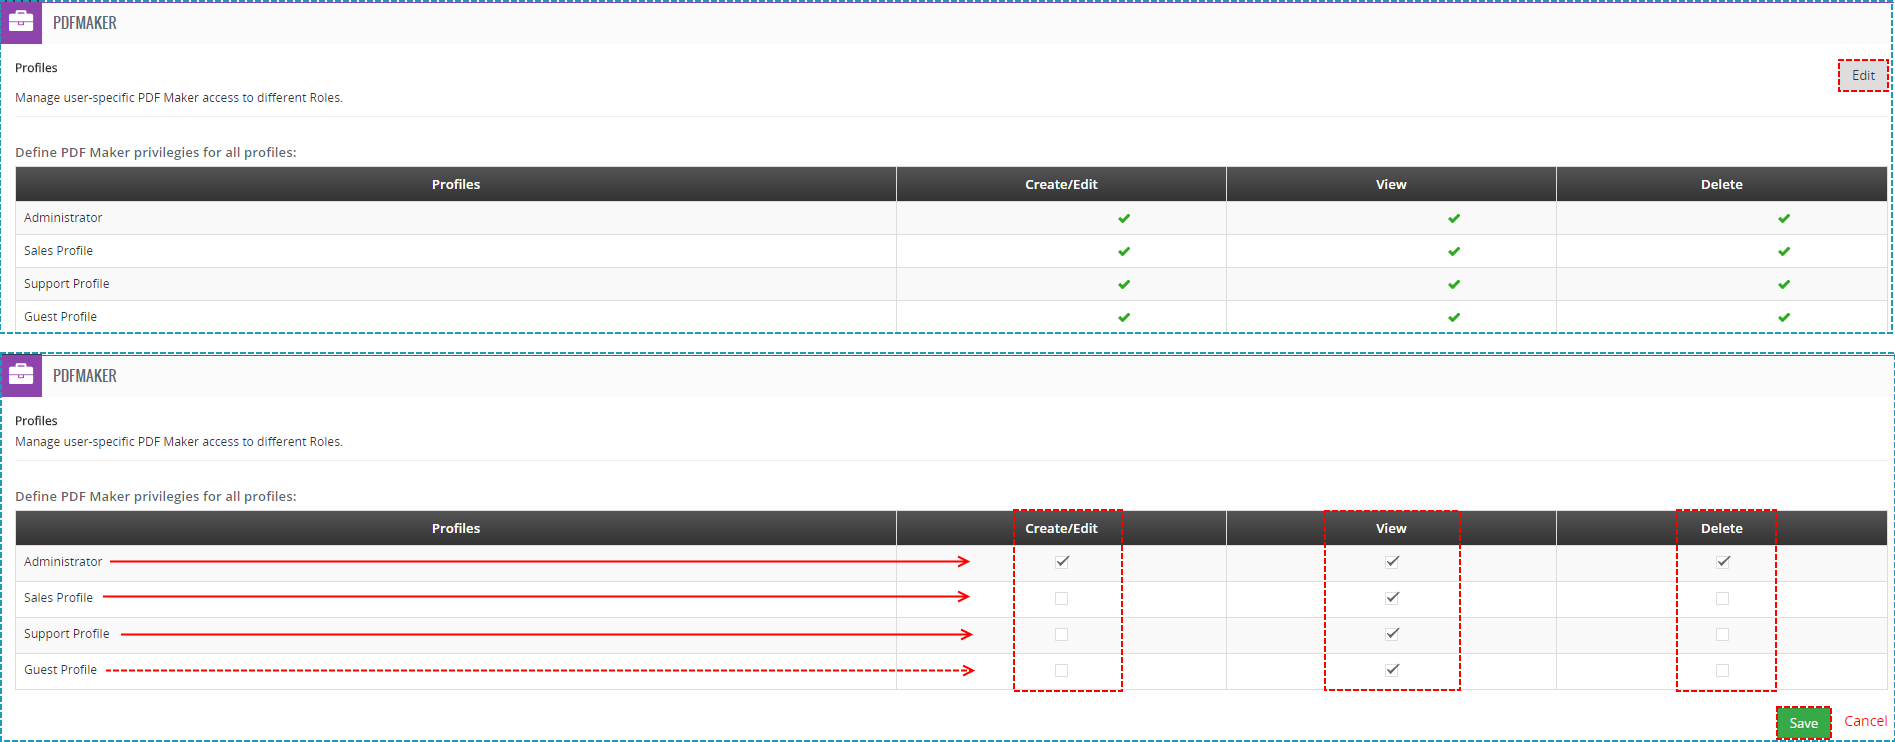
Manage profiles
10.4.Self-defined labels
If the global and module related labels are not sufficient for you, it is possible to define self-defined labels. In order to define self-defined please use following steps:
- In customize choose Self-defined labels

How to define self-defined labels
- Click on
 button.
How to define self-defined labels
- Define label key C_***** and value for your current language. Click on button.
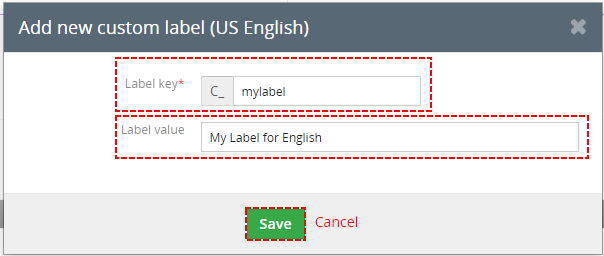
How to define self-defined labels
- In order to define values for other installed languages click on “Edit Other Translations” link.

How to define self-defined labels
- Define label value for additional languages and click on button.
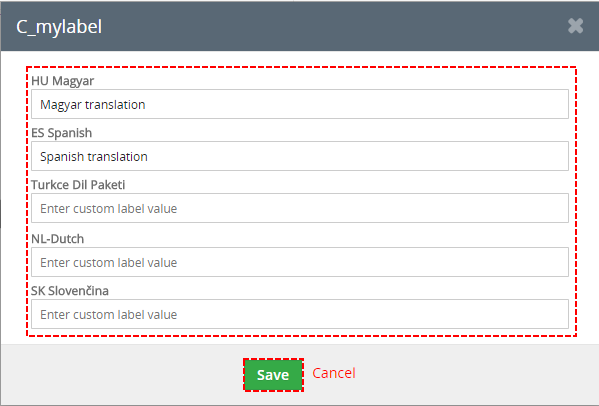
How to define self-defined labels


You can also find here button which allows you to delete unnecessary labels.

How to delete label
10.5.Product block templates
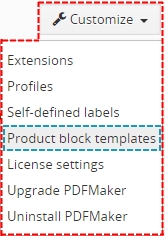
Product block template
As can be seen in the picture below, you can simply add – , edit –  , duplicate –
  or delete – product block templates.

Product block templates management
When you click on button following window will appear on your screen. In order to create and save your own product block template please provide following steps:
- Define product block template name.
- Insert product block template start (#PRODUCTBLOC_START#) and product block template end (#PRODUCTBLOC_END#).
- Add all necessary product/service fields according to your needs between (#PRODUCTBLOC_START#) and (#PRODUCTBLOC_END#) and provide formatting if needed.
- Click on button.
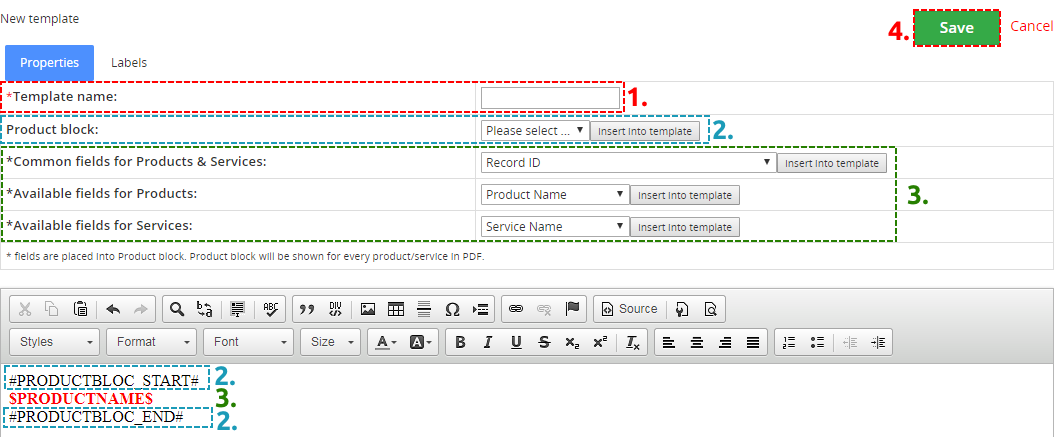
Create new product block template
10.6.Module Requirements
Here you can check if all module Requirements are meet and green. If not, they should be corrected.
- Red values, can be fixed by deactivating and reactivating PDF Maker in Module Manager
- If the issue persists, please contact our support via Email: info@its4you.sk
PDF Maker – Module Requirements
10.7.License settings
Since December 2019/January 2020 all our modules will be using Installer to manage licenses. Please check our Installer pages for more information.
You can access the License settings like its shown below:
(there can be more options from the pick-list, depends on the module)
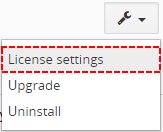
Settings – License settings
After accessing the License window you can see screen bellow with following information:
- Module name, Your Vtiger domain URL
- Description, if license is activate or not:
 – your license is currently active,
 – your license is not active and you need active it via Installer.
To activate or manage license, click on the ![]() button.
button.
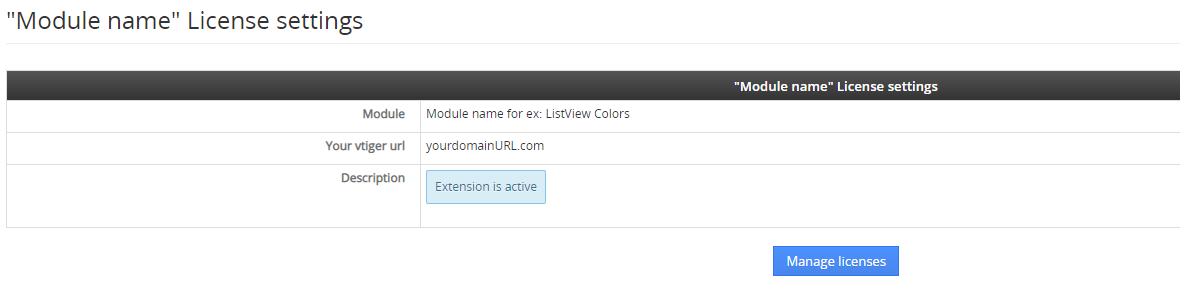
Settings – License settings window
10.7.1.Deactivate license
If you want to deactivate your license, please provide following steps:
- Go to your Installer, by a click on Notifications Icon and then on the button ,
or via Main Menu – Settings – CRM Settings – Extensions – ITS4YouInstaller - The following screen will appear (see below):

Installer – deactivation of license
You can deactivate license by click on the button

![]() Note: The module will be deactivated but not uninstalled and license will be removed from the Activated Licenses tab.
Note: The module will be deactivated but not uninstalled and license will be removed from the Activated Licenses tab.
10.7.2.Reactivate license
To reactivate a license after deactivation, you need to follow the same process as you activated it first time:
- Click on the
 button and enter your license key.

- Confirm with
 button.
When the license was activated you can see module available in the Modules tab below.
![]() Note: To see modules and manage licenses you have to log in to our e-shop with @email and password via
Note: To see modules and manage licenses you have to log in to our e-shop with @email and password via ![]() button (top right screen side in Installer module).
button (top right screen side in Installer module).
10.8.Update
The upgrade of the module is initiated manually or via our Installer.
Updating via Installer:
- open the Installer in the CRM
- in the Modules tab find your installed module and you should see the button available
- If the new version is available, you will be notified via Installer Notifications icon
Updating PDF Maker manually:
The upgrade of the PDF Maker is initiated in the same way as PDF maker installation or click on Upgrade PDF Maker link in Customize tab of PDF Maker.
How to update/upgrade PDF Maker
So please refer to above installation part for details how to initiate the import of the module from the file. As can be seen on following picture you will be notified that the PDF Maker module already exists. The upgrade will start immediately when you click on the [Update Now] button.
How to update PDF Maker
After upgrade the notification about successful upgrade is shown.
How to update PDF Maker
10.9.Uninstall
If you need to remove the module from your Vtiger you have two options:
- Uninstall via Installer.
- Manually via going to module Settings and choose Uninstall option.
10.9.1.Uninstall via Installer
You have also option to remove the module via Installer window by accessing the Settings – Uninstall window:
- Go to your Installer, by a click on Notifications Icon and then on the button ,
or via Main Menu – Settings – CRM Settings – Extensions – ITS4YouInstaller - Find the module you need to uninstall in the Modules tab
- Via
 pick list button choose the Uninstall option, you will be redirected to the Uninstall window.
 - Click on
 button

Installer – Uninstall module screen 1
- Confirm uninstall with
 button
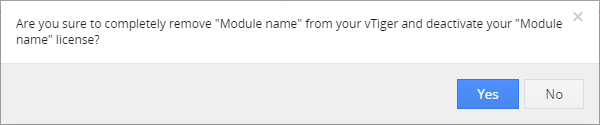
Installer – Uninstall module screen 2
Now, the module has been removed from your Vtiger and your license has been deactivated. To use this module again, you need to provide installation and validation steps (see Installation chapter).
10.9.2.Manual Uninstall
There is also available option to remove PDF Maker from your Vtiger manually. To uninstall please provide following steps:
- Go to the list view of PDF Maker and in Customize choose option Uninstall PDF Maker
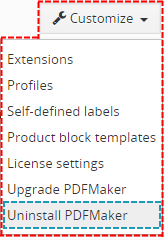
Uninstall PDF Maker
- Click on
 button
Uninstall PDF Maker
- Confirm uninstall with button
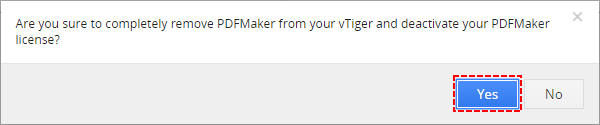
Uninstall PDF Maker
Now, PDF Maker is removed from your Vtiger and your license is deactivated. To use PDF Maker again you need to provide installation and validation steps (see chapter 2.How to install PDF Maker).
11.Tips & tricks
11.1.How to define background image
It is possible to define background image for PDF template as shown in the picture below. Just click on
and insert following code (see Picture 8.1):
 body {background-image: url(https://PATH_TO_IMAGE/picture.name);
background-repeat:repeat-y;}
background-position:right;
In addition, you can define background image repeat property via “background-repeat:value;” by values:
- repeat – default value i.e. not necessary to define
- repeat-x – the background image will be repeated only horizontally
- repeat-y – the background image will be repeated only vertically (example below)
- no-repeat – the background-image will not be repeated
or background position via “background-position:value”.
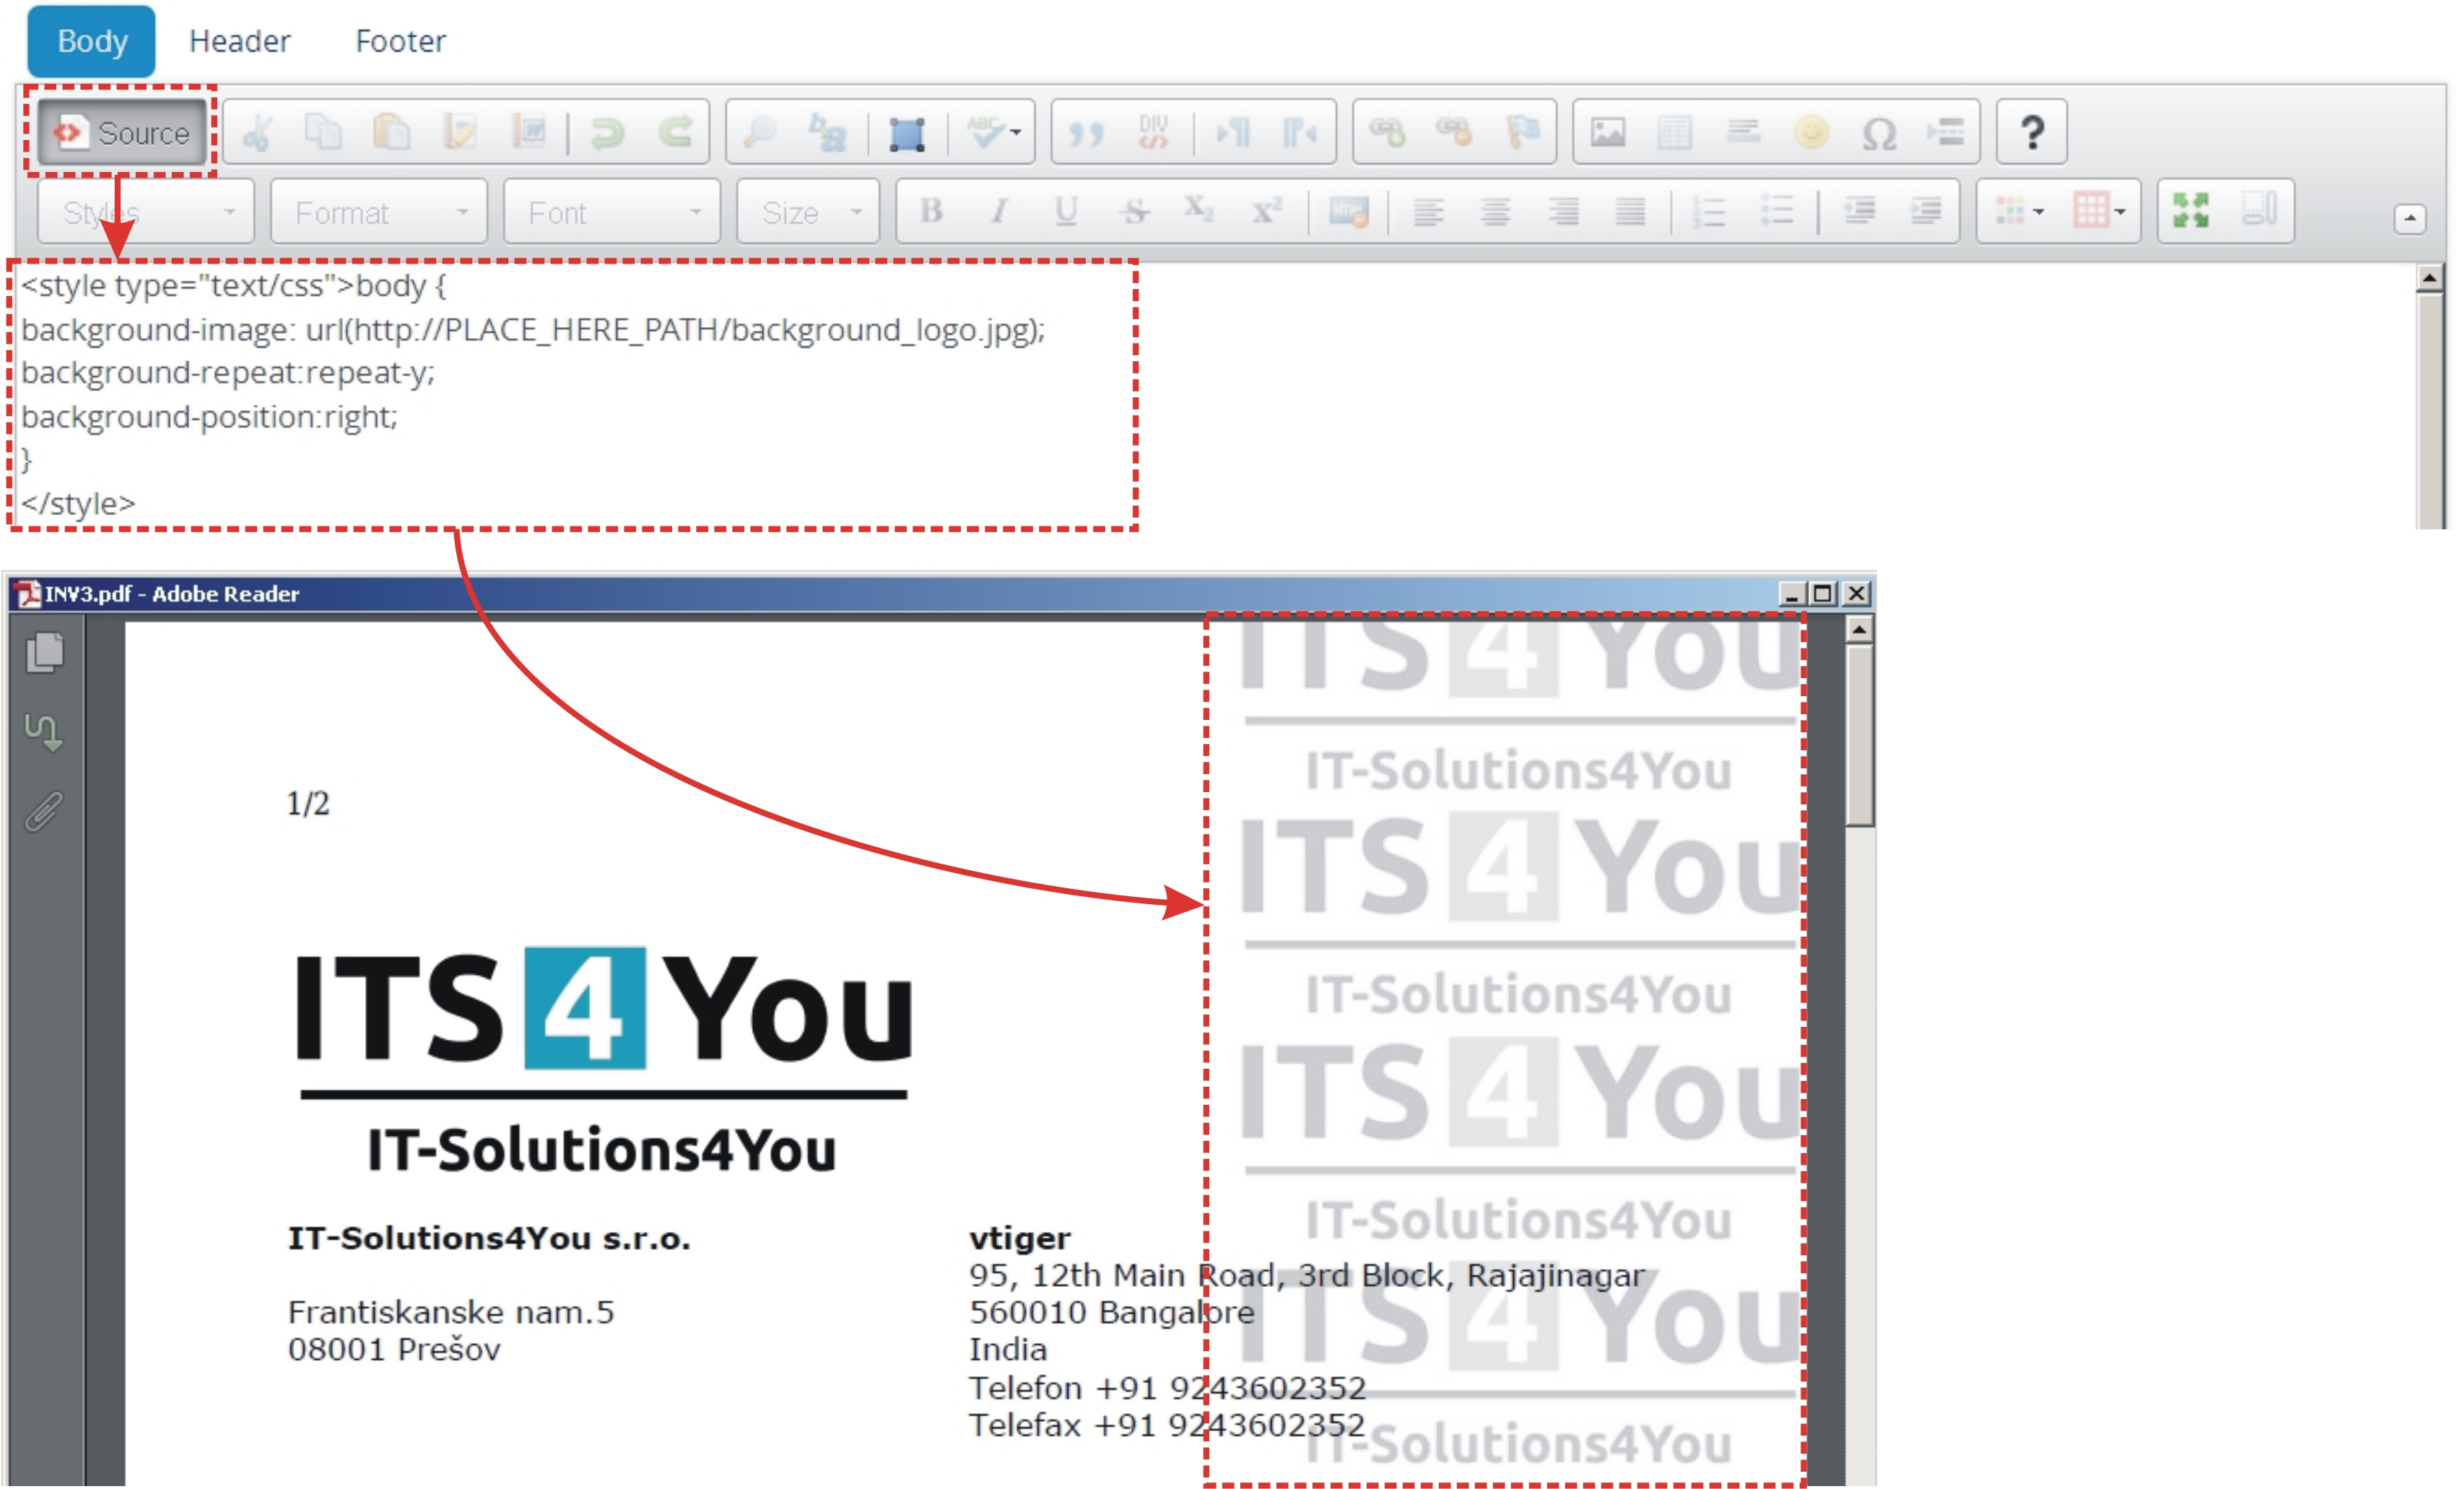
Background image
11.2.How to print labels, envelopes and more
Below is simple example how to print envelopes/labels. Please provide following steps:
- Define simple PDF template – for example with fields for organization address.
- Set minimum size of PDF template (100×100 mm).
- Use option “Multiple” for Page sizing & Handling according to your needs.
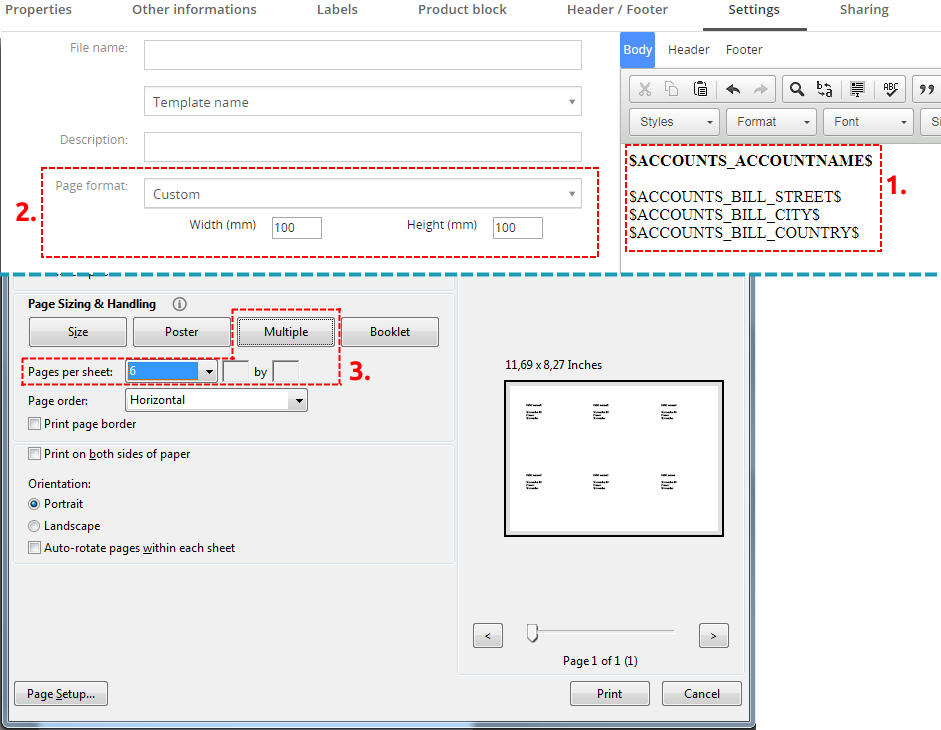
Envelope/labels printing with PDF Maker
12.Change log
- Check latest versions available and fixes applied
- What was changed/added to manual
12.2.Manual for PDF Maker
- 31 August 2021: manual based on PDF Maker version: 4.26
- added new chapter: Custom bar codes
- added new chapter: Merge documents
- January 2021: manual based on PDF Maker version: 4.19
- added new chapter: Download all records in one click
— 2020 —
- November 2020: manual based on PDF Maker version: 4.16
- some chapters were updated based on current PDF Maker version
- January 2020: manual based on PDF Maker version: 4.0
- updated chapters: Installation, Updates, License settings, Uninstall
- new licensing via Installer – additional chapters added
— 2019 —
- July 2019: manual based on PDF Maker 700.10.0
- new chapter:
— 2018 —
- November 2018: manual based on PDF Maker 700.7.0
- new chapter:
- August 2018: manual based on PDF Maker 700.5.0
- new chapters:
- updated chapter:
- April 2018: manual based on PDF Maker 700.4.0
- new chapters:
- updated chapter:
— 2017 —
- July 2017: manual based on PDF Maker 700.1.5
- first initiate for vtiger 7.x.x
